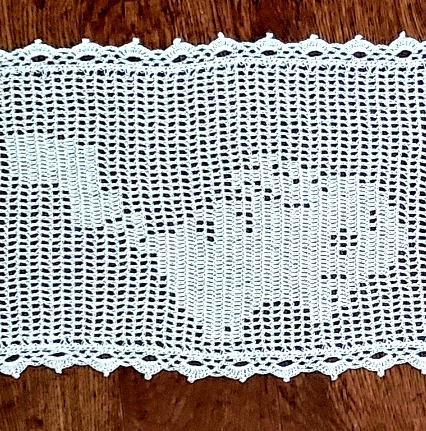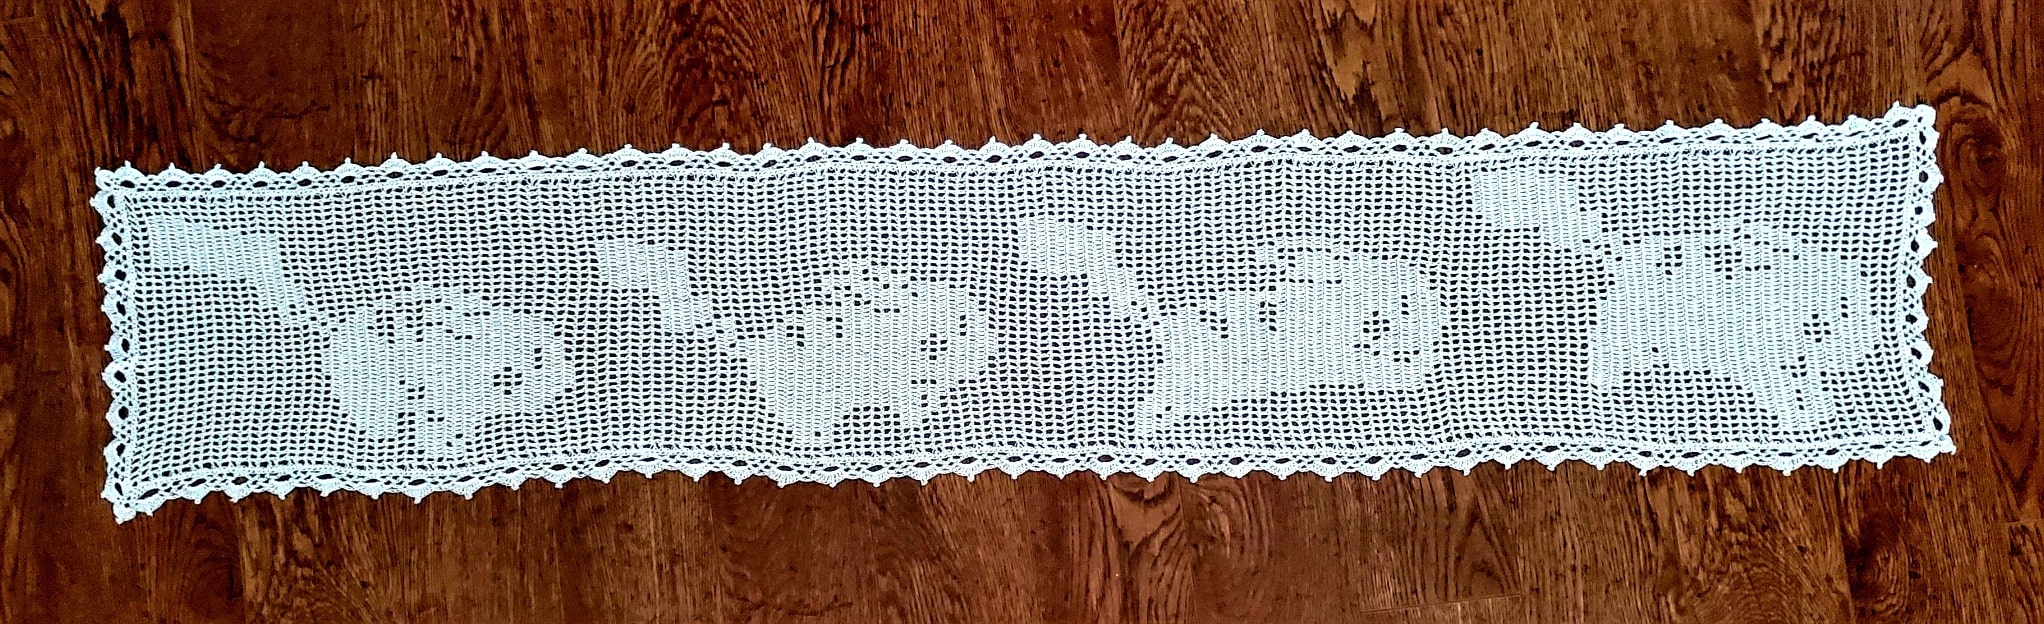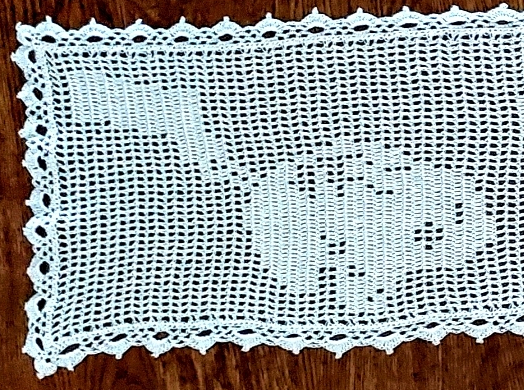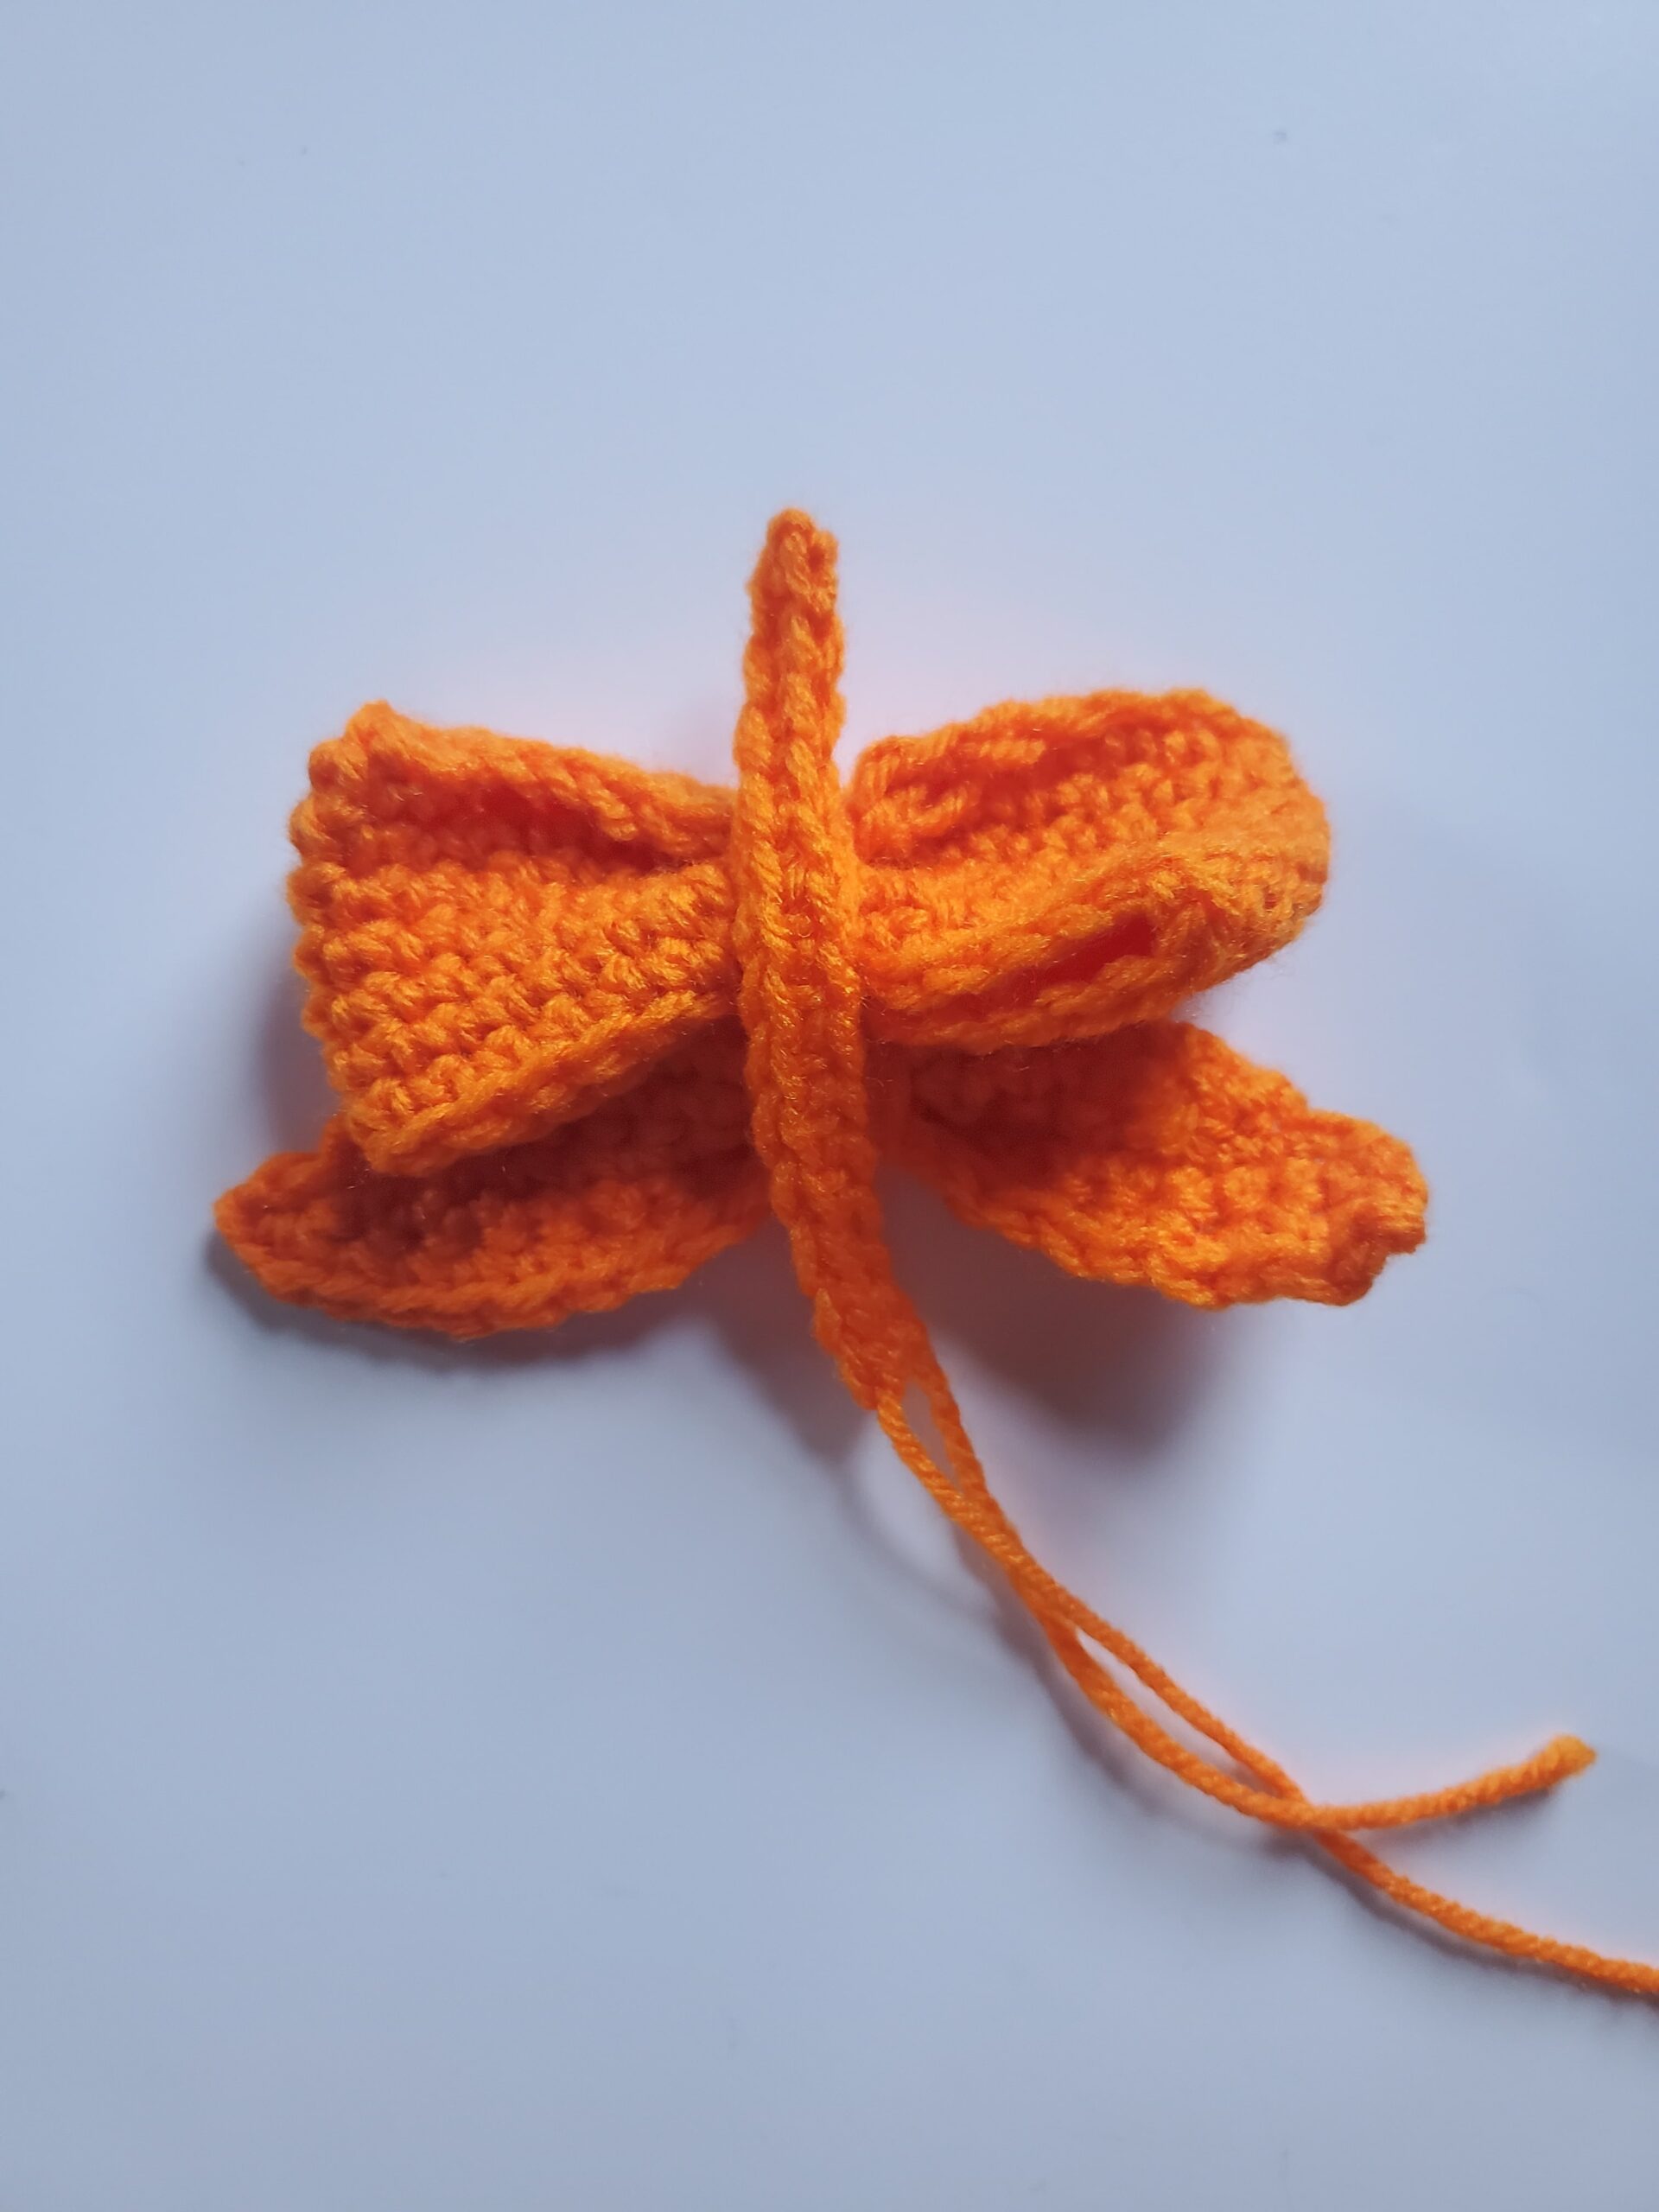
Animal Crossing Crochet Tabletop Pattern – Free Pattern

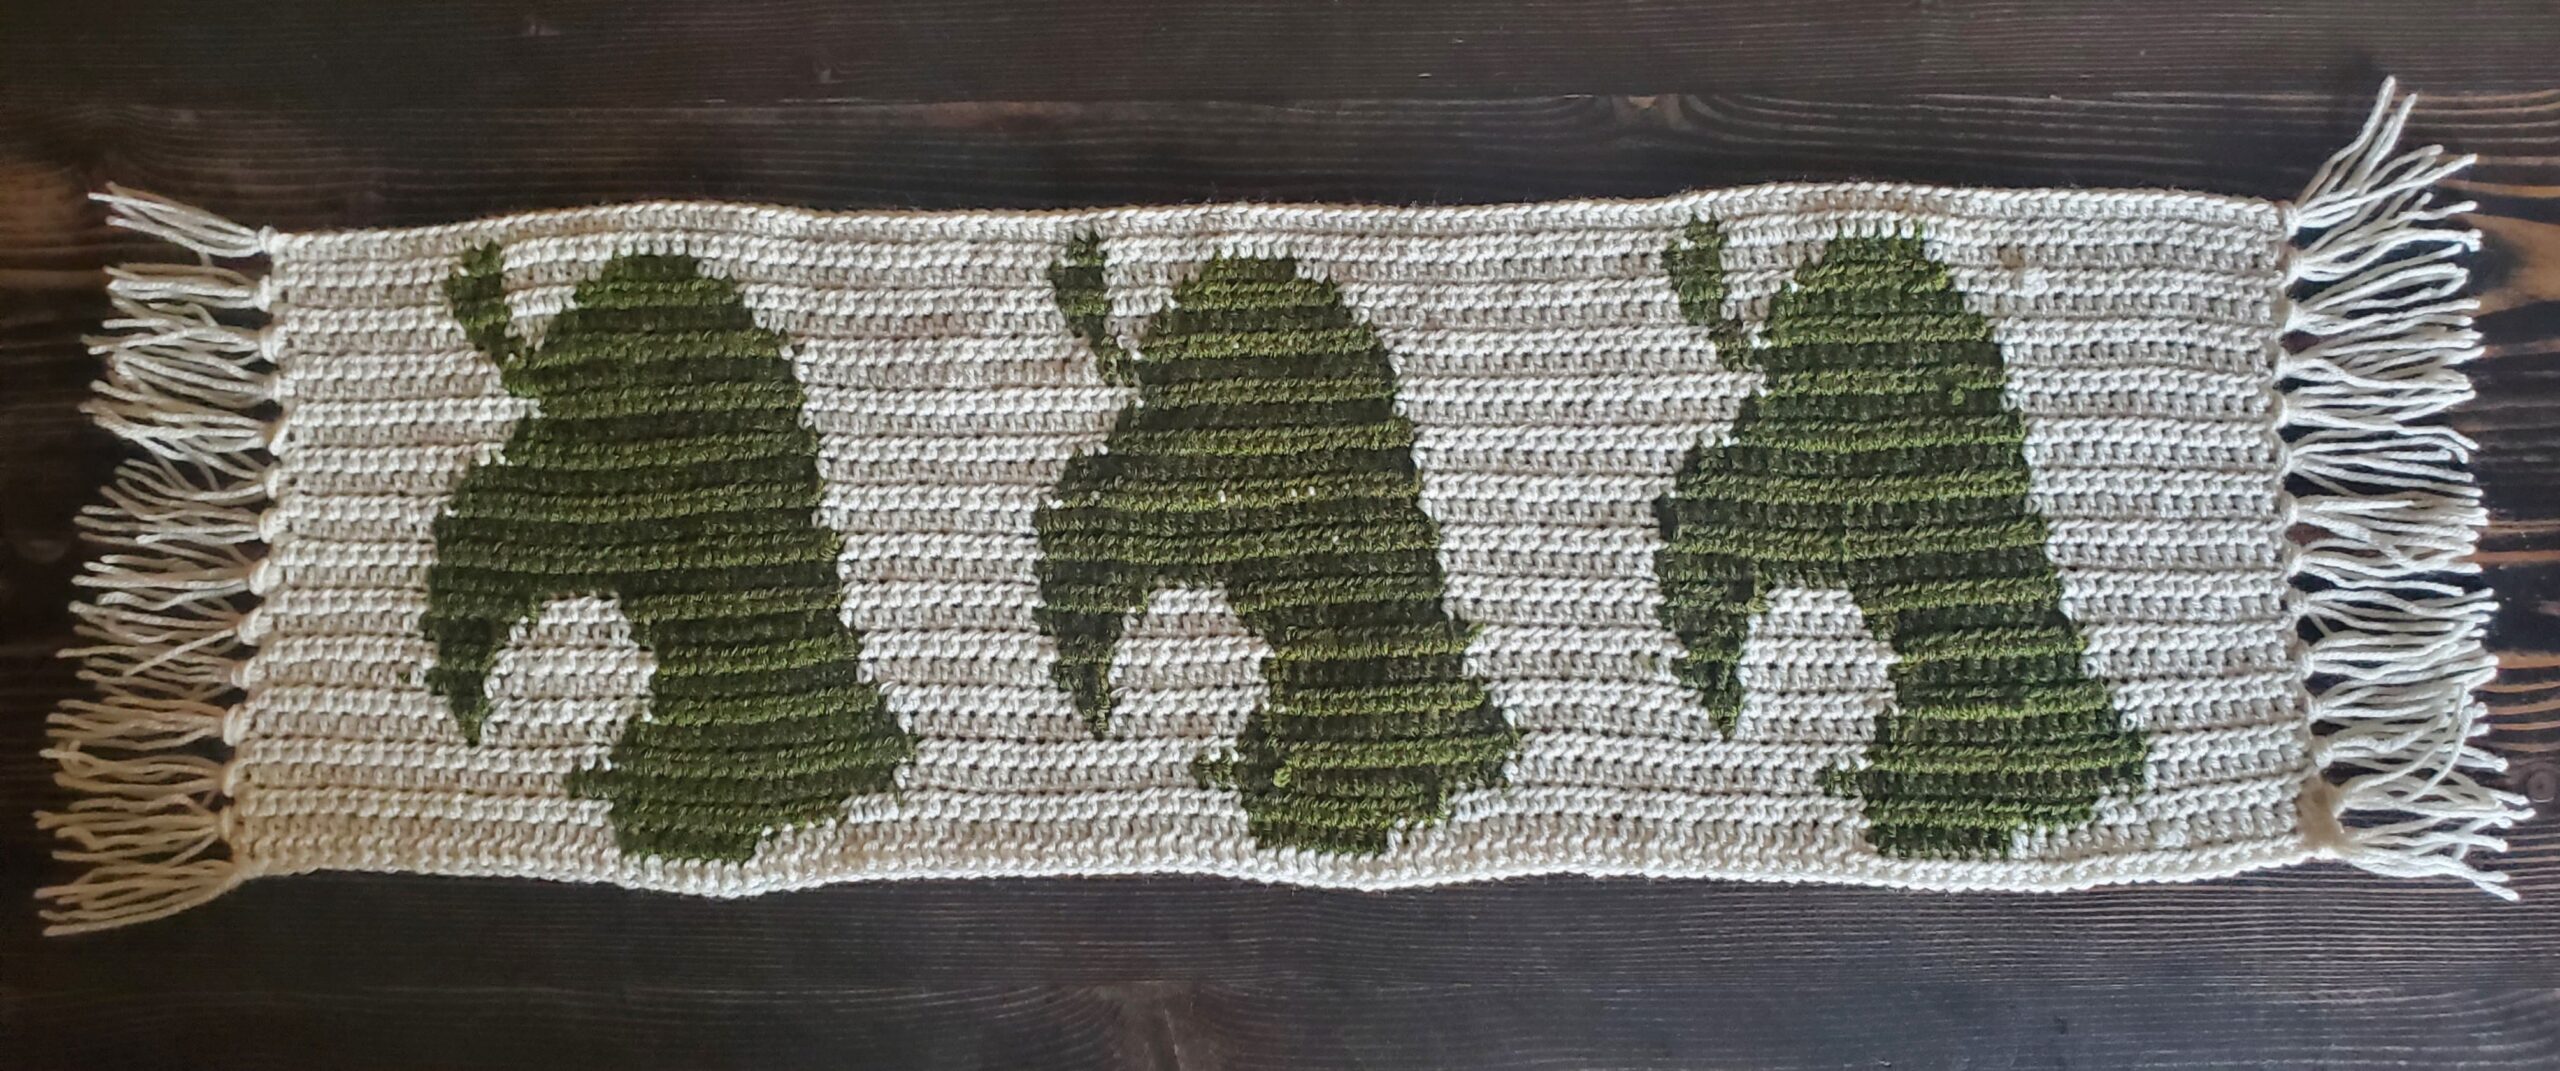
Hello and welcome back to another free crochet pattern, created by yours truly! Today I have for you an Animal Crossing Crochet Tabletop Pattern! Now that summer is here, I always tend to crochet more decorative items, because let’s be real…wearing acrylic crochet is not much fun in the heat.

Animal Crossing is another video game that is near and dear to my heart. I’ve been feeling a little nostalgic recently and I have fond memories of playing Animal Crossing during my childhood. It’s such a relaxing game with lots of open ended play. 

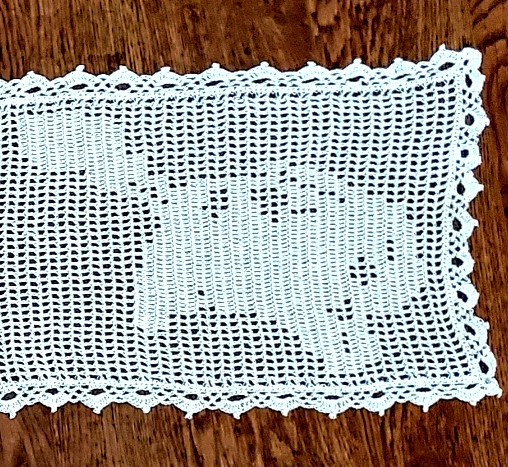
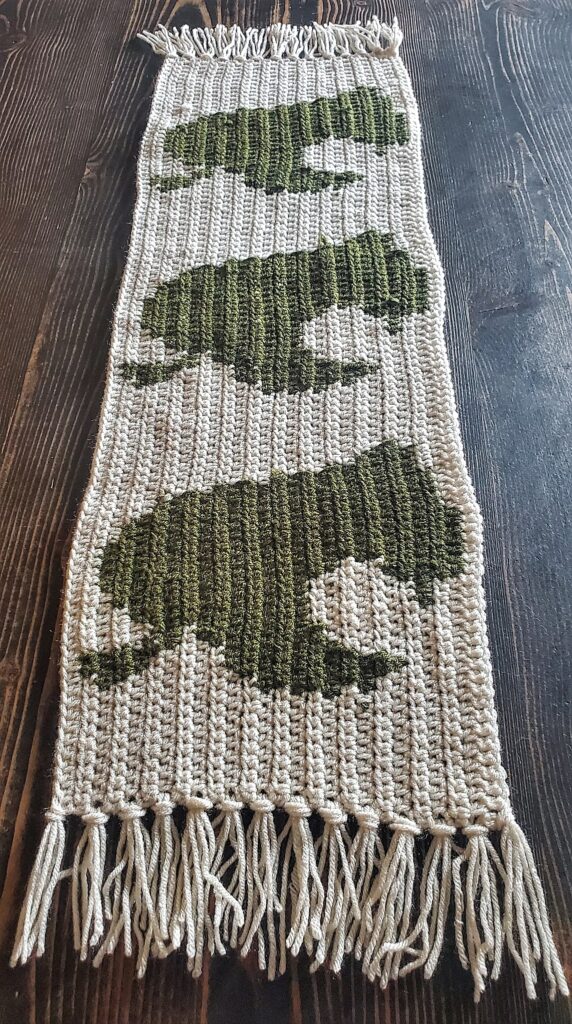
I would use this as a centerpiece for your table or coffee table. It’s a little too tall (thick? lol!) to be a runner for an end table in my opinion. When completed (and prior to blocking), my piece measured roughly 31″ x 9.5″ before adding fringe.

The Animal Crossing Crochet Tabletop Pattern has the iconic leaf logo from the game in a repeat of three. 

You’ll have to change between two colors throughout the pattern. I will explain my process below, however, feel free to use whatever method of color changing you prefer. If you need more help, you can check out my previous post on How to Color Change in Crochet the Right Way.

Tag me on Instagram with your finished projects @strommercrafts!

Thank you and I hope you enjoy this pattern! 🙂

Check out these other FREE Crochet Patterns!
Animal Crossing Crochet Tabletop Decor Runner

Materials Needed:

  • 5 mm crochet hook
  • 1 skein of Red Heart Super Saver Worsted Weight Size 4 in Aran color
  • 1 skein of Red Heart Super Saver Worsted Weight Size 4 in Thyme color
  • Tapestry Needle
  • Scissors
  • Stitch marker (optional)

Abbreviations Used:

  • ch – chain
  • st(s) – stitch(es)
  • hdc – half double crochet
  • CTA – change to aran
  • CTT – change to thyme

Useful Tips:

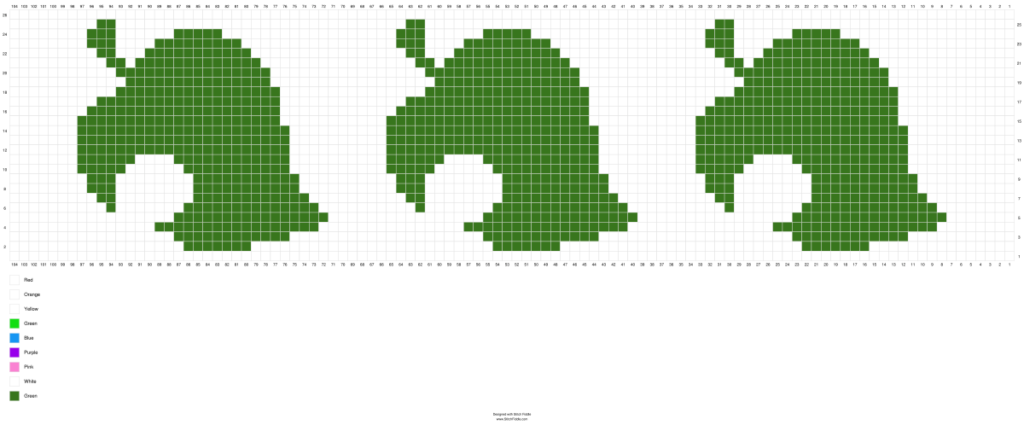
  • I have written out all the color changes below, but I have a picture and PDF of the chart if you’re more of a visual person. If using the chart, each square = 1 hdc.
  • Read the chart left to right for row 1, right to left for row 2 and so on. 
  • Use the stitch marker on one side to help you determine left from right.
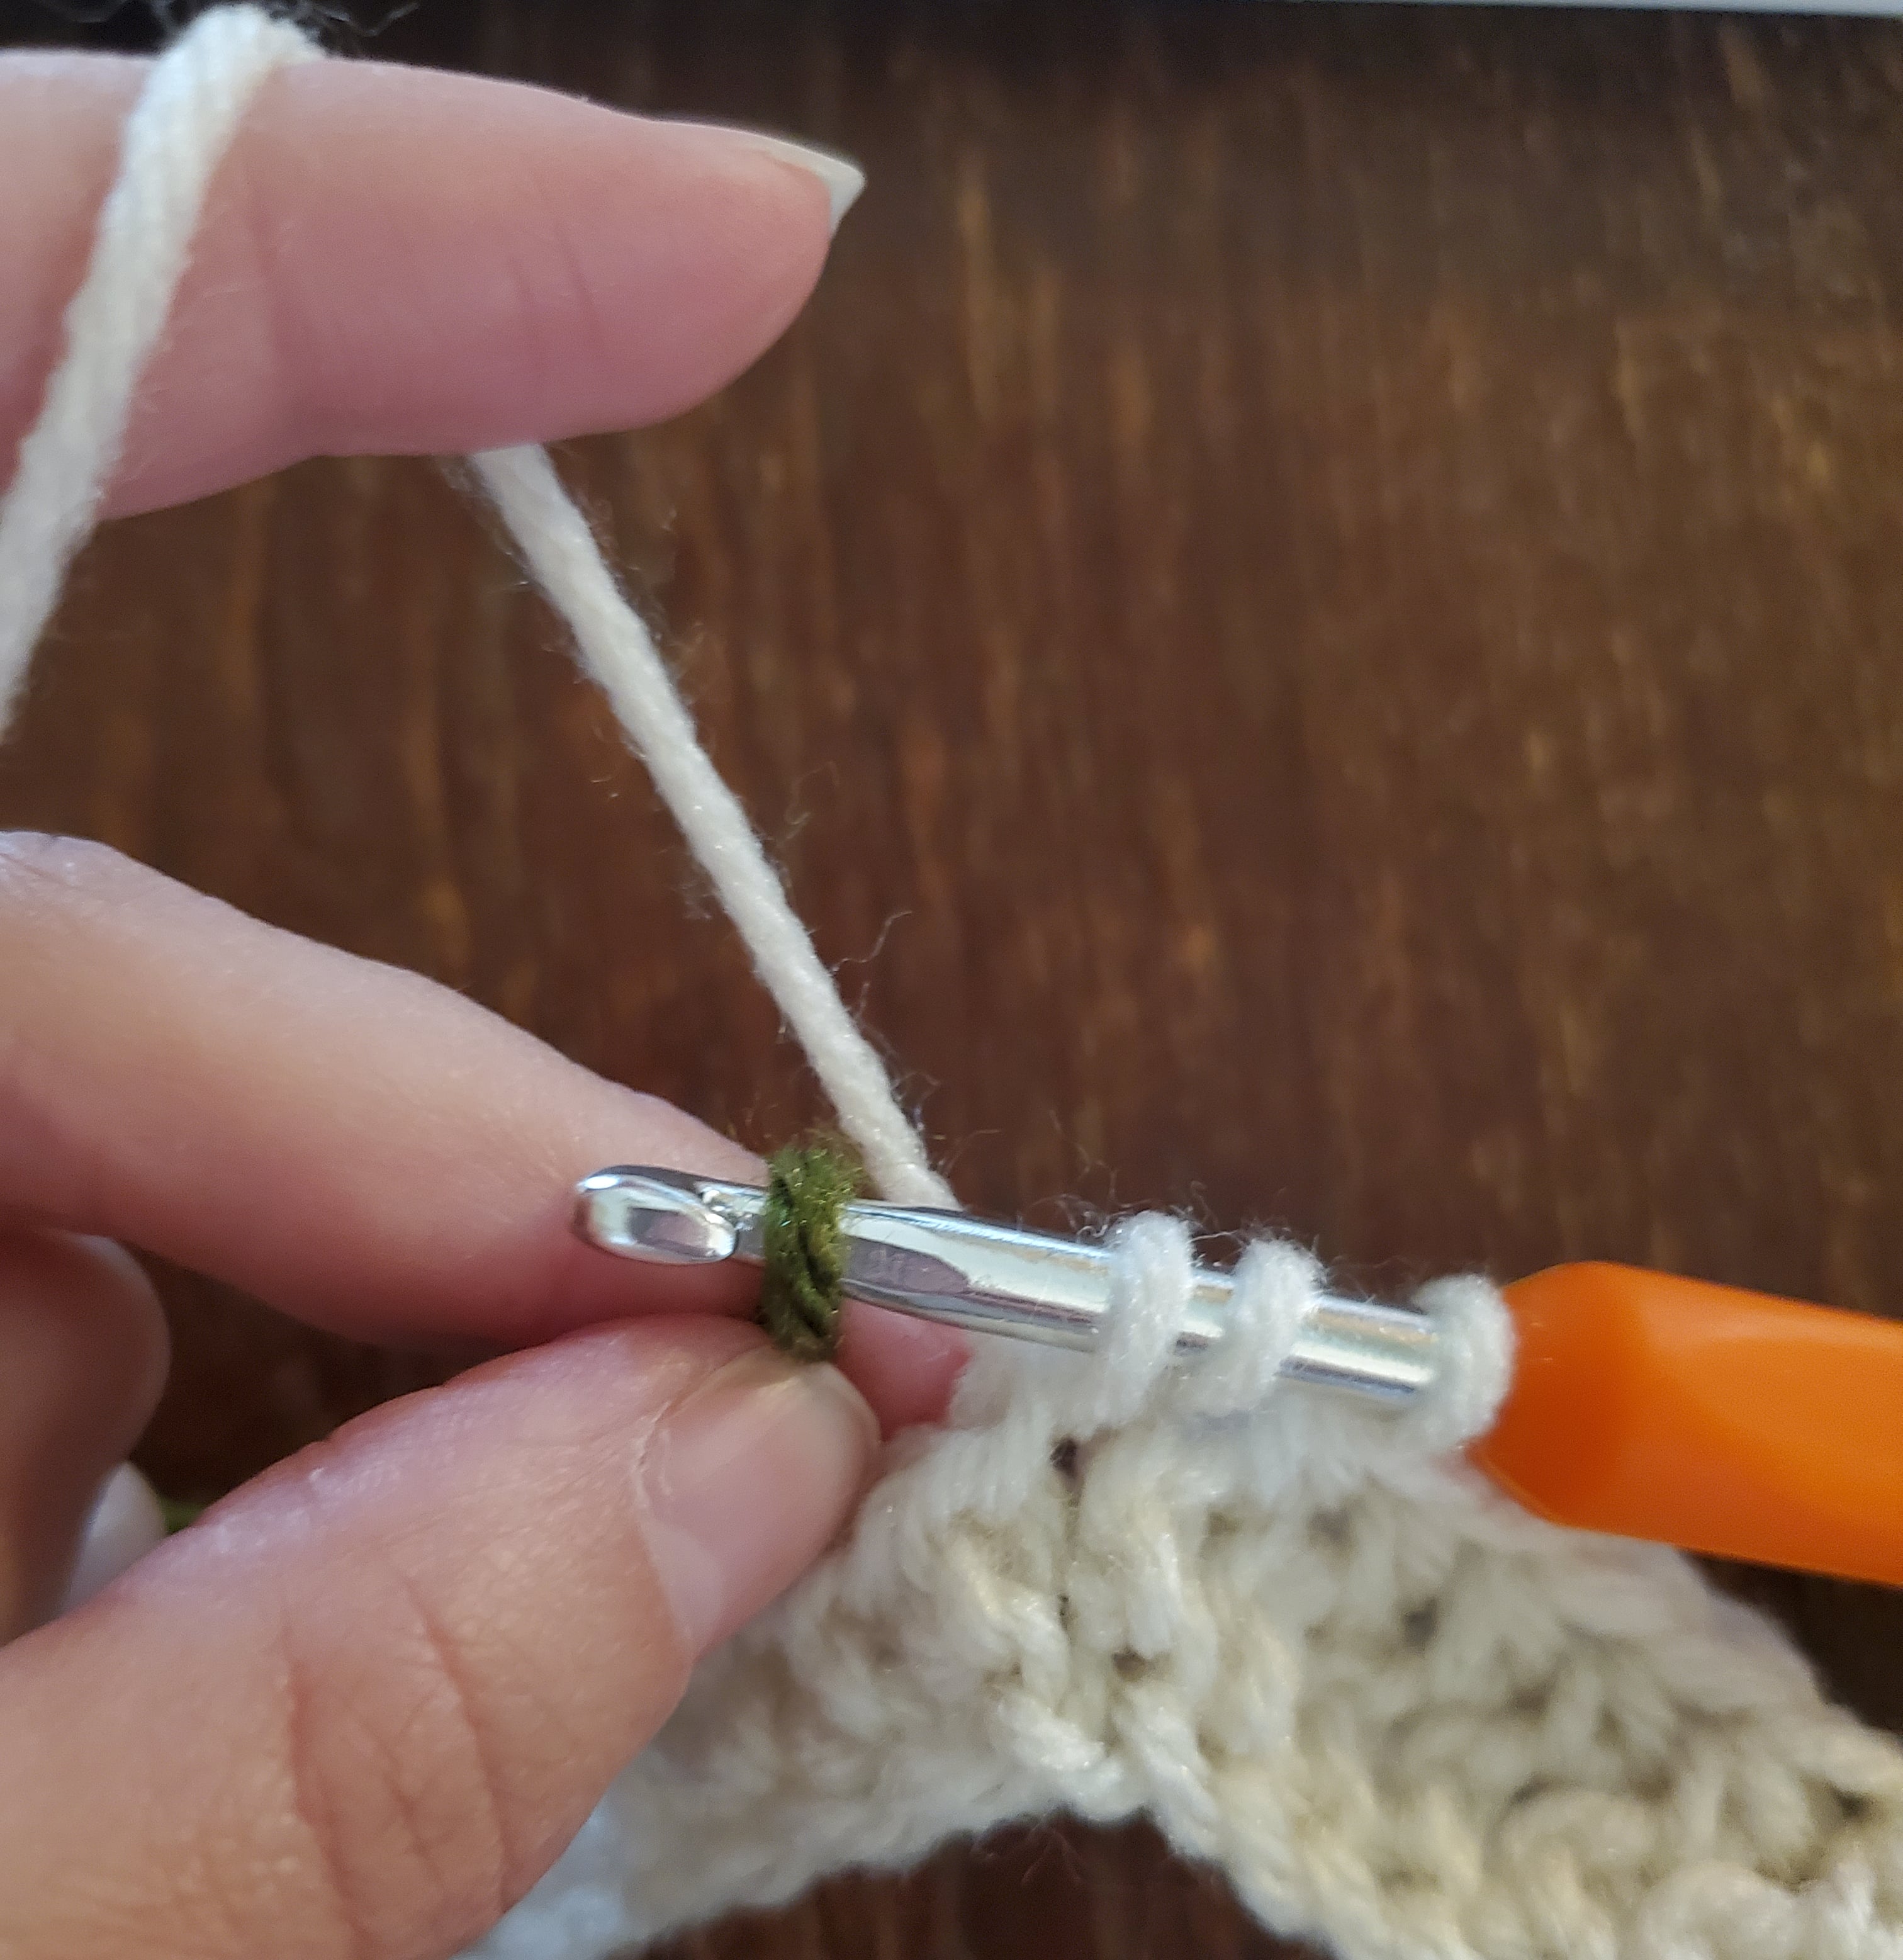
  • When changing colors, you’ll always stop 1 st before the needed color change. Do not finish your hdc all the way (you’ll have 3 strands of yarn on your hook), put your new color on the hook and pull through.
    • For example: I have aran on my hook and need to switch to thyme on the 10th st (or square if using the chart). On the 9th stitch I will color change as described above.
  • I tend to crochet the ends of my yarn along the way when I can. You can weave the ends in if you’d rather. If you weave in too many ends, you tend to get a little wave/bulge going in your work.
  • I chose to carry the aran color throughout the pattern, even when working on the leaves, but I dropped the thyme color only in the spaces between the leaves. (Due to the light aran color, you can really see the thyme color between stitches, which is fine, it’s just not my preference).
Animal Crossing Crochet Tabletop Graph

Animal Crossing Crochet Tabletop Pattern:

  • Row 1 – With Aran color, Ch 105, hdc in second chain from hook, 1 hdc in each ch until end of row. (104 sts) 
  • Row 2 – Turn, ch 1, 1 hdc in next 15 sts (don’t finish the 15th stitch all the way, with 3 strands of yarn on your hook, switch to green yarn and pull through. Do this for switching between colors throughout the pattern), *with green yarn, 1 hdc in next 7 sts, CTA, 1 hdc in next 25 sts*. Repeat from *to* once more. CTT, 1 hdc in next 7 sts, CTA, 1 hdc in next 18 sts (104 sts) 
Color Changing in Crochet Step 1
Hdc, don't finish all the way, place thyme on hook
Color Change in Crochet Step 2
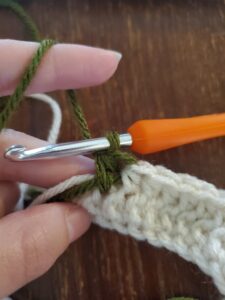
Pull through with thyme (you might have to pull on/keep taut both yarns to keep a tight stitch)
  • Row 3 – Turn, ch 1, 1 hdc in next 17 sts, *CTT, 1 hdc in next 12 sts, CTA, 1 hdc in next 20 sts*. Repeat from *to* once more. CTT, 1 hdc in next 12 sts, CTA, 1 hdc in next 11 sts (104 sts)
  • Row 4 – Turn, ch 1, 1 hdc in next 8 sts, *CTT, 1 hdc in next 17 sts, CTA, 1 hdc in next 15 sts*. Repeat from *to* two more times. (104 sts)
  • Row 5 – Turn, ch 1, 1 hdc in next 17 sts, *CTT, 1 hdc in next 16 sts, CTA, 1 hdc in next 16 sts*. Repeat from *to* once more. CTT, 1 hdc in next 16 sts, CTA, 1 hdc in next 7 sts (104 sts)
  • Row 6 – Turn, ch1, 1 hdc in next 8 sts, *CTT, 1 hdc in next 14 sts, CTA, 1 hdc in next 7 sts, CTT, 1 hdc in next st, CTA, 1 hdc in next 10 sts*. Repeat from *to* two more times. (104 sts)
  • Row 7 – Turn, ch 1, 1 hdc in next 9 sts, *CTT, 1 hdc in next 2 sts, CTA, 1 hdc in next 8 sts, CTT, 1 hdc in next 12 sts, CTA, 1 hdc in next 10 sts*. Repeat from *to* once more. CTT, 1 hdc in next 2 sts, CTA, 1 hdc in next 8 sts, CTT, 1 hdc in next 12 sts, CTA, 1 hdc in next 9 sts. (104 sts)
  • Row 8 – Turn, ch 1, 1 hdc in next 10 sts, *CTT, 1 hdc in next 11 sts, CTA, 1 hdc in next 8 sts, CTT, 1 hdc in next 3 sts, CTA, 1 hdc in next 10 sts*. Repeat from *to* once more. CTT, 1 hdc in next 11 sts, CTA, 1 hdc in next 8 sts, CTT, 1 hdc in next 3 sts, CTA, 1 hdc in next 8 sts. (104 sts)
  • Row 9 – Turn, ch 1, 1 hdc in next 8 sts, *CTT, 1 hdc in next 3 sts, CTA, 1 hdc in next 8 sts, CTT, 1 hdc in next 11 sts, CTA, 1 hdc in next 10 sts*. Repeat from *to* once more. CTT, 1 hdc in next 3 sts, CTA, 1 hdc in next 8 sts, CTT, 1 hdc in next 11 sts, CTA, 1 hdc in next 10 sts. (104 sts)
  • Row 10 – Turn, ch 1, 1 hdc in next 11 sts, *CTT, 1 hdc in next 11 sts, CTA, 1 hdc in next 6 sts, CTT, 1 hdc in next 5 sts, CTA, 1 hdc in next 10 sts*. Repeat from *to* once more. CTT, 1 hdc in next 11 sts, CTA, 1 hdc in next 6 sts, CTT, 1 hdc in next 5 sts, CTA, 1 hdc in next 7 sts. (104 sts)
  • Row 11 – Turn, ch 1, 1 hdc in next 7 sts, *CTT, 1 hdc in next 6 sts, CTA, 1 hdc in next 4 sts, CTT, 1 hdc in next 12 sts, CTA in next 10 sts*. Repeat from *to* once more. CTT, 1 hdc in next 6 sts, CTA, 1 hdc in next 4 sts, CTT, 1 hdc in next 12 sts, CTA in next 11 sts. (104 sts)
  • Row 12 – Turn, ch 1, 1 hdc in next 11 sts, *CTT, 1 hdc in next 22 sts, CTA, 1 hdc in next 10 sts*. Repeat from *to* once more. CTT, 1 hdc in next 22 sts, CTA, 1 hdc in next 7 sts. (104 sts).
  • Row 13 – Turn, ch 1, 1 hdc in next 7 sts, *CTT, 1 hdc in next 22 sts, CTA, 1 hdc in next 10 sts*. Repeat from *to* once more. CTT, 1 hdc in next 22 sts, CTA, 1 hdc in next 11 sts. (104 sts)
  • Row 14 – Turn, ch 1, 1 hdc in next 11 sts, * CTT, 1 hdc in next 22 sts, CTA, 1 hdc in next 10 sts*. Repeat from *to* once more. CTT, 1 hdc in next 22 sts, CTA, 1 hdc in next 7 sts. (104 sts)
  • Row 15 – Turn, ch 1, 1 hdc in next 7 sts, *CTT, 1 hdc in next 21 sts, CTA, 1 hdc in next 11 sts*. Repeat from *to* once more. CTT, 1 hdc in next 21 sts, CTA, 1 hdc in next 12 sts. (104 sts)
  • Row 16 – Turn, ch 1, 1 hdc in next 12 sts, *CTT, 1 hdc in next 20 sts, CTA, 1 hdc in next 12 sts*. Repeat from *to* once more. CTT, 1 hdc in next 20 sts, CTA, 1 hdc in next 8 sts. (104 sts)
  • Row 17 – Turn, ch 1, 1 hdc in next 9 sts, *CTT, 1 hdc in next 19 sts, CTA, 1 hdc in next 13 sts*. Repeat from *to* once more. CTT, 1 hdc in next 19 sts, CTA, 1 hdc in next 12 sts. (104 sts)
  • Row 18 – Turn, ch 1, 1 hdc in next 12 sts, *CTT, 1 hdc in next 17 sts, CTA, 1 hdc in next 15 sts*. Repeat from *to* once more. CTT, 1 hdc in next 17 sts, CTA, 1 hdc in next 11 sts. (104 sts)
  • Row 19 – Turn, ch 1, 1 hdc in next 12 sts, *CTT, 1 hdc in next 15 sts, CTA, 1 hdc in next 17 sts*. Repeat from *to* once more. CTT, 1 hdc in next 15 sts, CTA, 1 hdc in next 13 sts. (104 sts)
  • Row 20 – Turn, ch 1, 1 hdc in next 13 sts, *CTT, 1 hdc in next 16 sts, CTA, 1 hdc in next 16 sts*. Repeat from *to* once more. CTT, 1 hdc in next 16 sts, CTA, 1 hdc in next 11 sts. (104 sts)
  • Row 21 – Turn, ch 1, 1 hdc in next 10 sts, *CTT, 1 hdc in next 2 sts, CTA, 1 hdc in next st, CTT, 1 hdc in next 13 sts, CTA, 1 hdc in next 16 sts*. Repeat from *to* once more. CTT, 1 hdc in next 2 sts, CTA, 1 hdc in next st, CTT, 1 hdc in next 13 sts, CTA, 1 hdc in next 14 sts (104 sts)
  • Row 22 – Turn, ch 1, 1 hdc in next 15 sts, *CTT, 1 hdc in next 11 sts, CTA, 1 hdc in next 3 sts, CTT, 1 hdc in next 2 sts, CTA, 1 hdc in next 16 sts*. Repeat from *to* once more. CTT, 1 hdc in next 11 sts, CTA, 1 hdc in next 3 sts, CTT, 1 hdc in next 2 sts, CTA, 1 hdc in next 9 sts (104 sts)
  • Row 23 – Turn, ch 1, 1 hdc in next 8 sts, *CTT, 1 hdc in next 3 sts, CTA, 1 hdc in next 4 sts, CTT, 1 hdc in next 9 sts, CTA, 1 hdc in next 16 sts*. Repeat from *to* two more times. (104 sts)
  • Row 24 – Turn, ch 1, 1 hdc in next 18 sts, *CTT, 1 hdc in next 5 sts, CTA, 1 hdc in next 6 sts, CTT, 1 hdc in next 3 sts, CTA, 1 hdc in next 18 sts*. Repeat from *to* once more. CTT, 1 hdc in next 5 sts, CTA, 1 hdc in next 6 sts, CTT, 1 hdc in next 3 sts, CTA, 1 hdc in next 8 sts. (104 sts)
  • Row 25 – Turn, ch 1, 1 hdc in next 9 sts, *CTT, 1 hdc in next 2 sts, CTA, 1 hdc in next 30 sts*. Repeat from *to* once more. CTT, 1 hdc in next 2 sts, CTA, 1 hdc in next 29 sts. (104 sts)
  • Row 26 – Turn, ch 1, 1 hdc in each st across (104 sts). Cut yarn and pull through. Weave in ned with tapestry needle.

Fringe:

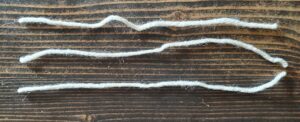
  • Cut 3 strands of aran yarn about 8″ long
3, 8 inch strands of aran yarn for fringe
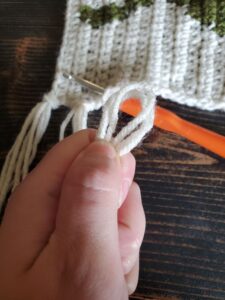
  • Line up strands and make a loop. Make sure the ends are lined up evenly.
  • Insert 5 mm hook from bottom to top in end of row 26.
Loop strands for fringe
Insert hook bottom to top
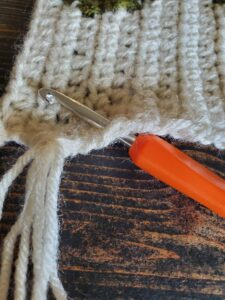
  • Put your looped strands on the hook and pull through, but not all the way!
  • Pull the end of the strands through the loop, either with your hands or your hook.
  • Pull the strands snug.
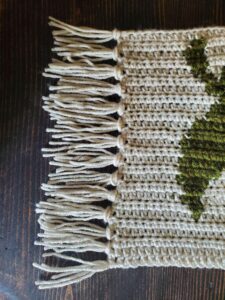
  • Repeat steps in every other row all the way down both edges. 
  • You’ll have to put the last two fringes next to each other.
  • Trim up any long strands with scissors.
Completed Fringe

And that is it! I hope this pattern was easy enough to follow! I would love to see your finished projects below…tag me on IG @strommercrafts!

Until next time! 🙂

Kyriakos Grizzly Crochet Pattern

If you don’t know who Kyriakos Grizzly is, he’s a huge guy from Greece who posts videos on YouTube of himself working out and weightlifting in unconventional ways.

He’s become a meme in the fitness community and has been named the Bloat Lord due to his massiveness and ability to move an incredible amount of weight.

I was inspired to crochet this image of Kyriakos Grizzly after watching one of his most famous workout videos on YouTube, which can be found here.

In this workout video, he shrugs like 7 plates worth of weight on each side of the bar and then screams loudly when he’s done.

For those of you who aren’t familiar with weight lifting, a plate is 25 lbs. So if my math is correct, he’s shrugging something crazy, like 350 lbs. 

I can barely bench the bar, let alone hold that much weight. I think I’d probably collapse and die! 

However, even if I can’t lift much weight, I’m still incredibly impressed. This is why I wanted to crochet the image of him screaming in that moment. That, and also my husband loves the meme, so I made it for him too!

If you’re interested in crocheting Kyriakos Grizzly screaming, keep reading!

Method Used

I used a method of crocheting called filet crochet to make this image. If you’re not familiar with how to filet crochet, I learned how to do it here

I also used 3DC, so 3 double crochet in a row = 1 block filled OR 1 double crochet, a ch 1, and then another double crochet = 1 open block.

How Long Will This Take?

This piece took me around a month of working 1-2 hours a day to complete. This is due to using a tiny crochet hook and thread to get all the details in his face.

I also made a few mistakes and had to frog a couple of rows. So if you’re careful and pay attention (unlike me lol!), your timeline might look different.

Materials Used:

  • 1.65 mm crochet hook
  • Red Heart Classic Crochet Thread Size 10 in White (1000 yards) x 2
  • Tapestry Needle
  • Scissors

Helpful Tips: 

  • Below I have a link to the chart I used to make Kyriakos Grizzly’s face. You might have to create an account on Stitch Fiddle in order to view it, but I’m not entirely sure, but it’s totally free to do so.
  • On the chart; black squares = open blocks and white squares = closed blocks.
  • When you get to the end of a row, ch 3 and turn. This counts as a stitch.
  • If for some reason, the link is not working, I have a picture of the chart, although it may be difficult to see the squares.
  • I highly recommend finding a way to mark off squares as you go. I edited the chart on Stitch Fiddle and used different colored squares to show where I left off. You may also try to print out the chart and mark off as you go. Even writing down what row you’re on will be helpful.
  • You can also use a stitch marker or a scrap piece of thread/yarn to mark one side of the chart, so you don’t get turned around. I placed a stitch marker on the right side of my work so I could determine right from left (very helpful in the very beginning).

Kyriakos Grizzly Crochet Chart:

Link to Stitch Fiddle Chart of Kyriakos Grizzly: https://www.stitchfiddle.com/c/skcao8-jgdgil

Picture of Kyriakos Grizzly Crochet Chart

Starting Chain: Chain 204, double crochet into 5th chain from hook. Follow the chart starting from the bottom from left to right, placing 3 double crochet per white block (remember that 1 double crochet will be shared with the next block when you are counting. To make it easier multiply the number of needed blocks by 2 and add 1 double crochet). For the black blocks, chain 1, skip a chain, and then double crochet in the next chain. 

Continue until the end of the row, turn and ch 3 (counts as a double crochet) for row 2. 

Follow the chart reading from right to left now for the second row. At the end of this row, place a double crochet in the top of the ch 3 from the previous row.

Keep crocheting each based on the chart, I recommend counting your open blocks and making sure they line up correctly, especially on Kyriakos Grizzly’s t-shirt. 

Once the last row is completed, do not cut your thread!

Border: Chain 1, place a (single crochet, chain 1, single crochet) in the corner, single crochet down the side of the piece. Place another (single crochet, chain 1, single crochet) in the next corner stitch. 

Continue single crocheting in each stitch across all sides and placing in the corners a (single crochet, chain 1, single crochet). Slip stitch to the initial chain 1, cut thread of scissors and pull through.

Weave in end with tapestry needle.

Pinterest Pin of Kyriakos Grizzly Crochet

Blocking and Framing:

This is actually something I intend to do with this project, but just *haven’t* been able to do yet. 

I like to block my projects using cardboard and pins, but I am currently out of cardboard large enough to do this with. So once I get my hands on a piece large enough, I will be blocking this to get framed. 

As for framing, I plan on sewing the blocked piece with clear/invisible thread onto a dark place mat (I’ve heard using suede can be good, but sewing into it can be difficult). Once that’s completed, I will get this framed according to the blocked dimensions.

We have a framing business in our town that I plan on checking prices out on, however, I need to block and sew onto a place mat before doing this. 

Once I complete those steps I will try to update this post with pictures of the framed piece! 

Thank you as always and happy crocheting! 

Crochet Legend of Zelda Pattern – Hearts

Hello everyone today I have another free, Zelda themed pattern; a Crochet Legend of Zelda Heart Pattern! I’ve recently been interested in a crochet technique called filet crochet. Have you ever heard of it? It creates a vintage vibe, and all you need is a super tiny hook and thread!

I think The Legend of Zelda series will always have a special place in my heart, it was one of the first video games that I ever played. The series of three hearts represents the amount of life you have when you start most Zelda games. As you play and get hurt by monsters, fall damage, etc., you lose parts or whole hearts until you collapse or replenish them.

Related Posts:

The filet crochet Legend of Zelda Hearts would look great if framed with a dark background and hung on the wall, or you can leave it as is and use it as a cute, nerdy place mat or table decoration. 

Alright, so before we get started there are a few basics about filet crochet we need to cover (it’s not too crazy, I promise).

Filet Crochet Basics:

In filet crochet, you can create your very own image using open or closed squares/gaps/holes. In order to create an open square, two sides of the square will be a dc and two sides will be a ch 1. A closed square will be comprised of 3 dc in a row. 

If you would like to add more columns to the sides, the correct math for the starting ch is x2 number of squares needed + 4 more chs, then dc in the 6th ch from your hook. So for this heart pattern, I have 50 squares across, so this gets me my 100 chs, plus 4 (the extra 4 make up a dc and a ch 1 for 1 side and the top of an open square). 

Clear as mud? Don’t worry, you’ll get the hang of it after a few rows!

Please note that some of these links are affiliate links. That means that if you click on these links and make a purchase, I may receive a commission at no extra cost to you. You can find more information about our disclosure policy here. Thank you for your support.

Materials Needed:

Abbreviations (US Terms):

  • ch – chain
  • sl st – slip stitch
  • sc – single crochet
  • dc – double crochet

Pattern Chart:

The image below is a helpful chart if you’re more of a visual learner.

Tips for this Pattern:

  • For this filet pattern, we use 3 dc to make a closed square and dc, ch1, dc for an open square.
  • The turning chain counts as a dc, ch 1 throughout the whole pattern.
  • The ch 1 spaces count as a stitch.
  • You can place a stitch marker on the left or right side to help you keep track of where you are, however once you start making the 3rd half heart, it’s not difficult to determine.
  • Repeat instructions enclosed in () by the number indicated at the end. Example: (ch 1, skip ch 1 space, dc in next dc x3 times). 

Crochet Legend of Zelda Hearts Pattern

Ch 104

Foundation Chain for LOZ Heart Pattern
Ch 104

Row 1: Dc in 6th ch from hook, *ch 1, skip a ch, dc in next ch.* Repeat from *to.* End with a dc in the last ch (100 sts/50 open squares).

Dc in 6th ch from hook
Row 1 Completed
Row 1

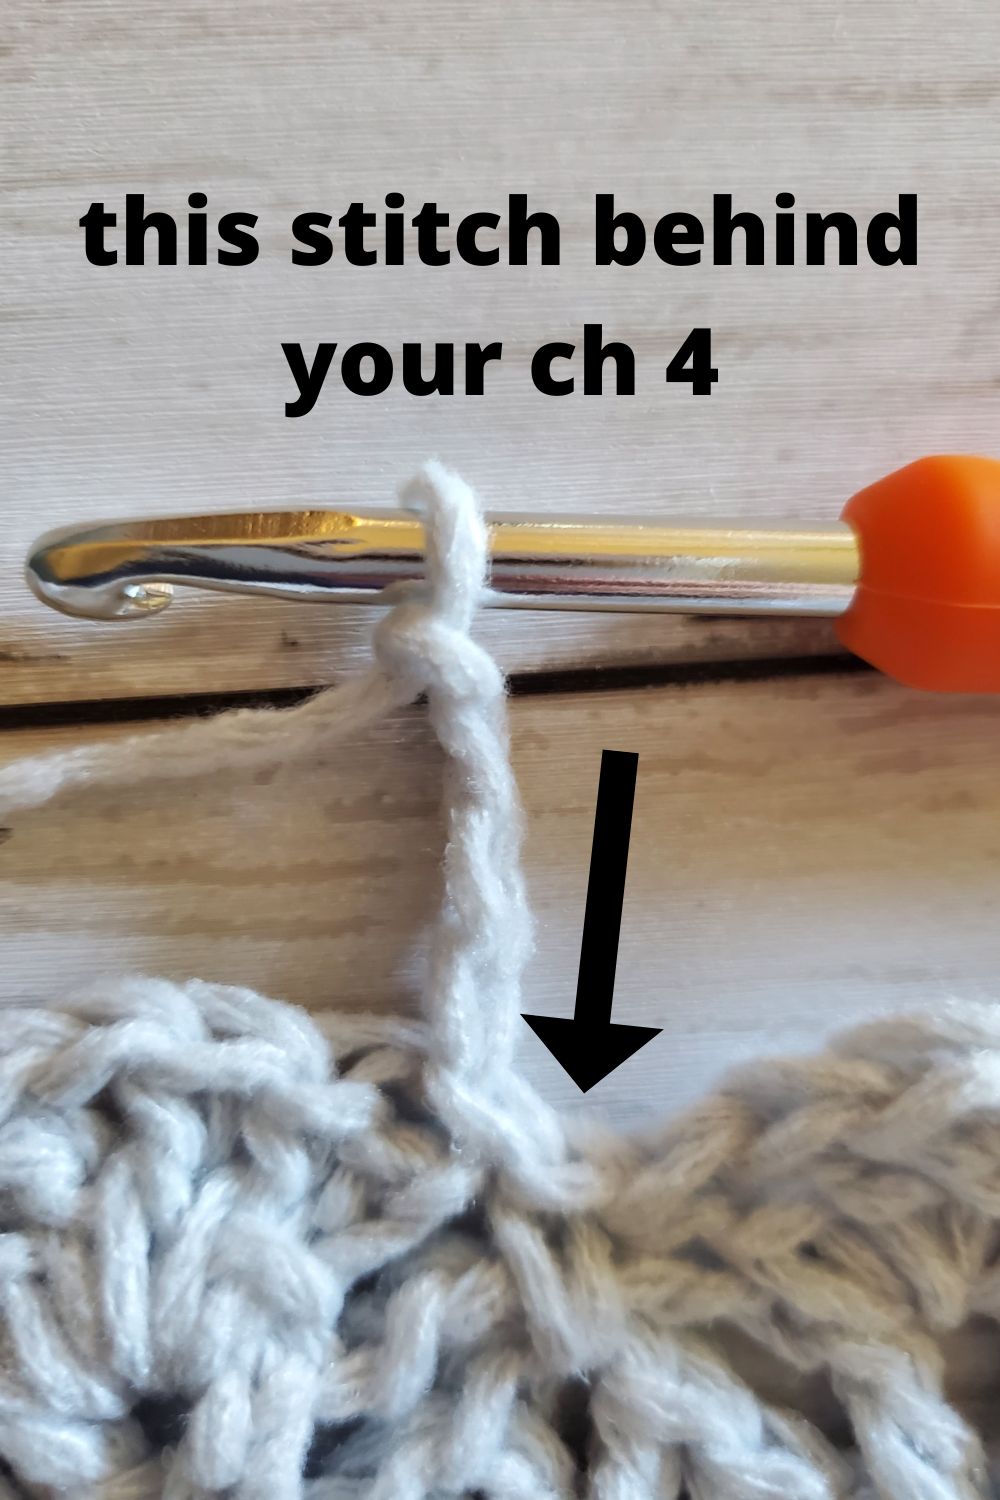
Row 2: Turn, ch 4, skip ch 1 space, dc in next dc, *ch1, skip ch1 space, dc in next dc* Repeat from *to* (50 open squares).

Turn, ch 4, dc in next dc for Row 2
Beginning of Row 2: Turn, ch 4, dc in next dc

Row 3: Turn, ch 4, skip ch 1 space, dc in next dc, (ch 1, skip ch 1 space, dc in next dc x 7 times), (dc in ch 1 space, dc in next dc x 2). At this point you should have 8 open squares and 2 closed squares. *(Ch 1, skip ch 1 space, dc in next dc x 14), (dc in ch 1 space, dc in next dc x 2 times).* Repeat *to* once more. (Ch 1, skip ch 1 space, dc in next dc x 8 times). (44 open squares, 6 closed squares).

Row 3
Row 3

Row 4: Repeat row 3.

Row 5: Turn, ch 4, skip ch 1 space, dc in next dc, (ch 1, skip ch 1 space, dc in next dc x 6  times), *dc in next ch 1 space, dc in next 5 sts, (dc in ch 1 space, dc in next dc x2 times). (Ch 1, skip ch 1 space, dc in next dc x11 times).* Repeat from *to* once more. Start of 3rd half heart. Dc in next ch 1 space, dc in next 3 sts, ch 1 skip a st, dc in next dc, (dc in next ch 1 space, dc in next dc x2 times), (ch 1 skip ch 1 space , dc in next dc x6 times). (14 closed squares, 36 open squares).

Row 5
Row 5

Row 6: Turn, ch 4, skip ch 1 space, dc in next dc, (ch 1, skip ch 1 space, dc in next dc x 4 times). Dc in ch 1 space, dc in next dc, (ch 1, skip next st, dc in next st x2), ch 1, skip ch 1 space, dc in next 5 dc, (dc in ch 1 space, dc in next dc x2 times) (Ch 1, skip ch 1 space, dc in next dc x8 times), *dc in next ch 1 space, dc in next 11 sts, (dc in next ch 1 space, dc in next dc x2 times)* (ch 1, skip ch 1 space, dc in next dc x8 times). Repeat from *to* once more, (ch 1, skip ch 1 space, dc in next dc x5 times). (21 closed squares, 29 open squares).

Row 7: Turn, ch 4, skip ch 1 space, dc in next dc, (ch 1, skip ch 1 space, dc in next dc x 4 times), *dc in next 16 sts, (ch 1, skip ch 1 space, dc in next dc x8 times).* Repeat from to *to* once more. Dc in next 8 dc, (ch 1, skip ch 1 space, dc in next dc x3 times), dc in next 2 sts, (ch 1 skip ch 1 space, dc in next dc x5 times). (21 closed squares, 29 open squares).

Row 7
Row 7

Row 8: Turn, ch 4, skip ch 1 space, dc in next dc (ch 1, skip ch 1 space, dc in next dc x2 times), (dc in next ch 1 space, dc in next dc x2 times), ch 1, skip next st, dc in next st, (ch 1, skip ch 1 space, dc in next dc x3 times), dc in next 8 sts, (dc in next ch 1 space, dc in next dc x2 times), *(ch 1, skip ch 1 space, dc in next dc x 4 times), (dc in next ch 1 space, dc in next dc x2 times), dc in next 16 sts, (dc in next ch 1 space, dc in next dc x2 times).* Repeat from *to* once more. (Ch 1, skip ch 1 space, dc in next dc x3 times). (18 open squares, 32 closed squares).

Row 8 of LOZ Hearts
Row 8

Row 9: Turn, ch 4, skip ch 1 space ,dc in next dc (ch 1, skip ch 1 space, dc in next dc x2 times), *dc in next 24 sts, (ch 1, skip ch 1 space, dc in next dc x4 times.* Repeat from *to* once more. Dc in next 12 sts, (ch 1, skip ch 1 space, dc in next dc x4 times), dc in next 4 sts, (ch 1, skip ch 1 space, dc in next dc x3 times). (18 open squares, 32 closed squares).

Row 10: Turn, ch 4, skip ch 1 space, dc in next dc, ch 1, skip ch 1 space, dc in next dc, dc in ch 1 space, dc in next st (ch 1 skip ch 1 space, dc in next dc x6 times), dc in next 12 sts, *dc in ch 1 space, dc in next st, (ch 1 skip ch 1 space, dc in next dc x 2), dc in next ch 1 space, dc in next 25 sts.* Repeat from *to,* one more time, dc in ch 1 space, dc in next dc, (ch 1 skip ch 1 space, dc in next dc x2 times). (14 open squares, 36 closed squares).

Row 10 of filet crochet LOZ Hearts
Row 10

Row 11: Turn, ch 4, skip ch 1 space, dc in next dc, ch 1, skip ch 1 space, dc in next 3 sts (ch 1 skip ch 1 space, dc in next dc x2 times), dc in next 22 sts, (ch 1, skip ch 1 space, dc in next dc x2 times), dc in next 2 sts, (ch 1, skip ch 1 space, dc in next dc x2 times), dc in next 22 sts, (ch 1, skip ch 1 space, dc in next dc x2 times), dc in next 2 sts, (ch 1, skip ch 1 space, dc in next dc x2 times), dc in next 8 sts, (ch 1, skip ch 1 space, dc in next dc x6 times), dc in next 2 sts, (ch 1, skip ch 1 space, dc in next dc x2 times). (18 open squares, 32 closed squares).

Row 12: Turn, ch 4, skip ch 1 space, dc in next dc, ch 1, skip ch 1 space, dc in next dc, dc in next 2 sts, (ch 1, skip ch 1 space, dc in next dc x6 times), dc in next 8 sts, *(ch 1, skip ch 1 space, dc in next dc x2 times), dc in next 2 sts, (ch 1, skip ch 1 space, dc in next dc x2 times), dc in next 22 sts.* Repeat from *to* once more, (ch 1, skip ch 1 space, dc in next dc x2 times), dc in next 2 sts, (ch 1, skip ch 1 space, dc in next dc x2 times). (18 open squares, 32 closed squares).

Row 12 of filet crochet LOZ Hearts
Row 12

Row 13: Turn, ch 4, skip ch 1 space, dc in next dc, ch 1, skip ch 1 space, dc in next 3 dc, *(ch 1, skip ch 1 space, dc in next dc x2 times), dc in next 22 sts, (ch 1, skip ch 1 space, dc in next dc x2 times), dc in next 2 sts.* Repeat from *to* once more. (Ch 1, skip ch 1 space, dc in next dc x2 times), dc in next 8 sts, dc in ch 1 space, dc in next st, (ch 1, skip ch 1 space, dc in next dc x5 times), dc in next 2 sts, (ch 1, skip ch 1 space, dc in next dc x2 times). (19 open squares, 31 closed squares).

Row 13
Row 13

Row 14: Turn, ch 4, skip ch 1 space, dc in next dc, ch 1, skip ch 1 space, dc in next 3 sts, (ch 1, skip ch 1 space, dc in next dc x5 times), dc in next 10 sts, *(ch 1, skip, ch 1 space, dc in next dc x2 times), dc in next 2 sts, (ch 1, skip ch 1 space, dc in next dc x2 times), dc in next 22 sts.* Repeat from *to* once more. (Ch 1, skip ch 1 space, dc in next dc x2 times), dc in next 2 sts, (ch 1, skip ch 1 space, dc in next dc x2 times). (19 open squares, 31 closed squares).

Row 15: Turn, ch 4, skip ch 1 space, dc in next dc, ch 1, skip ch 1 space, dc in next dc, ch 1, skip a st, dc in next st, *(dc in next ch 1 space, dc in next dc x2 times), dc in next 6 sts, (ch 1, skip a st, dc in next st x2 times), dc in next 10 sts, ch 1, skip a st, dc in next st, (ch 1, skip ch 1 space, dc in next dc x2 times), ch 1, skip a st, dc in next st.* Repeat from *to* once more. (Dc in ch 1 space, dc in next st x2 times), dc in next 6 sts, (ch 1, skip a st, dc in next st x2 times), (dc in ch 1 space, dc in next dc x5 times), (ch 1, skip ch 1 space, dc in next dc x3 times). (20 open squares, 30 closed squares).

Row 16: Turn, ch 4, skip ch 1 space, dc in next dc, (ch 1, skip ch 1 space, dc in next dc x2 times), ch 1, skip a st, dc in next 7 sts, ch 1, skip a st, dc in next dc, (ch 1, skip ch 1 space, dc in next dc x2 times), ch 1, skip a st, dc in next st, dc in next 6 sts, *ch 1, skip a st, dc in next st, (ch 1, skip ch 1 space, dc in next dc x4 times), ch 1, skip a st, dc in next 7 sts, ch 1, skip a st, dc in next st, (ch 1, skip ch 1 space, dc in next dc x2 times), ch 1, skip a st, dc in next 7 sts.* Repeat from *to* once more. Ch 1, skip a st, dc in next st, (ch 1, skip ch 1 space, dc in next dc x2 times). (32 open squares, 18 closed squares).

Row 16
Row 16

Row 17-18: Turn, ch 4, dc in next dc, *ch 1, skip ch 1 space/next st, dc in next dc.* Repeat from *to.* (50 open squares).

Border:

Turn, ch 1 (ch 1 does not count as a st), sc in each st across (sc inside the ch 1, not under), when you get to the end of the first row, (sc, ch 2, sc) for your corner stitch. Continue down the short side. See picture below for sc placement. Try to place a sc in the top and middle of the dcs. 

arrows pointing to where to sc on short side

The right most arrow points to the “top” of a dc, the middle arrow to the “middle” and the left arrow to the next “top.”

Place a (sc, ch 2, sc) in the next 3 corner spaces.

Continue until you finish the last corner, then sl st into first sc.

Cut thread with scissors and pull through. Weave in ends with tapestry needle.

Dc in 6th ch from hook

Optional: Blocking

If you want a super straight, and clean looking finished product, I would suggest blocking your work. This step is optional, and you don’t have to do this if you like the way your project looks.

There are many different ways to do this, however, my favorite is to soak the project in some water, place it on a towel and gently pat/soak of the excess water. I use a scrap cardboard box to to lay it on and place pins around the project into the cardboard to “stretch” it out. Let it air dry (usually 24 hours+) and take the pins out. 

Your crochet project should be much straighter! 

And there it is! I hope you all enjoyed this Crochet Legend of Zelda Heart Pattern! Let me know what you think on Instagram by tagging me @strommercrafts with your finished project :). 

Happy crocheting! Until next time xoxo.

Simple and Cute Crochet Belt Pattern

Hello again, and welcome to Strommer Crafts. Today we will be learning how to make simple and cute crochet belt! I thought I would share this pattern even though anyone could have come up with it.

***Please note that this post may contain affiliate links. This means that I may receive a commission if you purchase something through these links (at no cost to you!). Thank you for your support!***

I had recently made an online purchase of a yellow, floral dress for my birthday. When it arrived, I tried it on and quickly noticed that it was missing something…

A belt! 

Although, I ashamedly admit, I didn’t have one (but now I do, yay!). So I started browsing through the internet for a cute black belt. After scrolling for a while and not being satisfied with the belt or price, it hit me; why not just make a belt?

I have so much yarn to use, I thought I would at least try to whip one up. Plus it would save me a little bit of cash, which is always a bonus in my book!

This is a great project for beginner crocheters! The only “weird” thing you do in the pattern is crochet in the back loop of your single crochets. 

Plus all you need is a bit of yarn and a crochet hook and you’re good to go! I used Black Yarn by Red Heart Super Saver and a 5 mm crochet hook, however, feel free to use whatever yarn and hook size you would like. Just note that different yarn and hook sizes might make your project wider or skinnier.

Feel free to adjust the number of chains at the beginning if you would like a wider or skinnier belt.

Simple and Cute Crochet Belt Pattern

The pattern gives it a nice little “ridged” texture, as well as making the ends slightly pointy. I didn’t want my belt to be totally squared off at the ends, and I think the end result looks pretty decent.

I had originally thought about making a single crochet border around the finished belt, but decided against it. I thought the little gaps between the rows gave it a nice texture too. Of course, if you like a little more structure with your crochet projects, feel free to add a border of your choice around.

Alright, let’s get started!

Materials Needed:

Abbreviations Used:

  • Ch – chain
  • Sc – single crochet
  • Sc2tog – single crochet 2 stitches together

Simple and Cute Crochet Belt Pattern:

With Black yarn and 5 mm crochet hook: (if you need help putting your yarn on your hook by slip knotting click here).

  • Row 1: Ch 3, from second ch from hook, make 2 sc in that ch and in the next ch make another 2 sc (4 sts)
  • Row 2-desired length: Ch 1 and turn, sc in the back loop of each st, repeat for each row. (4sts)
    • What is the back loop? If you look straight down on your stitch…it has 2 sides and looks a little bit like a V, insert your hook into the side that is farthest away from you and make your sc. This helps create that nice ridged texture.
  • At desired length: Ch1, turn, sc2tog and then sc2tog again (2sts). At the end of your row, cut yarn with scissors and pull through. Weave in ends with tapestry needle.
Simple and cute crochet belt with polka dot dress

Tada! It’s really that simple! Here’s another picture of the belt with a different dress. Get creative and tie it in different ways! 

Thank you as always for checking out my patterns, see you in the next one!

Black and White Star Crochet Baby Blanket

Hey there and welcome to StrommerCrafts, today I am presenting to you my first completed baby blanket pattern! A Black and White Star Crochet Baby Blanket! 

***Please note that this post may contain affiliate links. This means that I may receive a commission if you purchase something through these links (at no cost to you!). Thank you for your support!***

I used a 5 mm crochet hook and 1 jumbo skein of white yarn from Red Heart Super Saver and 1 jumbo skein of black yarn from Red Heart Super Saver. 

When finished, this blanket is about 33” x 27” depending on your gauge. 

The stars are actually not a perfectly repeating pattern…I found an image of stars that I liked and used my favorite crochet graph generator, Stitch Fiddle, to create it.

Since the stars are not all the same, you can adjust the black stitches to be the exact same as the first whole star if the variations among the stars bothers you. I’m just lazy, so I left it as is ;).

You’ll also need to change colors correctly when following this pattern. When you switch between the two colored yarns, you’ll find that your skeins will start to get twisted. That is ok! That just tends to happen when you switch, just make sure that you unravel them occasionally so they don’t get knotted. 

Each square on the graph represents 1 half double crochet. I had originally used single crochets, but found that it took way too long to complete a baby blanket this way. Plus it was pretty stiff. The half double crochets worked perfectly, as the stars didn’t get stretched out too much (double crochets would distort the image and make it too tall…if that makes sense!).

Here is the graph I used to make the blanket:

Black and White Star Crochet Graph from Stitch Fiddle
Black and White Star Blanket Graph

Here is a link to a PDF of the pattern, which may be easier to see.

I suggest either printing the graph out to mark where you are in the Black and White Star Baby Blanket pattern or head over to Stitch Fiddle and mark where you are by using your own colored square (this is how I did it). You can also write down on a piece of paper or on your phone which row you last completed or are on.

It’s easy to get lost if you don’t have a way of marking which row you’re on, especially since this is a longer crochet project!

I also polished up the blanket by adding a shell stitch border around it. The shell border makes it look a little more feminine in my opinion, but you can add any border you like (or none at all!).

Corner shot of black and white star baby blanket with shell border
Check out that Shell Border!

Okay, let’s get started on our Black and White Star Crochet Baby Blanket!

Abbreviations Used:

  • Ch(s) – chain(s)
  • St – stitch
  • Sl st – slip stitch
  • Hdc – half double crochet
  • Dc – double crochet

Special Instructions:

  • Each square on the graph is equal to 1 half double crochet.
  • I carry the yarn color I’m not using with me. This prevents having a thousand ends that have to be weaved back into the project, however, you will be able to see the black yarn between the white. 
  • Make sure that you change yarn colors correctly. This prevents your colors from “straying” away.
  • Remember to untwist your skeins occasionally to prevent future knots and entanglement.

Black and White Star Baby Blanket Pattern:

With black yarn and 5 mm crochet hook:

  • Ch 103, in second ch from your hook, make 1 hdc in each ch across (102 sts)
  • Rows 1-62: Turn, ch 1 and follow the squares on the graph. The white squares indicate that 1 white hdc should be placed and the same with the black. I started Row 1 by reading the graph, left to right. Please see image above or high quality PDF below.
  • Click here for PDF version of the pattern.
  • If you want to make the shell border, don’t cut your yarn yet. When I ended the last row, I had black yarn on my hook already, so I went ahead and cut the white yarn off.

Shell Border (optional)

With 5 mm crochet hook and black yarn:

  • If you haven’t already, turn and ch 1. Skip 2 sts, in the third st make a total of 5 dcs, all separted by a ch 1 (do not ch 1 after the 5th dc).
  • In other words, in the same st: dc and ch 1, dc and ch1, dc and ch1, dc and ch1, and dc.
  • Skip 2 sts and make a sl st in the next st.
  • Repeat all the way to the end of the row. 
Start of the shell border
Turn and ch 1
Close up of shell stitch
Dc and ch 1 x4, dc
3 shell stitches for border
3 shells
  • You should end with a sl st in the last st (if not it’s ok if a shell is there, just keep repeating the pattern around).
  • If you end with a sl st in the last st, ch 1 to adjust for the corner and sl st into the same st.
  • Continue to skip 2 sts (or rows now that we’re down the side) make the shell, sl st, skip 2, all the way around the blanket.
  • The sides of the blanket can be difficult to see where you need to skip two and put your stitches. Try you’re best to stay consistent on both sides. I would count the shells to make sure they match.

And you’re done! I think this black and white star baby blanket turned out great! It took some time, but we always stitch with love, don’t we? 

As always, thank you for checking out my crochet patterns! Until next time!

A Whale of a Pattern! Try this Free Crochet Pattern Today!

Learn to crochet this free whale pattern in a day! This post contains: materials needed, the free whale pattern, and pictures to help guide you.

***Please note that this post may contain affiliate links. This means that I may receive a commission if you purchase something through these links (at no cost to you!). Thank you for your support!***

Summer is finally here! Can you believe it? I feel like this year has flown by so quickly and it’s more than halfway over! 

Why not celebrate by crocheting this cute little whale? I had a lot of fun coming up with another crochet stuffed animal, and having it be nautical themed just seemed appropriate for the season.

This crochet whale toy is made very similarly to my frog toy. I will admit, that I’ve been in the groove for making these flatter stuffed animals. They are kind of like amigurimi, but you have to sew two sides of the project together. 

When completed, the whale is about 7″ x 5,” but depends on your tension.

I use Red Heart Super Saver, medium 4 worsted weight yarn for this project. You can use a different type of yarn if you prefer. If it’s not medium 4 worsted weight, then it might come out bigger or smaller than expected!

This project took me less than a day to complete, so it’s a super quick crochet pattern. Perfect for a last minute crochet gift!

Alright let’s dive in!

Materials Needed:

  • 5 mm crochet hook 
  • <1 skein of Dusty Gray Yarn by Red Heart Super Saver 
  • <1 skein of Soft White Yarn by Red Heart Super Saver
  • <1 skein of Black Yarn by Red Heart Super Saver 
  • Poly-fil for stuffing
  • Stitch marker
  • Tapestry Needle
  • Scissors

Abbreviations Used:

(Please note that these are in US terms, not UK)

  • Ch – chain
  • Mc – magic circle
  • St – stitch
  • Sl st – slip stitch
  • Sc – single crochet
  • Hdc – half double crochet

Special Instructions:

  • When working on the body of the crochet whale, do not join to your first stitch with a slip stitch. Continue to single crochet around. Your stitch marker will come in handy to mark the beginning of your rounds. That way, you won’t get lost.
  • When working the tail of the whale (haha), you will notice that some of the rows do not require chain 1’s. This is intentional.
  • I sew both the whale panels together using slip stitches with the crochet hook. Instead of cutting my yarn and pulling through for the second side of the whale, I keep my hook on so I can do this. This step is up to you, you can sew with the tapestry needle instead if you would like.
  • Sew the facial features onto the front panel before joining the two panels together. This is so you can tie your strands of yarn securely inside of the whale.
  • The rounds end with a (x), where x represents the number of stitches you should have.

Crochet Whale Body (Front Panel)

With 5 mm crochet hook and Dusty Gray yarn:

Main Body:
  • 6 sc in mc (if you don’t like the mc, you can ch 2 and start in the second from the hook, but the center “hole” tends to be a little bigger)
  • Round 1: 2 sc in each st around (12 sts)
  • Round 2: 2 sc in first st, 1 sc in next st. Repeat around (18 sts)
  • Round 3: 2 sc in first st, 1 sc in next 2 sts. Repeat around (24 sts)
  • Round 4: 2 sc in first st, 1 sc in next 3 sts. Repeat around (30 sts)
  • Round 5: 2 sc in first st, 1 sc in next 4 sts. Repeat around (36 sts)
  • Round 6: 2 sc in first st, 1 sc in next 5 sts. Repeat around (42 sts)
  • Round 7: 2 sc in first st, 1 sc in next 6 sts. Repeat around, sl st into the first st (48 sts)
Tail:
  • Round 8: Ch 1, turn, 1 sc in next 5 sts, sl st into next 5 sts (10 sts)
  • Round 9: Turn, sl st into next 3 sts (do not sl st into the first st after you turn…sl st into the next, you’ll lose a st here), 1 hdc into next 2 sts, 1 sc in next 4 sts (9 sts)
  • Round 10: Ch 1, turn, 1 sc into next 3 sts, sl st into next 2 sts (5 sts)
  • Round 11: Turn, sl st into next st (again, not the first st, but the next). 1 hdc in next st, 1 sc in next 2 sts (4 sts)
  • Round 12: Ch 1, turn, 1 sc in next sts (2 sts)
  • Round 13: Ch 4, turn, (from second ch from hook), 1 sc into next 5 sts (see pic below) (5 sts)
  • Round 14: Ch 4, turn, (from second ch from hook), 1 sc into next 3 sts, sl st into next 2 sts, 1 sc into next 3 sts (8 sts)
  • Round 15: Turn, sl st into next 4 sts, 1 sc in last 3 sts (7 sts)
  • Cut yarn with scissors and pull through.
Beginning of crochet whale fin
Round 13
Middle of crochet whale fin
Round 14 (where to sl st)
Finished fin
Round 15

Crochet Whale Body (Back Panel)

With 5 mm crochet hook and Dusty Gray yarn:

Body:
  • 6 sc in mc
  • Repeat Rounds 1-6 from front panel (above). 
  • Round 7: 2 sc in first st, 1 sc in next 6 sts, Repeat around (48 sts)
Tail (Back Panel):
  • Round 8: 1 sc in next 5 sts (5 sts)
  • Round 9: Ch 1, turn, 1 sc in next 5 sts, sl st into next 5 sts (10 sts)
  • Round 10: Turn, sl st into next 3 sts (do not sl st into the first st after you turn…sl st into the next, you’ll lose a st here), 1 hdc into next 2 sts, 1 sc in next 4 sts (9 sts)
  • Round 11: Ch 1, turn, 1 sc into next 3 sts, sl st into next 2 sts (5 sts)
  • Round 12: Turn, sl st into next st (again, not the first st, but the next). 1 hdc in next st, 1 sc in next 2 sts (4 sts)
  • Round 13: Ch 1, turn, 1 sc in next sts (2 sts)
  • Round 14: Ch 4, turn, (from second ch from hook), 1 sc into next 5 sts (see pic below) (5 sts)
  • Round 15: Ch 4, turn, (from second ch from hook), 1 sc into next 3 sts, sl st into next 2 sts, 1 sc into next 3 sts (8 sts)
  • Round 16: Turn, sl st into next 4 sts, 1 sc in last 3 sts (7 sts)
  • Do not cut yarn yet.

Belly

With 5 mm crochet hook and Soft White Yarn:

  • Ch 10
  • Row 1: From second ch from hook, 1 sc into the next 6 chs across, sl st into last 3 chs (9 sts)
  • Row 2: Ch 1, turn, sl st into the next 3 sts, make 1 hdc in next 6 sts (9 sts)
  • Row 3: Ch 1, turn, 1 hdc in next 3 sts, 1 sc in next 2 sts, sl st into the next 4 sts (9 sts)
  • Cut a long piece of yarn of for sewing later and pull through.
Belly of whale in soft white yarn
Finished Whale Belly

Facial Features:

  • With your tapestry needle, sew the belly of the whale onto the front panel. Place the belly in the bottom middle of the crochet whale body.
  • Tie off excess yarn in the back of the panel (this will be hidden inside the whale when completed)
  • With Black yarn, cute 3 long strands off with scissors.
  • Sew on the left and right closed eyes, as well as the smile. I like to make a line straight across and then “catch” it a row or so below in the middle. This helps create the “U” shape. See picture below to use as a reference. Tie off excess yarn in the back.
Front panel of crochet whale with finished facial features
Finished Facial Features

Arms (make 2):

With 5 mm crochet hook and Dusty Gray yarn:

  • Ch 4
  • Row 1: From second ch from hook, make 1 hdc in next 2 chs, sl st in last ch (3 sts)
  • Cut a length of yarn for sewing and pull through.
Finished Crochet whale arm
Finished Whale Arm
Front and Back Panels of Crochet Whale Pattern
Front and Back Panels
  • Sew both crochet whale arms onto front panel. The whale’s right arm (your left) will be sewn right on the edge of the front panel. See picture above for reference. Tie off excess yarn in the back.
  • Pick up the back panel of the whale body. Line up the front and the back panels so that they match up evenly. Make sure that the correct sides are facing out.
  • With your 5 mm crochet hook and the back panel, sl st into both the front and back panels of the crochet whale to sew them together. Do not completely sew shut.
  • Leave an open space large enough to stuff the body with poly-fil. Continue to sl st sew along after stuffing.
  • Cut yarn and pull through.
  • Weave in any extra yarn ends with tapestry needle.

And that’s it! I think this little crochet stuffed whale turned out pretty cute. What do you think?

As always, thank you for checking out my crochet patterns! Until next time!

Crochet Whale Pattern by Strommercrafts Pin

Make a Stuffed Crochet Frog in an Afternoon!

Hello everyone! Today we are going to learn how to make a stuffed crochet frog toy! This pattern is so easy and quick, you can crochet this little guy in an afternoon!

***Please note that this post may contain affiliate links. This means that I may receive a commission if you purchase something through these links (at no cost to you!). Thank you for your support!***

Okay, so I was inspired to make my little frog friend to go along with my Frog Bucket Hat I made a few months ago. I use the same green yarn for both patterns so they match! Here they are side by side:

Crochet Stuffed Frog and Crochet Frog Bucket Hat

I think they’re so cute together! 

When I was creating this little crochet frog friend, I couldn’t decide if I wanted to give him arms or not. I decided to add arms, but did this using an amigurumi technique by working in a magic circle. The belly is also made with this technique.

If you like how your frog looks without the arms, you can leave them off.

I used medium 4 worsted weight, acrylic yarn. You can use any kind of yarn you would like as long as it’s the correct weight. I just really like the yarn from Red Heart for fun projects like this. Especially since it’s reasonably priced and comes in so many colors.

When finished, he is about 5″ x 5.5″ (give or take, all depends on your tension!)  

Ready to learn how to make your cute, little, crochet frog stuffy? Let’s get started!

Materials Needed:

Abbreviations Used:

  • Ch – chain
  • St(s) – stitch(es)
  • Sl st – slip stitch
  • Sc – single crochet
  • Sc2tog – single crochet two stitches together
  • Mc – magic circle

Special Considerations:

  • When making the body of the frog, the chain 1 does not count as a stitch.
  • When working in the magic circle, do not join to the first st with a slip stitch, just continue single crocheting around (a stitch marker is helpful to keep track of your rounds).
  • The number in parenthesis at the end of the row/round, indicates how many stitches you should have.
  • When finished with the 2nd body panel (do not cut yarn, leave your hook on there if you want to sl st them together)

Body of Frog (make 2):

With 5 mm crochet hook and lime green yarn:

  • Ch 11
  • Row 1: From second ch from hook, sc in each ch across (10 sts)
  • Row 2: Turn, ch 1, make 2 sc in first st, sc in each st across until last st, make 2 sc in last st (12 sts)
  • Row 3: Turn, ch 1, make 2 sc in first st, sc in each st across until last st, make 2 sc in last st (14 sts)
  • Row 4: Turn, ch 1, make 2 sc in first st, sc in each st across until last st, make 2 sc in last st (16 sts)
  • Row 5-8: Turn, ch 1, sc in each st across (16 sts)
  • Row 9: Turn, ch 1, sc2tog, sc in each st across until the last two sts, sc2tog (14 sts)
  • Row 10-11:  Turn, ch 1, sc in each st across (14 sts)
  • Row 12: Turn, ch 1, make 3 sc in first st, sc in each st across until last st, make 3 sc in last st (18 sts)
  • Row 13: Turn, ch 1, make 2 sc in first st, sc in each st across until last st, make 2 sc in last st (20 sts)
  • Row 14: Turn, ch 1, sc2tog, sc in each st across until last two sts, sc2tog (18 sts)
  • Row 15: Turn, ch 1, sc2tog, 1 sc in next st, sl st into next 4 sts loosely, 1 sc in next 4 sts, sl st into next 4 sts loosely, 1 sc in next st, sc2tog (16 sts)
  • Row 16: Turn, ch 1, 2 sc in first st, sc2tog, sl st into next 3 sts loosely, 1 sc in next 4 sts, sl st into next 3 sts, sc2tog, 2 sc in last st (16 sts)
  • Sl st into same st, cut a reasonable length off and pull through for the FIRST PANEL.
  • If you don’t cut your yarn for the second panel, it can be easy to sew them together by sl sting later. If you want to make the arms, I would suggest sewing the panels together first and then making the arms (unless you would rather sew with your needle, totally up to you).
How body of crochet frog stuffy should look
Completed Body

Eyes (make 2):

With 5 mm hook and black yarn:

  • Ch 3
  • Row 1: From second ch from hook, 1 sc in next 2 chs (2 sts)
  • Cut a reasonable length of yarn for sewing and pull through.

Belly:

With 5 mm hook and soft white yarn:

  • Make 6 sc in mc (6 sts)
  • Round 1: Make 2 scs in each st around (12 sts) [You can use a stitch marker to mark the begining/end of your round so you can count your stitches]
  • Round 2: Make 2 scs in next st, 1 sc in next st. Repeat around (18 sts)
  • Round 3: Make 2 scs in next st, 1 sc in next 2 sts. Repeat around (24 sts)
  • Cut a long piece of yarn off for sewing later, and pull through.

Arms (optional, make 2)

With 5 mm hook and lime green yarn:

  • Make 6 sc in mc (6 sts)
  • Round 1-3: Sc in each st around (6 sts)
  • Cut a long piece of yarn off for sewing later and pull through.
Finished frog arm

Assembly:

  • Step 1: Start by sewing facial features onto one of the body panels (see pic below). Tie excess yarn securely in the back.
  • Step 2: Sew the mouth on with a piece of long black yarn. Insert needle into row even with the bottom of the eyes. Go 5 sts across. Insert needle 3 rows below your “line” and catch it to create a V smile (see pic below). Tie excess yarn securely in the back.
  • Step 3: Sew the belly on by lining the bottom of the belly up with the bottom of the body. Tie excess yarn securely in the back.
  • The tied off portions will be hidden inside the frog. Don’t worry about how messy your yarn looks for now!
  • Step 4: With the second body panel, line it up with the first. Use your crochet hook to sew them together by slip stitching around. Leave one side open.
  • Step 5: Stuff with poly-fil to your liking. Continue to sew across by slip stitching until the last st. Cut yarn and pull through. Sew tail with tapestry needle.  
Finished crochet frog with arms
Step 1
How to sew on mouth
Step 2
Line up body panels of the frog
Step 4
Stuffing the body
Step 5

You’re all done! What a fun crochet project this was, and I really think it pairs well the Frog Bucket Hat. Make them both as a baby shower gift or just for fun for the kids!

Does the crochet frog stuffy look great with or without the arms? Which one do you think looks better? Let me know in the comments below!

Add a Little Texture to Your Life! 2 Beautiful Crochet Dishcloths in Peaches and Creme Yarn

***This post may contain affiliate links. This means if you click on a link and make a purchase, I may make a commission at no extra cost to you***

In this post you’ll find: the crochet pattern for both dishcloths and materials used.

Hello everyone! Today I bring you not just one, but TWO dishcloth patterns with gorgeous texture! I am using the Peaches and Creme yarn in Linen to make these.

I am so in love with the Peaches and Creme yarn line. The yarn literally looks like peaches and creme! Not only is it beautiful, but the cotton yarn feels so nice to touch. It’s soft, but durable!

If you enjoy these crochet textures and this yarn, check out my previous post on another Peaches and Creme dishcloth here!

Starting left to right, the patterns are: the Bean Stitch Dishcloth and the Crunchy Stitch Dishcloth

Both are very simple stitches that even a beginner crocheter can do. The bean stitch is a combination of single crochets, puffs, and chains. The crunchy stitch is a combination of slip stitches and half double crochets. They both give off a texture that looks somewhat complex, but they are SO easy.

Here’s a close up of that beautiful texture from the Bean Stitch Dishcloth:

Close up of bean stitch dishcloth with peaches and creme stripey linen
Bean Stitch

And here’s a close up of the Crunchy Stitch Dishcloth:

Close up of crunchy stitch dishcloth with peaches and creme stripey linen
Crunchy Stitch

Aren’t they just pretty?

These crochet dishcloths measure around 7″ x 7″ (depending on your tension) when completed.

The bean stitch and crunchy stitch patterns can be made not just for dishcloths, but blankets, hats, scarves, and others! The patterns provided have instructions on how to increase the size if needed.

Materials Needed for Both Patterns:

Abbreviations Used:

  • ch(s) – chain(s)
  • st – stitch
  • sl st – slip stitch
  • sc – single crochet
  • hdc – half double crochet

Special Instructions:

  • Instructions are made in US crochet terms, not UK.
  • Repeat pattern between *and* when indicated.
  • For the bean stitch dishcloth pattern, the turning chain does NOT count as a stitch.
  • The bean stitch is comprised of puff stitches, this is how you need to make the puff for this pattern:
    • Step 1: insert hook into the st, yarn over, draw up a loop [2 loops on hook]
    • Step 2: insert into the same st, yarn over, draw up a loop [4 loops on hook]
    • Step 3: insert hook into the same st again, yarn over, draw up a loop [6 loops on hook]
    • Step 4: yarn over and pull through all 6 loops

Bean Stitch Dishcloth Pattern:

  • Ch 26 (or any even number of chs), turn
  • Row 1: Sc in each ch, turn
  • Row 2: Ch 1, sc in next st, skip the next st, make 1 puff st in the next st (see special instructions), *ch 1, skip next st, make 1 puff st in the next st* repeat from *to* until the last st, make 1 sc in last st, turn
  • Row 3-21 (or until desired height): Repeat instructions for Row 2
  • Border (optional): turn, ch 1, sc in each st across until the corner, make a (sc, ch 1, sc), and continue making sc down the sides of the dishcloth. Sl st into the last st. 
  • Cut yarn, pull through and weave in end with tapestry needle.
Crunchy Stitch Dishcloth:

  • Ch 26 (or any even number of chs)
  • Row 1: Sl st in the 2nd ch from your hook, *1 hdc in next ch, sl st into next ch,* repeat from *to,* turn
  • Row 2: Ch 2 (counts as first hdc), *Sl st into next hdc, 1 hdc into the next sl st,* repeat from *to,* turn
  • Row 3: *Sl st into next hdc, 1 hdc in next sl st,* repeat from *to*, sl st into turning ch
  • Row 4-25: Repeat rows 2 and 3
  • Border (optional): turn, ch 1, sc in each st across until the corner, make a (sc, ch 1, sc), and continue making sc down the sides of the dishcloth. Sl st into the last st. 
  • Cut yarn, pull through and weave in end with tapestry needle. 
As always, thank you for checking out these patterns and I hope you enjoy! I always love a good texture, and the Peaches and Creme yarn makes for wonderful dishcloths.

Happy crocheting!

Peaches and Creme Yarn: Beautiful Crochet Dishcloth Pattern (Free)

***This post may contain affiliate links. This means if you click on a link and make a purchase, I may make a commission at no extra cost to you***

Hello everyone! Today I thought I would share my next crochet project with you; dishcloths! But it’s not just any dishcloth, it’s a dishcloth that has a beautiful texture with beautiful yarn! The yarn that I’ve used for this pattern is called Peaches and Creme Ombre – Oasis. 

This is a cotton yarn which is great for practical crochet projects like dishcloths. It’s softer and much more durable than acrylic. Plus it just feels so much nicer to hold and feel.

I really am quite happy with the way that the yarn looks in this pattern too. Sometimes with the speckled or striped yarns, it’s difficult to tell how it’ll look with your project. The little chocolate and brownish-red flecks break up that main beige color in such a way that’s pleasing to the eye.

The texture created is really simple too. It’s a combination of a single crochet and two double crochets in the same stitch, then skipping two stitches. The stitches lay in such a way that it makes a subtle “bulge” in the project, creating a beautiful, squishy texture.

When finished, the dishcloth measures about 7″ x 7″ (give or take depending on your gauge). 

Here’s a close up of the texture with the Peaches and Creme Oasis yarn:

Close up of textured dishcloth in peaches and creme oasis cotton yarn

Pretty isn’t it? 

As always, you can use any type of yarn you like for this project, and it doesn’t have to be a dishcloth. You can make a blanket or a scarf or a burp cloth for example. Just make sure your yarn is a medium 4 weight yarn or else it might come out too big or small!

If you like this pattern, you might also want to check out my Easy Textured Burp Cloth pattern (which has another beautiful, squishy texture to it).

Materials Used:

  • 5 mm crochet hook
  • 1 little skein (2oz) of Peaches and Creme Cotton Yarn – Oasis 
  • Scissors
  • Tapestry Needle

Abbreviations Used:

Please note that I am using US crochet terms and not UK crochet terms for this pattern.

  • ch(s) – chain(s)
  • sc – single crochet
  • dc – double crochet
  • st(s) – stitch(es)
  • sl st – slip stitch

Special Considerations:

  • If you need to adjust the size of your project, chain a multiple of 13 + 1.
  • The turning chain does not count as a stitch.

Textured Crochet Dishcloth Pattern:

  • Ch 26
  • Row 1: From second ch from hook, make *(1 sc, 2 dc) in the same ch, skip 2 chs.* Repeat from *to* until you reach the last 3 chs. Make 1 sc in last ch. Turn (25 sts)
  • Row 2: Ch 1, (turning ch does not count as a st) make *(1 sc, 2 dc) in the next st, skip next 2 sts.* Repeat from *to* until you reach the last 3 sts, 1 sc in last st. Turn (25 sts)
  • Row: 3-18 (or until desired height): Repeat Row 2
Ch 26 for Peaches and Creme Dishcloth
Ch 26
Beginning of Row 2 for Textured Dishcloth
Beginning of Row 2
End of Row 2 for textured dishcloth pattern
End of Row 2
Textured Dishcloth using Peaches and Creme Oasis Cotton Yarn
Completed Peaches and Creme Dishcloth with border!

You can sc a border around the dishcloth if you’d like, but it is totally optional. Otherwise cut your yarn, pull through, and weave in end with tapestry needle.

Border: sc in each st across until the last st, (sc, ch 1, sc) in the corner st. Crocheting down the side of a project can be challenging, since we are making a square, try to make the side as even as the top/bottom (so 25 sts). Continue making (sc, ch 1, sc) in the corner sts and sc across until the last st. Sl st to last stitch, Cut yarn and pull through. Weave in end with tapestry needle. 

As always, thank you for reading this post and happy crocheting! Until next time!

Duck Bucket Hat – Free Crochet Pattern

Hello everyone, I wanted to share with you my latest creation; a crochet duck bucket hat! Now that it’s getting warmer, I’ve been in the mood to make less wintery hats and focus more on summer time crochet patterns.

I was inspired to create this little guy after I finished my Frog Bucket Hat. I think both turned out super cute!

The Duck Bucket Hat (pictured above) is toddler size, however I do have different sizes included. If you need help determining your hat size, I have a size chart here.

I have estimated sizes underneath each hat size. Please note that these may be a little bigger or smaller depending on your tension. 

As always, you can use any yarn type (this is acrylic), as long as it’s worsted medium weight #4. If you use different yarn weights and hook sizes, your hat might come out too big or small!

I use a magic circle to start the duck bucket hat, but you can use a chain 2 and start your hat in the second chain from your hook if you prefer. If you need help with starting a magic circle, see my previous post here.

The brim of a bucket hat is created by working in the front loop of the next stitch. If you look at the top of your stitch, you can see that there are two little “bars” next to each other. The “bar” that is closest to you is the front one. 

Crocheting in the front loop makes your stitches go out instead of down! Very useful for making brims on hats.

Please also note that on this page, instructions for the different size hats is displayed first and the facial features are at the bottom of this page. I use the same size eyes, beak and hair tufts for all the sizes, however feel free to adjust and make bigger or small by taking away or adding stitches.

Alright, let’s get to the pattern!

Please note that some of these links are affiliate links. That means that if you click on these links and make a purchase, I may receive a commission at no extra cost to you. You can find more information about our disclosure policy here. Thank you for supporting Strommer Crafts!

Materials Used:

Abbreviations Used:

  • Mc – magic circle
  • Ch – chain
  • St(s) – stitch(es)
  • Sl st -slip stitch
  • Sc – single crochet
  • Hdc – half double crochet
  • Dc – double crochet

Special Considerations:

  • The beginning chain does not count as a stitch in the bucket hat.
  • Every round starts in the same stitch as the beginning chain in the bucket hat.
  • Slip stitch to the first stitch of the round to join (not the beginning chain) in the bucket hat.
  • Repeat instructions between *and* when indicated.
  • You will see (x) at the end of the instructions for each round/row. X indicates how many stitches you should have when finished with that round/row.
  • Use pins to keep the eyes, beak and hair tufts in placed while sewing (this step is not totally necessary, just a preference).

Crochet Duck Bucket Hat Pattern

Newborn Size:

Hat circumference: 13″ | Hat length: 5″

With Bright Yellow yarn and 5mm crochet hook:

  • Round 1: Make 8 hdc in mc, sl st to first st (8 sts)
  • Round 2: Ch 1, *2 hdc in next stitch* repeat around, sl st to first st (16 sts)
  • Round 3: Ch 1, *2 hdc in next st, 1 hdc in next st* repeat around, sl st to first st (24 sts)
  • Round 4: Ch 1, *2 hdc in next st, 1 hdc in next 2 sts* repeat around, sl st to first st (32 sts)
  • Round 5: Ch 1, *2 hdc in next st, 1 hdc in next 3 sts* repeat around sl st into first st (40 sts)
  • Round 6: Ch 1, *2 hdc in next st, 1 hdc in next 7 sts* repeat around sl st into first st (45 sts)
  • Round 7-13: Ch 1, hdc in each st around, sl st into first st (45 sts)
Hat Brim:
  • Round 14: Ch 1, *2 hdc in front loop of next st, 1 hdc in front loop of next st* repeat around, Sl st to first st (68 sts)
  • Round 15-16 (or until desired length): Ch 1, hdc in each st around, sl st to first st (68 sts)

Cut yarn and pull through. Weave in end using your tapestry needle.

***See at the end of page for eye, beak, and hair tuft instructions***

0-3 Months:

Hat circumference: 14″ | Hat length: 5.25″

With Bright Yellow yarn and 5 mm crochet hook:

  • Round 1: Make 8 hdc in mc, sl st to first st (8 sts)
  • Round 2: Ch 1, *2 hdc in next stitch* repeat around, sl st to first st (16 sts)
  • Round 3: Ch 1, *2 hdc in next st, 1 hdc in next st* repeat around, sl st to first st (24 sts)
  • Round 4: Ch 1, *2 hdc in next st, 1 hdc in next 2 sts* repeat around, sl st to first st (32 sts)
  • Round 5: Ch 1, *2 hdc in next st, 1 hdc in next 3 sts* repeat around, sl st to first st (40 sts)
  • Round 6: Ch 1, *2 hdc in next st, 1 hdc in next 4 sts* repeat around, sl st to first st (48 sts)
  • Round 7-14: Ch 1, hdc in each st around, sl st to first st (48 sts)
Hat Brim: 
  • Round 15: Ch 1, *2 hdc in front loop of next st, 1 hdc in front loop of next st* repeat around, Sl st to first st (72 sts)
  • Round 16-17 (or until desired length): Ch 1, hdc in each st around, sl st to first st (72 sts)

Cut yarn and pull through. Weave in end using your tapestry needle.

***See at the end of page for eye, beak, and hair tuft instructions***

3-6 Months: 

Hat circumference: 15″ | Hat length: 5.75″

With Bright Yellow yarn and 5 mm crochet hook:

  • Round 1: Make 8 hdc in mc, sl st to first st (8 sts)
  • Round 2: Ch 1, *2 hdc in next stitch* repeat around, sl st to first st (16 sts)
  • Round 3: Ch 1, *2 hdc in next st, 1 hdc in next st* repeat around, sl st to first st (24 sts)
  • Round 4: Ch 1, *2 hdc in next st, 1 hdc in next 2 sts* repeat around, sl st to first st (32 sts)
  • Round 5: Ch 1, *2 hdc in next st, 1 hdc in next 3 sts* repeat around, sl st to first st (40 sts)
  • Round 6: Ch 1, *2 hdc in next st, 1 hdc in next 4 sts* repeat around, sl st to first st (48 sts)
  • Round 7: Ch 1, *2 hdc in next st, 1 hdc in next 11 sts* repeat around, sl st to first st (52 sts)
  • Round 8-15: Ch 1, hdc in each st around, sl st to first st (52 sts)
Hat Brim:
  • Round 16: Ch 1, *2 hdc in front loop of next st, 1 hdc in front loop of next st* repeat around, Sl st to first st (78 sts)
  • Round 17-18 (or until desired length): Ch 1, hdc in each st around, sl st to first st (78 sts)

Cut yarn and pull through. Weave in end using your tapestry needle.

***See at the end of page for eye, beak, and hair tuft instructions***

6-12 Months:

Hat circumference: 16″ | Hat length: 6.25″

With Bright Yellow yarn and 5 mm hook:

  • Round 1: Make 8 hdc in mc, sl st to first st (8 sts)
  • Round 2: Ch 1, *2 hdc in next stitch* repeat around, sl st to first st (16 sts)
  • Round 3: Ch 1, *2 hdc in next st, 1 hdc in next st* repeat around, sl st to first st (24 sts)
  • Round 4: Ch 1, *2 hdc in next st, 1 hdc in next 2 sts* repeat around, sl st to first st (32 sts)
  • Round 5: Ch 1, *2 hdc in next st, 1 hdc in next 3 sts* repeat around, sl st to first st (40 sts)
  • Round 6: Ch 1, *2 hdc in next st, 1 hdc in next 4 sts* repeat around, sl st to first st (48 sts)
  • Round 7: Ch 1, *2 hdc in next st, 1 hdc in next 5 sts* repeat around, sl st to first st (56 sts)
  • Round 8-16: Ch 1, hdc in each st around, sl st to first st (56 sts)
Hat Brim: 
  • Round 17: Ch 1, *2 hdc in front loop of next st, 1 hdc in front loop of next st* repeat around, sl st to first st (84 sts)
  • Round 18-19 (or until desired length): Ch 1, hdc in each st around, sl st to first st (84 sts)

Cut yarn with scissors and pull through. Weave in end using your tapestry needle.

***See at the end of page for eye, beak, and hair tuft instructions***

Toddler (1-3 Years):

Hat circumference: 17″ | Hat length: 7″

With Bright Yellow yarn and 5mm hook:

  • Round 1: Make 8 hdc in mc, sl st to first st (8 sts)
  • Round 2: Ch 1, *2 hdc in next stitch* repeat around, sl st to first st (16 sts)
  • Round 3: Ch 1, *2 hdc in next st, 1 hdc in next st* repeat around, sl st to first st (24 sts)
  • Round 4: Ch 1, *2 hdc in next st, 1 hdc in next 2 sts* repeat around, sl st to first st (32 sts)
  • Round 5: Ch 1, *2 hdc in next st, 1 hdc in next 3 sts* repeat around, sl st to first st (40 sts)
  • Round 6: Ch 1, *2 hdc in next st, 1 hdc in next 4 sts* repeat around, sl st to first st (48 sts)
  • Round 7: Ch 1, *2 hdc in next st, 1 hdc in next 5 sts* repeat around, sl st to first st (56 sts)
  • Round 8: Ch 1, *2 hdc in next st, 1 hdc in next 13 sts* repeat around, sl st to first st (60 sts)
  • Round 9-18: Ch 1, 1 hdc in each st around, sl st to first st (60 sts)
Hat Brim:
  • Round 19: Ch 1, *2 hdc in front loop of next st, 1 hdc in front loop of next st* repeat around, sl st to first st (90 sts)
  • Round 20-23 (or until desired length): Ch 1, hdc in each st around, sl st to first st (90 sts)

Cut yarn with scissors and pull through. Weave in end using your tapestry needle.

***See at the end of page for eye, beak, and hair tuft instructions***

Child (4-10 years):

Hat circumference: 18″ | Hat length: 7.5″

With Bright Yellow yarn and 5mm crochet hook:

  • Round 1: Make 8 hdc in mc, sl st to first st (8 sts)
  • Round 2: Ch 1, *2 hdc in next stitch* repeat around, sl st to first st (16 sts)
  • Round 3: Ch 1, *2 hdc in next st, 1 hdc in next st* repeat around, sl st to first st (24 sts)
  • Round 4: Ch 1, *2 hdc in next st, 1 hdc in next 2 sts* repeat around, sl st to first st (32 sts)
  • Round 5: Ch 1, *2 hdc in next st, 1 hdc in next 3 sts* repeat around, sl st to first st (40 sts)
  • Round 6: Ch 1, *2 hdc in next st, 1 hdc in next 4 sts* repeat around, sl st to first st (48 sts)
  • Round 7: Ch 1, *2 hdc in next st, 1 hdc in next 5 sts* repeat around, sl st to first st (56 sts)
  • Round 8: Ch 1, *2 hdc in next st, 1 hdc in next 6 sts* repeat around, sl st to first st (64 sts)
  • Round 9-20: Ch 1, hdc in each st around, sl st to first st (64 sts)
Hat Brim:
  • Round 21: Ch 1, *2 hdc in front loop of next st, 1 hdc in front loop of next st* repeat around, sl st to first st (96 sts)
  • Round 22-25 (or until desired length): Ch 1, hdc in each st around, sl st to first st (96 sts)

Cut yarn with scissors and pull through. Weave in end using your tapestry needle.

***See at the end of page for eye, beak, and hair tuft instructions***

Teen/Adult Small

Hat circumference: 19.5″ | Hat length: 7.75″

With Bright Yellow yarn and 5mm crochet hook:

  • Round 1: Make 8 hdc in mc, sl st to first st (8 sts)
  • Round 2: Ch 1, *2 hdc in next stitch* repeat around, sl st to first st (16 sts)
  • Round 3: Ch 1, *2 hdc in next st, 1 hdc in next st* repeat around, sl st to first st (24 sts)
  • Round 4: Ch 1, *2 hdc in next st, 1 hdc in next 2 sts* repeat around, sl st to first st (32 sts)
  • Round 5: Ch 1, *2 hdc in next st, 1 hdc in next 3 sts* repeat around, sl st to first st (40 sts)
  • Round 6: Ch 1, *2 hdc in next st, 1 hdc in next 4 sts* repeat around, sl st to first st (48 sts)
  • Round 7: Ch 1, *2 hdc in next st, 1 hdc in next 5 sts* repeat around, sl st to first st (56 sts)
  • Round 8: Ch 1, *2 hdc in next st, 1 hdc in next 6 sts* repeat around, sl st to first st (64 sts)
  • Round 9: Ch 1, *2 hdc in next st, 1 hdc in next 15 sts* repeat around, sl st to first st (68 sts)
  • Round 10-21: Ch 1, hdc in each st around, sl st to first st (68 sts)
Hat Brim:
  • Round 22: Ch 1, *2 hdc in front loop of next st, 1 hdc in front loop of next st* repeat around, sl st to first st (102 sts)
  • Round 23-26 (or until desired length): Ch 1, hdc in each st around, sl st to first st (102 sts)

Cut yarn with scissors and pull through. Weave in end using your tapestry needle.

***See at the end of page for eye, beak, and hair tuft instructions***

Adult Medium:

Hat circumference: 20.5″ | Hat length: 8″

With Bright Yellow yarn and 5mm crochet hook:

  • Round 1: Make 8 hdc in mc, sl st to first st (8 sts)
  • Round 2: Ch 1, *2 hdc in next stitch* repeat around, sl st to first st (16 sts)
  • Round 3: Ch 1, *2 hdc in next st, 1 hdc in next st* repeat around, sl st to first st (24 sts)
  • Round 4: Ch 1, *2 hdc in next st, 1 hdc in next 2 sts* repeat around, sl st to first st (32 sts)
  • Round 5: Ch 1, *2 hdc in next st, 1 hdc in next 3 sts* repeat around, sl st to first st (40 sts)
  • Round 6: Ch 1, *2 hdc in next st, 1 hdc in next 4 sts* repeat around, sl st to first st (48 sts)
  • Round 7: Ch 1, *2 hdc in next st, 1 hdc in next 5 sts* repeat around, sl st to first st (56 sts)
  • Round 8: Ch 1, *2 hdc in next st, 1 hdc in next 6 sts* repeat around, sl st to first st (64 sts)
  • Round 9: Ch 1, *2 hdc in next st, 1 hdc in next 7 sts* repeat around, sl st to first st (72 sts)
  • Round 10-21: Ch 1, hdc in each st around, sl st to first st (72 sts)
Hat Brim: 
  • Round 22: Ch 1, *2 hdc in front loop of next st, 1 hdc in front loop of next st* repeat around, sl st to first st (108  sts)
  • Round 23-26 (or until desired length): Ch 1, hdc in each st around, sl st to first st (108 sts)

Cut yarn with scissors and pull through. Weave in end using your tapestry needle.

***See at the end of page for eye, beak, and hair tuft instructions***

Adult Large:

Hat circumference: 21.75″ | Hat length: 8.25″

With Bright Yellow yarn and 5mm crochet hook:

  • Round 1: Make 8 hdc in mc, sl st to first st (8 sts)
  • Round 2: Ch 1, *2 hdc in next stitch* repeat around, sl st to first st (16 sts)
  • Round 3: Ch 1, *2 hdc in next st, 1 hdc in next st* repeat around, sl st to first st (24 sts)
  • Round 4: Ch 1, *2 hdc in next st, 1 hdc in next 2 sts* repeat around, sl st to first st (32 sts)
  • Round 5: Ch 1, *2 hdc in next st, 1 hdc in next 3 sts* repeat around, sl st to first st (40 sts)
  • Round 6: Ch 1, *2 hdc in next st, 1 hdc in next 4 sts* repeat around, sl st to first st (48 sts)
  • Round 7: Ch 1, *2 hdc in next st, 1 hdc in next 5 sts* repeat around, sl st to first st (56 sts)
  • Round 8: Ch 1, *2 hdc in next st, 1 hdc in next 6 sts* repeat around, sl st to first st (64 sts)
  • Round 9: Ch 1, *2 hdc in next st, 1 hdc in next 7 sts* repeat around, sl st to first st (72 sts)
  • Round 10: Ch 1, *2 hdc in next st, 1 hdc in next 17 sts* repeat around, sl st to first st (76 sts)
  • Round 11-22Ch 1, hdc in each st around (76 sts)
Hat Brim: 
  • Round 23: Ch 1, *2 hdc in front loop of next st, 1 hdc in front loop of next st* repeat around, sl st to first st (114 sts)
  • Round 24-27 (or until desired length): Ch 1, hdc in each st around, sl st to first st (114 sts)

Cut yarn with scissors and pull through. Weave in end using your tapestry needle.

***See at the end of page for eye, beak, and hair tuft instructions***

Eye, Beak, and Hair Tuft:

Use a 4 mm crochet hook for eyes, beak, and tufts.

Again, these are for all hat sizes. Feel free to adjust size if desired by adding or subtracting stitches/rows or by sizing up/down a hook size.

Eyes (make 2):

With Black yarn and 4 mm crochet hook:

  • Round 1: Make 5 dc in magic circle (5) 
  • Round 2: Use stitch marker to mark the next stitch. Do not sl st to the next st, continue crocheting in the round. Make 2 sc in each st around. Sl st to first st (10 sts)

Cut a long length of yarn for sewing later with your scissors, and pull through.

Beak:

Note that I am not counting the turning chain as a stitch.

With Pumpkin yarn and 4 mm crochet hook:

  • Row 1: Ch 2, make 1 sc in second ch from hook (1 sc)
  • Row 2: Ch 2, turn, make 2 dc in the previous sc you made (2 sts)
  • Row 3: Ch 2, turn, make 2 dc in next st, 1 dc in next st, and 2 dc in the top of the turning chain from the previous row (5 sts)
  • Row 4: Ch 2, turn, make 2 dc in next st, make 1 dc in the next 3 sts, make 2 dc in last st (not the turning chain this time) (7 sts)
  • Row 5: Ch 2, turn, make 2 dc in the next st, make 1 dc in next 5 sts, and make 2 dc in last st (9 sts)

Cut a long length of yarn for sewing later with your scissors, and pull through.

Beginning of beak
Row 1
Row 2 of beak
Row 2
Row 3 of beak
Row 3
Row 4 of beak
Row 4
Row 5 of beak
Row 5
Hair Tufts (make 6):

With Bright Yellow yarn and 4 mm crochet hook:

Row 1: Ch 10, from 3rd ch from hook, make 1 dc, make 1 hdc in next 2 chs, make 1 sc in next 2 chs, and make 1 sl st in next 3 chs (8 sts)

Cut a long length of yarn for sewing later with your scissors and pull through.

Row 1 hair
Ch 10
Row 1
Dc, hdc x2, sc x2, sl st x3

Assembly:

You will need to sew two pieces of the hair tufts together, that way you have a total of three “bulkier” pieces.

Line two tufts up and sew together with tapestry needle. Whip stitch, or use whichever sewing method you prefer. Do not cut off any excess yarn yet.

Line one tuft up on the top of the hat by placing one directly in the middle (there should be a larger hole there). Sew in place with tapestry needle. I like to tie the yarn ends together and cut of any excess, that way my assembled pieces are more secure.

Sew the next two tufts on each side of the middle tuft to create three cute little tufts coming from the top of the hat together. See pic below for reference.

Line the beak in the middle of the hat and sew in place. I think the beak looked better by lining the tip of the beak on the very last round prior to the brim. Feel free to use pins to keep the beak from moving around on you. Tie and cut off any excess.

Sew both eyes almost right on the two corners of the beak. Sew closer than you think you need to. If you sew them too far away from the beak, it tends to look a little wonky when the hat is worn. Wearing the hat will stretch the eyes away from each other a bit and the facial features might look a little silly.

Duck Bucket Hat

And there you have it! I hope you found this crochet duck bucket hat pattern fun and useful. 

This post was all about how to make a crochet duck bucket hat! 

Thank you and happy crocheting!