15 Small Crochet Doily Patterns

Hey everyone! Today, I’ve got a fantastic lineup of 15 Small Crochet Doily Patterns for you, and guess what? They’re all absolutely free! If you’ve been honing your crochet skills and are ready to tackle some doilies, this list is perfect for you.

Now, let me tell you, these small crochet doilies are some of the coolest finds I’ve stumbled upon on Pinterest. They’re all presented as crochet doily diagrams or charts, so if you’re not familiar with reading crochet charts, a quick Google search for a key will definitely be your friend to help you along the way.

Here’s the thing about doily patterns on Pinterest: there are tons of them out there, but surprisingly few come with written instructions! But don’t let that discourage you. Trust me when I say that you’ve got this! Even if you look at a crochet doily diagram and think, “OMG, this looks nuts,” just believe in yourself. If I can do it, you can too! 

The great thing about these diagrams is that they transcend language barriers. So regardless of where someone comes from or what language they speak, everyone can understand the pattern. 

Related Posts:

Please note that some of these links may be affiliate links. That means that if you click on these links and make a purchase, I may receive a commission at no extra cost to you. You can find more information about our disclosure policy here. Thank you for your support.

What do I mean by “small” crochet doilies? 

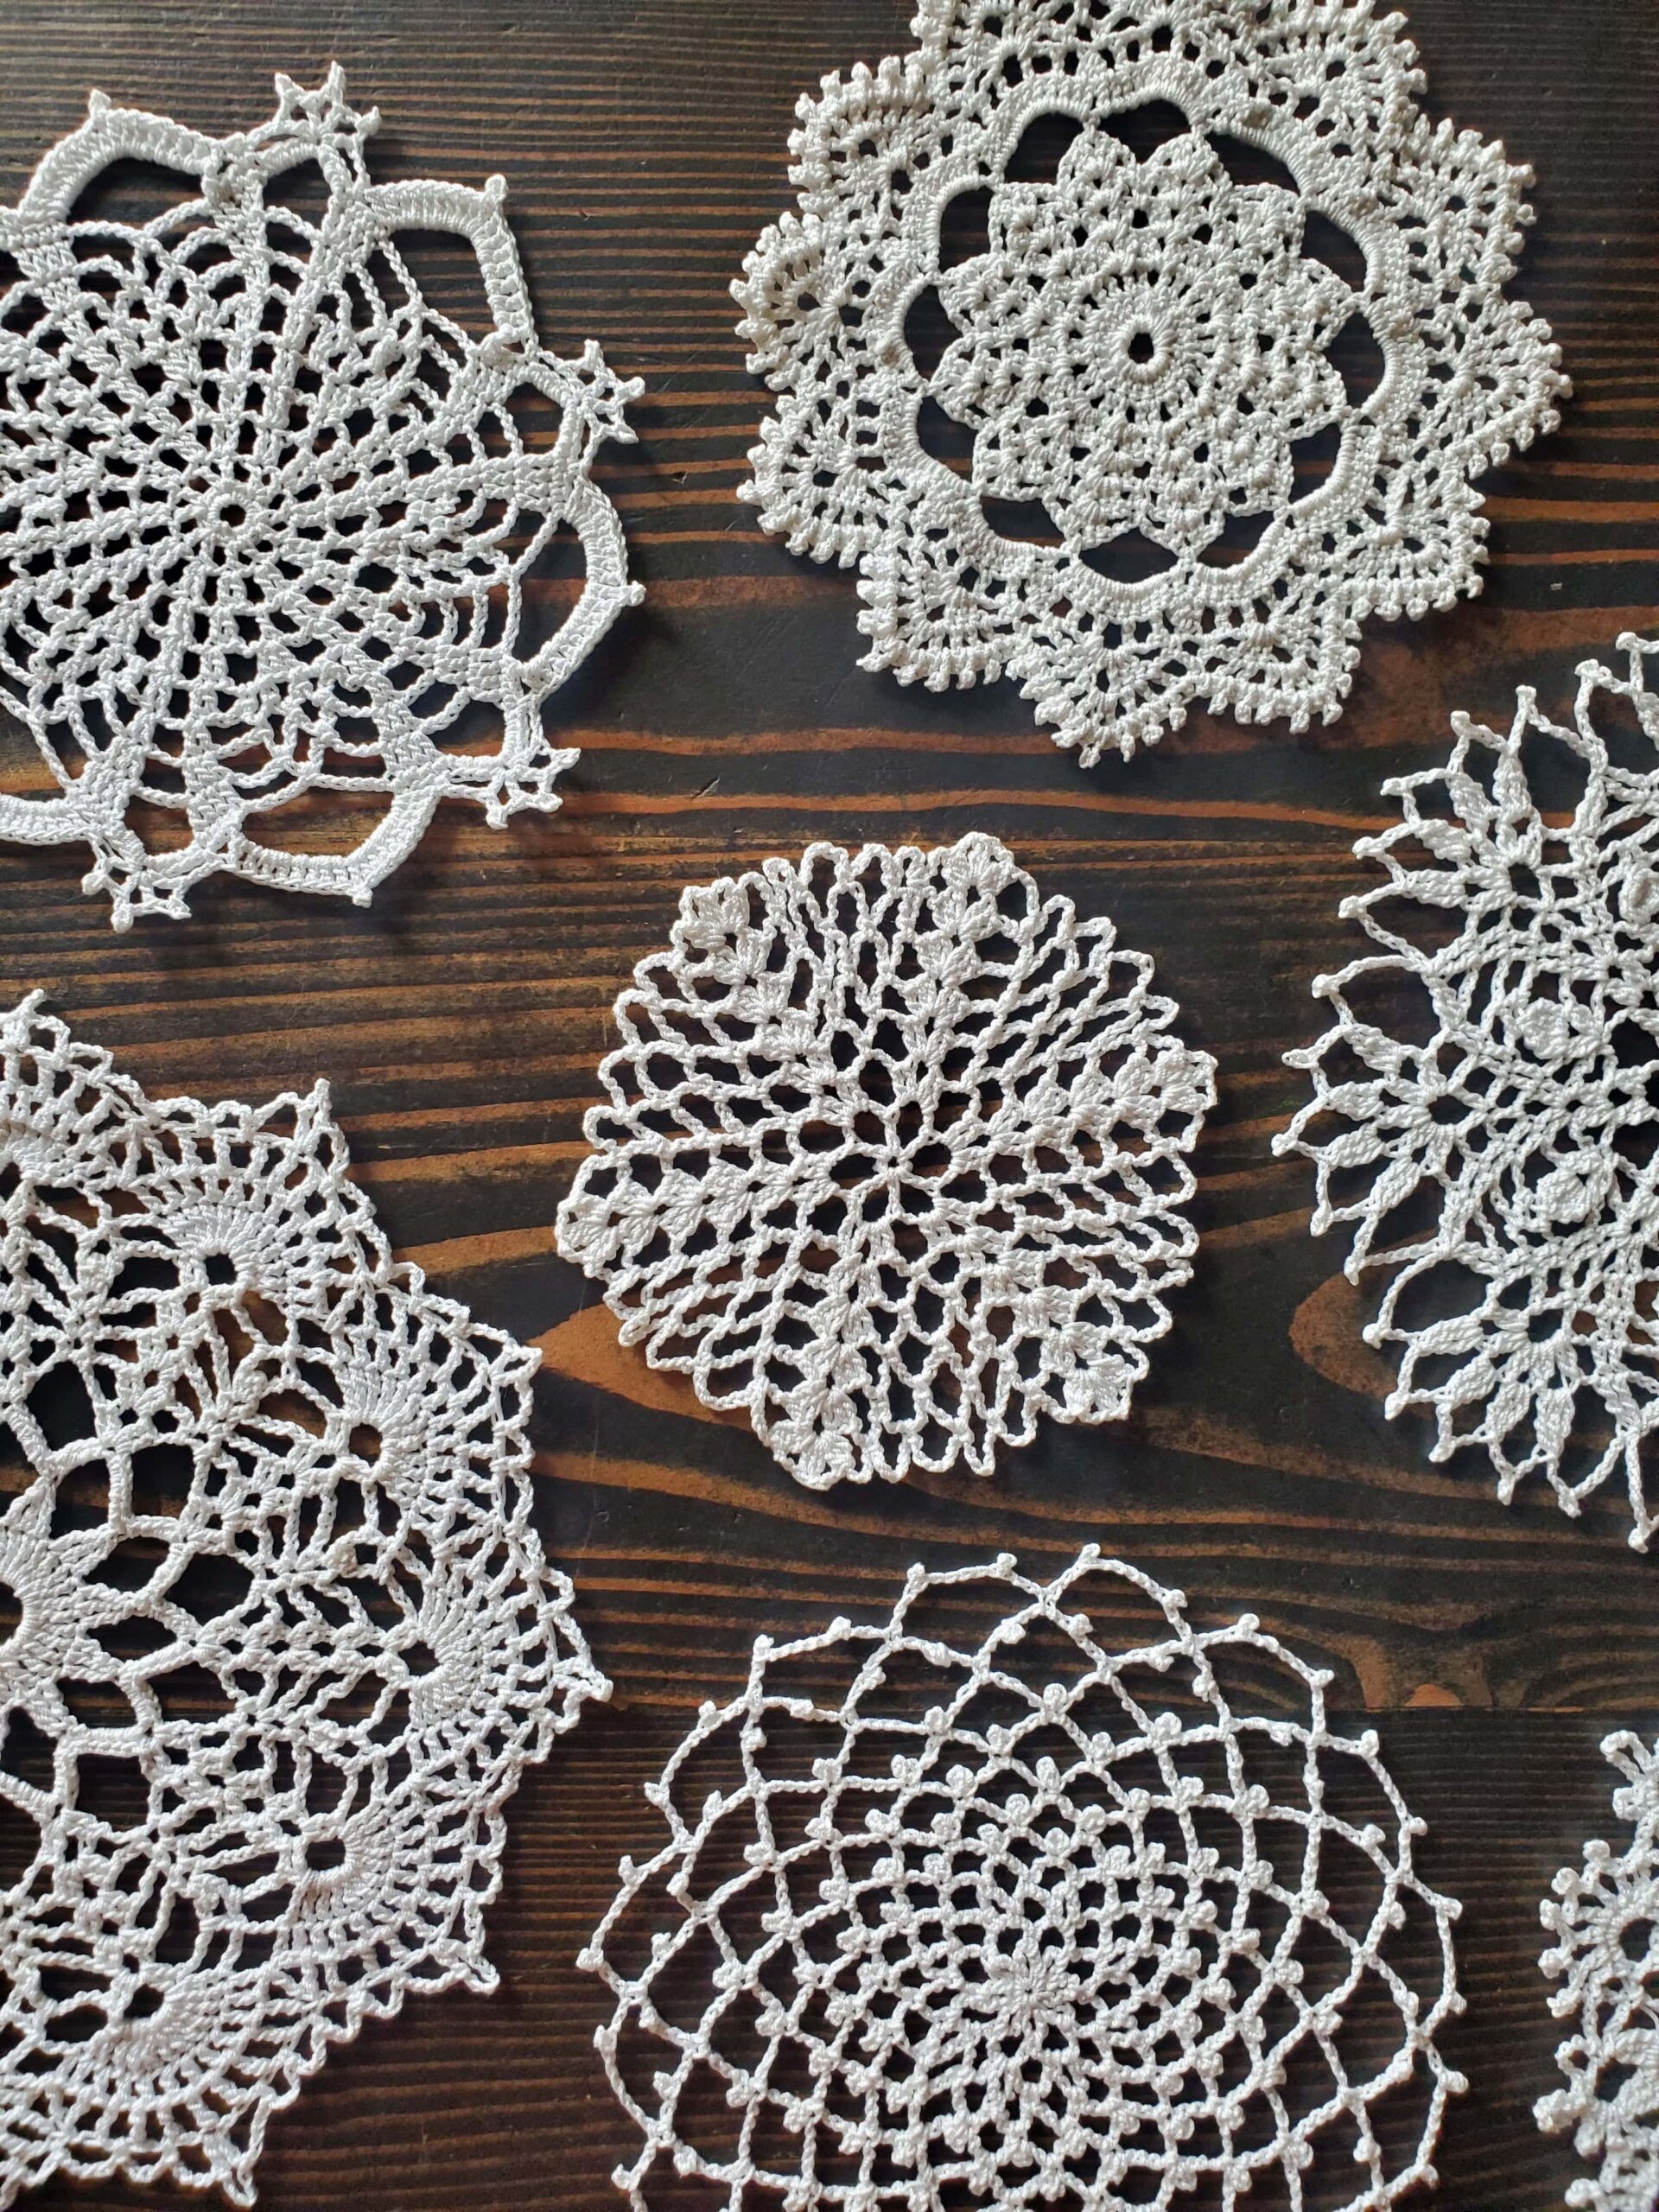
All the doilies listed below are 12 rounds or fewer (with most of them being about 9 rounds), and with a diameter ranging from 5-9.5.” I obtained those measurements by using a 1.65mm crochet hook and crochet thread. 

These small crochet doily patterns would be perfect for placing under a vase of your favorite flowers or used as coasters with a refreshing cup of tea.

Should small crochet doilies be blocked?

I definitely recommend crochet doilies (of any size) to be blocked if you want them to be displayed for people to see. 

I like to use just plain water to block my doilies, but if you want to have them stiff, you’ll need to use a starch solution.

I block my doilies on a blocking mat with pins, but if you don’t have one, a cardboard box or a pizza box will do the trick. 

What kind of yarn should you use?

You can use whatever size or type of yarn you prefer for these crochet doily patterns, however I recommend using crochet thread size 10 yarn, which is what I used for all the doilies below.  

Crochet doilies are usually made to look like lace and this type of yarn will do just the trick.

Plus if you use a yarn that is a bigger size, your crochet doilies probably won’t end up being so small!

What size hook should you use?

Size 10 crochet thread is pretty tiny, so you’ll need a tiny crochet hook to go with it. I am using a 1.65mm crochet hook, however I believe that on the roll of Red Heart Classic Crochet Thread, it suggests using a 1.5mm crochet hook.

I like to use the 1.65mm crochet hook because it’s just a little bit bigger than the recommended 1.5mm. I found that I could yarn over more easily with that size, but you might not have the same problem I do! 

Okay, so now that we have some of that in mind, let’s go ahead and jump into this awesome list of 15 Small Crochet Doily Patterns!

Materials Used:

#1 Small Crochet Doily Simple Pattern

Click to learn the Small Crochet Doily Simple Pattern here.

Small Crochet Doily Patterns

This wonderful, lacy crochet coaster pattern works up quickly in just 7 rounds. While the link provides a chart-only pattern, rest assured it’s easy to follow. I love how simple, but delicate this doily is. Once completed, the coaster will have a ruffled edge, so I highly recommend blocking it to ensure it lays flat.

#2 Easy Round Small Crochet Doily

Click to learn the Easy Round Small Crochet Doily here.

Small Crochet Doily Patterns

Another small crochet doily pattern from JPCrochet, this one is completed in just 11 short rounds. Like the previous pattern, this one is presented as a crochet chart without a written pattern available (at least not that I found). However, fear not, as it’s easily readable. The Easy Round Small Crochet Doily is constructed by single crocheting into the chains of the previous rows, and as you progress through the pattern, you’ll add chain 3 picots for added flair.

#3 Circular Crochet Motif

Click to learn the Circular Crochet Motif here.

Small Crochet Doily Patterns

This lacy, circular crochet motif is completed in just 7 rounds. I adore how this cute little crochet doily resembles a delicate flower. While I struggled to identify the original creator of this doily, I’m keen to credit them appropriately, so if anyone knows, please reach out! To create this doily, you’ll need to feel confident working with treble crochets and decreasing through treble crochets, as this is how you’ll finish the tips of the flower petals.

#4 Beautiful Small Crochet Doily

Click to learn the Beautiful Small Crochet Doily here.

small round doily crochet free pattern

This beautiful small crochet doily is yet another pattern I stumbled upon on Pinterest, but unfortunately, I couldn’t find the original creator! While there are no written instructions available, the chart is included in the image. To begin, you’ll chain 8 and join to form a circle, then work 24 double crochets into that circle and build from there. My only gripe with this chart is that it doesn’t specify how the starting chains should be worked up, and I wasn’t quite sure what the circles at the very last row were meant to be, so I improvised with chain 3 picots—turned out pretty cute, though! Despite these minor hiccups, this doily is undeniably beautiful!

#5 Doily Lace by Anabelia

Click to learn the Doily Lace by Anabelia here.

crochet doilies free pattern

The Doily Lace crochet pattern by Anabelia is a 12-round doily that begins with a captivating starburst shape and concludes with beautifully intricate lacy shells. This doily would be ideal for placing under a lovely vase filled with your favorite flowers! Once more, this pattern is presented as a chart-only format, and unfortunately, the original post for this small crochet doily pattern by Anabelia is unavailable. However, the provided link offers a clear picture of the chart to guide you through the creation process.

#6 Crochet Circular Doily Design 51D

Click to learn the Crochet Circular Doily Design 51D here.

Small Crochet Doily

This crochet doily is completed in just 7 rounds! Throughout this pattern, you’ll be crocheting double and treble clusters of three. These clusters emanate from the center, resembling delicate flower petals or leaves towards the end of the doily. To finish, this tiny crochet doily is adorned with a row of single crochets and chain three picots.

#7 Small Flower Doily

Click to learn the Small Flower Doily here.

Small Crochet Doily Patterns Free

This crochet doily pattern features a charming 6-petaled flower motif, completed in just 8 rounds. Throughout this pattern, you’ll expand your petals using double crochet increases and conclude with double crochet decreases to shape the tips. In the final round, you’ll adorn your doily with three double crochet clusters encircled by chains and a cute little picot at the top.

#8 Delicate Round Crochet Motif

Click to learn the Delicate Round Crochet Motif here.

small crochet doilies free pattern

The Delicate Round Crochet Motif is a beautiful small crochet doily. This chart guides you through creating a series of double crochets to start, which then evolves into clusters, shells, and a mesh border, similar to the last round of pattern #7 in this list. With only 9 rounds, this crochet doily pattern would be perfect as a coaster or accessory.

#9 Crochet Doily Diagram Pattern 

Click to learn the Crochet Doily Diagram Pattern here.

crochet doily coaster

This small crochet doily, crafted by NoitkaLand, features an elegant design completed in just 6 rounds. It incorporates a variety of mesh stitches, utilizes treble crochets, clusters, and showcases a unique shell stitch in the final row.

#10 Unknown Small Doily Pattern

Click to learn the Unknown Small Doily Pattern here.

small crochet doily diagram free pattern

Unfortunately, I couldn’t trace the original creator of this crochet diagram or locate a clear picture of it. However, I can still offer some insight. If you’re drawn to this 6-round crochet pattern, it seems that the center begins with 8, 3-treble clusters separated by chain 6 spaces. While it’s challenging to discern whether the clusters in later rounds are made with double or treble crochets, I opted for double crochets in the image above for my doily. Despite the difficulty in interpreting parts of the diagram, I’m really fond of the unique appearance of this doily.

#11 Crochet Motif with Clovers

Click to learn the Crochet Motif with Clovers here.

crochet doily patterns small

The Crochet Motif with Clovers is a fun, 9-round doily adorned with eight cute, three-leaf clovers. If you reach the clovers and aren’t quite sure how to create them, here’s a written guide from me to you (you’re welcome!): Start by chaining 6, then work a 2 double crochet cluster into the 3rd chain from the hook. Chain 3, slip stitch into the same chain you clustered into, repeating this sequence 3 times. Finally, chain 3 and single crochet into the chain space to complete the stem. I find this small crochet doily really captivating; I’ve never seen one with clovers quite like this before.

#12 Doily 1 Pattern

Click to learn the Doily 1 Pattern here.

pretty crochet doily

The Doily 1 Pattern is completed in just 9 short rounds. This doily guides you through crocheting long chains to form the 12-petaled flower in the center, followed by a cluster border, a few rounds of mesh stitches, and finished with treble crochet shells.

#13 Small Flower Crochet Doily

Click to learn the Small Flower Crochet Doily here.

crochet doilies that are small

Making this floral crochet doily was an absolute delight. Completed in just 9 rounds, it blossomed into a beautiful, lacy creation. At its center lies pretty 8-petal flower, while the final round features 4 petals separated by long chains and picots, adding a delicate finishing touch.

#14 Easy Small Crochet Doily Pattern

Click to learn the Easy Small Crochet Doily here.

crochet lace doily

The Easy Small Crochet Doily Pattern is a lovely little doily. The diagram for this doily is available in the link above. Completed in 9 rounds, it evolves in an interesting manner. The center of the doily showcases a unique ribbing design that gradually transitions towards the ends, which reminds me of a snowflake. Unfortunately, the creator of this pattern remains a mystery, and the diagram provided may be a bit blurry. In the last round, those dark teardrop icons are likely picots. Although the exact number of chains within them is unclear, I opted for chain 3 picots in my sample.

#15 Mesh Star Doily 

Click to learn the Mesh Flower Star Doily here.

mesh star crochet doily

The Mesh Star Doily is an amazing doily design! I love how the 8-pointed star is delicately surrounded by a mesh border. This small crochet doily pattern is completed in just 9 rounds. For those who may be new to reading crochet diagrams, fear not! This pattern utilizes little black rectangles to represent single crochets, while the numbers indicate the number of chains required. To begin this doily, start by chaining 15, then slip stitch into the first chain to form a circle. From there, work 28 single crochets into the circle. With this solid foundation, the rest of the pattern should be a breeze to follow!

I hope you enjoyed this list of 15 Small Crochet Doily Patterns and that they get you inspired for your next project! 

Other Posts You May Like:

How to Crochet the Modified Gothic Crochet Stitch

Hey everyone, today I’m sharing how to crochet the Modified Gothic Crochet Stitch and how you can tailor it to fit your own crochet pattern! 

I absolutely love this crochet stitch, it gives your fabric the appearance of lacy diamonds, which is great for gothic crochet patterns.

The original Gothic Crochet Stitch was created by astra.lebedeva2019, who can be found on Instagram. I became very inspired to crochet some sort of lacy crochet pattern with this stitch. However, I discovered what I wanted to use it for…well it just didn’t quite work the way I wanted it to! 

I needed the diamond stitches to be thicker and more chains in between the diamonds. This was to give a more lacy look to my particular project, hence the Modified Gothic Crochet Stitch was born. 

Please note that some of these links may be affiliate links. That means that if you click on these links and make a purchase, I may receive a commission at no extra cost to you. You can find more information about our disclosure policy here. Thank you for your support.

For this crochet stitch pattern, I’m using crochet thread from Hobby Lobby’s Artiste line, specifically in Orchid. The black yarn pictured is Rainbow Cotton from Hobbii. 

I think the black yarn works better for a gothic crochet pattern (for obvious reasons), but it can be pretty difficult to see the stitches in the following tutorial. So, I’ve opted for a lighter color (the Orchid) in order for you to be able to actually see.

Of course, you can use any yarn or hook size that you like, I just really like to crochet lace, so I’m using crochet thread with a 1.65mm crochet hook.

What is the Modified Gothic Crochet Stitch best used for?

I personally crocheted a Gothic Crochet Table Runner with this stitch, which I think looks pretty great (although I’m obviously biased)! 

This stitch would be a good choice to use on scarves, shawls, light weight blankets, veils, market bags…really anything that you can think of that would be great for lace crochet stitches!

What is the repeat formula for the Modified Gothic Crochet Stitch?

The repeat formula for this crochet stitch is 12+6. This means that you will chain a multiple of 12 chains and then add 6 more chains for the turning chain. 

For example: 12 x 3 = 36 chains, then + 6 more chains for the turning chain to = 42 chains.

The turning chain in this pattern counts as a treble crochet and a chain 2. 

What if I want to make a foundation row of single crochets, half double crochets, double crochets, etc.?

Go for it! The following instructions for the Modified Gothic Crochet Stitch work into the chains of your foundation row, however some crocheters may want a foundation row with stitches in it already.

In order to make a foundation row of single crochets, half double crochets, double crochets, treble crochets or whatever tickles your fancy, you’ll need to make sure that the total amount of stitches in that foundation row is a multiple of 12. 

It’s also up to you if you want to count your turning chain or not. If you want to count it…just remember to keep your total stitch count to a multiple of 12.

Related Posts:

Materials Used:

Abbreviations Used:

  • YO – yarn over
  • Ch(s) – chain(s)
  • St(s) – stitch(es)
  • Dc – double crochet
  • Trc – treble crochet

Modified Gothic Crochet Stitch Pattern:

For this swatch, I am going to ch a total of 54 (12 x 4 = 48, + 6 for the turning chain)

Row 1: *YO twice, insert into 9th ch from hook, pull up a loop, YO and pull through 2 loops (3 loops on your hook).

Crochet Stitch That Looks Like Diamonds

Skip a ch, YO insert your hook into next ch, pull up a loop, YO and pull through 2 loops (4 loops on your hook).

YO, skip a ch,  insert your hook into next ch, pull up a loop, YO and pull through 2 loops (5 loops on your hook).

YO, skip a ch, insert your hook into next ch, pull up a loop, YO and pull through 2 loops (6 loops on your hook).

Modified Gothic Crochet Stitch 4

YO, pull through 4 loops, YO and pull through 2 loops, YO and pull through 2 loops again. This is your triangle decrease stitch.

Ch 2, skip 2 chs, trc into next ch, ch 1, dc into the first two “loops” in the leg of the trc you just crocheted (see pic below for placement).

Ch 1, dc into same space, ch 1, dc into same space again, ch 1, dc one more time into the same space (you should have 4 posts separated by 3 ch 1s). This is your triangle increase stitch

Ch 2, skip 2 chs*, repeat from *to* trc into the last ch.

Row 2: Ch 6 (counts as a trc and ch 2), turn, for this row, we will be making triangle decrease stitches on top of the previous row’s triangle increase stitches and vice versa. 

The last stitch from row 1 should have been a triangle decrease stitch, so for row 2, we will begin with a triangle increase stitch. 

If your row 1 ended with a triangle increase, skip to row 3!

Skip the next ch 2 space, make a trc, but place it under the next stitch (not into it as you normally would). I find it helpful to think of this space as the “neck” of the last row’s triangle decrease stitch. Just find a space to insert your hook into the neck and trc there. If you trc into the stitch normally, the diamonds we are trying to create will look off-center (see pic below for placement).

Triangle increase stitch as you did in row 1 (ch 1, dc in the front 2 loops of the trc, ch 1, dc again in the same space).

Ch 2, now we will make a triangle decrease into the next triangle increase.

Make a triangle decrease stitch as we did in row 1, using only the dcs and trc sts and skipping the ch 1 spaces between. 

If crocheted correctly, this will give us our first diamond shape.

Ch 2 and repeat these two stitches with a ch 2 between each triangle increase and decrease.

After the last ch 2, ( you should have 3 chs left), finish your row by skipping 2 chs and trc into the last ch.

Row 3: Ch 6 (counts as a trc and ch 2), turn, the first st below should be a triangle increase stitch, so we will begin with a triangle decrease stitch. Make a decrease stitch as you did in row 1, but use the tr and dcs, while skipping the ch 1’s between. Ch 2, and triangle increase into the next triangle decrease like we did in row 2 (trc into the “neck” of the decrease stitch below, not the actual st). 

There is no difference in this row compared to row 2, other than starting with a different triangle stitch. 

Repeat rows 2-3 

And there you have it! That is the Modified Gothic Crochet Stitch! 

Thank you and I’ll see you next time.

Other Posts You May Like:

Magic Circle VS Chain 2: Which Method is Better in Crochet?

Hello everyone, today we are going to learn the difference between using a magic circle (sometimes called a magic ring) in crochet vs. a chain 2.

If you’ve been crocheting for a while, you might have noticed that some patterns start in the center and grow outward. Those patterns usually use a chain 2 or a magic circle to start. 

Crochet patterns that start from the center and grow out can include projects like blankets, hats, granny squares, doilies, shawls, and especially…amigurumi!

In this post, we’re going to look at the difference between using these two techniques. Which one is better to use? The magic circle or a chain 2?

Related Posts:

Let’s look at the magic circle first.

What is a magic circle?

A magic circle is basically just a modified slipknot. When you make a magic circle, you’ll notice that you have a circle with your crochet hook attached at the top. This is what a magic circle looks like:

You’ll see crochet makers use this for many patterns, and it is most commonly used in amigurumi (doll making using crochet).

Pros of the Magic Circle:

  • It’s easier to work into.
  • Has a less noticeable “center hole.”
  • You can adjust the size of the hole in the center.
  • Makes your work look neater.

Cons of the Magic Circle:

  • More difficult to learn.
  • Some crocheters report the magic circle coming undone more easily if you don’t sew the tail in securely.
  • Does not work well with certain types of yarn (velvet, chenille or anything that likes to split).

What about the Chain 2 Method?

The chain 2 (it can be any number of chains really), is a common way to start crocheting from the center out.

You put your yarn on your hook with a slipknot (like normal), chain 2, and then start crocheting into the first chain you made.

Let’s take a peek at the pros and cons of using this method.

Pros of the Chain 2:

  • Much easier to do, especially as a beginner.
  • Works great for most projects.
  • Some crocheters claim this method is sturdier.

Cons of the Chain 2:

  • Tends to have a more noticeable starting hole.
  • You cannot adjust the size of the starting hole well.
  • Difficult to crochet a large amount of stitches into the starting hole.
  • May leave a “bump” and not look as neat compared to the magic circle.

Now, let me show you the visual differences between the magic circle and the chain 2:

Magic Ring vs Chain 2
Chain 2 vs magic ring

The first picture above shows what a chain 2 with 8 starting double crochets (with a second row of 2 double crochets in each stitch) looks like. I’ve even pulled the tail end of the yarn pretty tight here.  

The second picture shows what the magic circle looks like with 8 starting double crochets (with a second row of 2 double crochets in each stitch).

As you can see, if you’re making a flat circle, they really don’t look that different (in terms of the starting center hole). I think maybe the magic circle looks a little neater, but I’ll leave that up to you to decide.

Now let’s add even more starting stitches and see what happens.

The first picture on the left depicts the chain 2. I’ve placed 18 double crochets into the first chain. You can see that there is a noticeable hole in the center here. I’ve pulled the tail end as tight as I could here too.

The second picture shows the magic circle, which has 18 starting double crochets as well. You can see that the center hole isn’t as noticeable as compared with the chain 2 method.

Okay, but what if you’re making amigurumi? 

Let’s see what happens when you make a sphere shape (a common shape in amigurumi) with the magic circle vs. the chain 2 method.

The first sphere on the left is made with the starting chain 2. I’ve placed 8 single crochet into the center and grew it out from there. As you can see, it looks pretty good!

Now the second sphere on the right is made with the magic circle. Again, I’ve placed 8 single crochet into the circle and created the sphere shape. This method looks pretty good too! 

Both methods look basically the same, however if you’re putting a lot of stitches into the center for a spherical shape, I would choose the magic circle method. This will prevent the big hole in the center.

When making amigurumi, you want your stitches to be tight, and it’s important to make sure the center stays closed so your stuffing doesn’t pop out!

Now let’s see what happens when we make a cone shape. This is another common shape in amigurumi.

Ch 2 or Magic Ring
Ch 2 Cone Side

These two pictures show what a cone shape looks like from the top and the side with the chain 2 method. Again, I think the tip (center hole) looks great.

Magic Circle Cone
Magic Ring Crochet Cone Side

As you can see here, they both look practically the same! Maybe the magic circle looks a little tiddier? But it’s almost impossible to tell. 

Magic circle vs.  chain 2 in crochet: which one is better to use?

So now that you know the differences between using a magic circle vs. a chain 2 in crochet, which one is better to use?

Well…to put it simply, it’s up to you and what your pattern is supposed to look like.

Both methods are completely valid to use.

If it were up to me, I would use whichever method is going to make you less frustrated.

Remember, crochet is supposed to be fun! 

I personally like to use the magic circle over the chain method, but I understand why someone wouldn’t want to use it. It can be tricky to get down! I just think it’s easier to crochet into since the starting circle doens’t get any bigger.

So to recap, the magic circle and chain 2 method look basically the same for most patterns, but there are instances where one may be preferred over the other.

The magic circle can be difficult to learn, but looks a little neater. 

The chain 2 method is much easier, but may cause unwanted center holes.

The magic circle is used for amigurumi to get a tight center, however, if you use the chain 2 and pull the tail end tight enough, it can work too.

Ultimately it’s up to you to decide what’s going to cause you the least amount of grief to get your crochet project up and going!

Which method do you prefer? Feel free to comment below!

Thanks and I hope this post helped you figure out the differences between the Magic Circle and the Chain 2 in crochet!

Other Posts You May Like:

What to Crochet When Sad: 18 Ideas to Brighten Up Your Mood

Hello everyone! Today, I’ve got a list of What to Crochet When Sad. These crochet ideas can be a mood lifter when life gets a bit challenging. We all face ups and downs—whether it’s a tough break-up, the loss of a loved one (human or furry), or just the everyday struggles that can leave us feeling low.

But here’s the good news: crochet has a magical way of boosting our spirits! If you’re curious about the therapeutic benefits of crochet, you can check out my previous post, Therapeutic Benefits of Crochet. In the meantime, let’s explore what you can crochet when those gloomy days come around.

When you’re feeling down, it’s normal to lack the mental energy to decide on a crochet project. There are so many patterns out there, and it can be overwhelming! That’s where I come in—I’m here to help. I hope this list sparks some inspiration and helps you crochet something that brings a bit of sunshine back into your days!

Please note that some of these links may be affiliate links. That means that if you click on these links and make a purchase, I may receive a commission at no extra cost to you. You can find more information about our disclosure policy here. Thank you for your support.

Related Posts:

#1 Comforting Blanket

Crochet a cozy, oversized blanket in your favorite colors (or pick colors that represents how you’re feeling). You can use any type of yarn you wish, but choosing a soft, chunky yarn will work up faster and feel better on the skin. 

Experiment with different types of stitches. You can go for the tried and true single crochet, or try more intricate stitch patterns. Pick something that aligns with your skill level to avoid unnecessary frustration. 

Consider adding a border to help frame the blanket and make it look complete.

#2 Amigurumi Friends

Consider crocheting cute, stuffed animals, plants, or dolls to keep you company.

Give your amigurumi buddies different colors to represent their unique personalities. Add small details, such as embroidered faces or accessories to personalize your friends.

#3 Mug Cozy/Coasters

Make crochet mug cozies/coasters to give your favorite drinks a hug. Select a pattern that matches your style, whether it’s a textured stitch or a cute design. You can adjust the cozy/coaster to fit your mug by adjusting the number of stitches in the pattern. Sip and enjoy!

#4 Crochet Cowl/Scarf

Crochet a stylish accessory to keep you warm and snug. Use a variety of stitch patterns, such as cables, or a ribbed design. Try stitches that help thicken up your scarf for added warmth. You could even make a matching set with a coordinating hat or gloves.

#5 Crochet Positive Affirmation Banner

Crochet banners that have uplifting words or phrases to decorate your space. You can try making small, individual flags that spell out uplifting words or phrases. Experiment with different font styles with your stitches. You could hang them on a string or sew the flags together to form a longer banner.

Check out Stitch Fiddle to help map out your own crochet positive affirmation banner.

#6 Crochet a Pillow to Hug

Crochet a soft, huggable pillow for moments when you need comfort. Crochet a square or a rectangular pillow, using bulky, velvet yarn for the best huggable feel.

There are many different stitch and color designs for crochet pillows. You can even use Stitch Fiddle to help design your very own.

Related Posts:

#7 Aromatherapy Sachet

Make small sachets that you can fill with calming herbs to help you relax. Crochet the pouches using lace or a mesh stitch for breathability.

Fill the pouches with dried lavender or another calming herb of your choice. Consider attaching a loop to hang the sachets where needed or simply place them in drawers and closets.

#8 Crochet a Blanket/Toy/Accessory for Your Pet

Crochet something special for your furry, scaly, or feathery friend to enjoy. Choose a durable, washable yarn for pet-friendly crochet patterns. You can experiment with different shapes or sizes for pet toys. Crochet a blanket or a sweater in colors that suite your pet to help them stay warm and comfy.

#9 Soothing Eye Mask

Crochet an eye mask to help get the rest you need. Use soft and breathable yarn since the fabric will be touching your skin.

Feels Like Butta Yarn from Lion Brand has the softest, squishiest yarn to crochet an eye mask in my opinion!

Add a strap with a button or a tie to help secure and adjust the fit as needed. Consider adding an extra layer of fabric to really help block out the light.

#10 Gentle Baby Blanket

Crochet a baby blanket to give a little one warmth and comfort. Use soft yarn with a pastel color palette. Gift your blanket to a family member or friend.

If you don’t know anyone expecting, consider donating your baby blanket to your local hospital or women’s shelter.

#11 Rainbow Wall Hanging

Brighten up your space with a colorful and uplifting wall hanging. Choose your favorite yarn colors to crochet a cheerful rainbow.

There are different crochet patterns out there to achieve a rainbow wall hanging. You can go for the tapestry crochet technique, color block, or crochet a rainbow in a semicircle, switching colors as you go.

Add fringe or tassels to the bottom for a playful touch.

#12 Bookmarks

Crochet an elegant bookmark for your favorite books. Experiment with various shapes, such as the classic rectangle, hearts, or even funny little characters. Incorporate lace or openwork stitches for a delicate feel.

You can try my Grim Reader Crochet Skull Bookmark or the Blissful Crochet Bookmark pattern to mark the book you’re reading.

#13 Gratitude Jar Cozy

One thing to crochet when you’re sad is a gratitude jar cozy. It might seem silly to do for yourself, but sometimes you gotta be the one cheering yourself on, especially if no one else is.

Decorate a glass jar with a crochet cozy for daily gratitude notes. Make sure it fits snugly around your jar. Use cable or shell stitches to add a little visual appeal.

#14 Crochet Socks/Slippers

Crochet cozy slippers or socks to keep your feet warm and snug. Choose a soft, breathable yarn.

Use different stitch patterns, such as ribbing for the cuffs and a different textured stitch for the foot.

Go the extra mile and add pom-poms, buttons or be silly and add contrasting colors for the toes or heel.

#15 Stress Ball Covers

We all feel stress, but you might feel more so when sad. Consider crocheting a stress ball cover with durable and stretchy yarn.

Use tight stitches or tighten your tension when making your ball. Add an embellishment like a crochet applique of your choice to give your stress ball a personal touch. Use different colorways for variety.

#16 Mindful Yoga Mat Bag

Crochet a bag that can hold your yoga mat, that way you can easily carry it with you wherever you go. Stretching and yoga may make your body feel better when you’re a little down.

#17 Calm Corner Basket

Crochet a sturdy basket to hold your favorite self care items in a relaxation corner of your home. Fill it with items like candles, a journal, your favorite skin products, or snacks.

Consider crochet handles to easily transport your basket around as needed. Don’t know what sort of yarn to use for your basket? My post on 7 Best Yarns for Crochet Baskets will help!

#18 Journal Cover

Lastly, crochet a cover for a journal or diary. Add a crochet pocket of pens or small notes you want to keep. Use textured stitches or add your own personalized touch with a crochet applique that reflects you.

I hope you enjoyed this list of What to Crochet When Sad: 18 Ideas to Brighten Up Your Mood. Remember, when life gives you lemons, crochet a basket for them!

While these crochet ideas might not entirely dispel your sadness, they can offer a creative and comforting outlet. It’s important to take care of yourself during challenging times. Get some rest, stay hydrated, engage in regular exercise, and consider taking your crochet project outdoors to bask in the sun.

Take small steps each day, and don’t forget that it’s okay not to be okay. Your well-being is the priority! 💕

Other Posts You May Like:

11 Crochet Stitches That Look Like Leaves

Hello everyone! Today I have a list of 11 Crochet Stitches that Look Like Leaves for you! 

I’ve been wanting to start planting seeds in my garden soon and was inspired to find ways to incorporate a little nature into my crochet projects.

This list of crochet leaf stitches will not include patterns of leaves themselves, but rather combinations of crochet stitches that work up to make the appearance of a leaf…if that makes sense! 

Please note that some of these links may be affiliate links. That means that if you click on these links and make a purchase, I may receive a commission at no extra cost to you. You can find more information about our disclosure policy here. Thank you for your support.

Feel free to use whatever yarn and crochet hook fits your needs. For these crochet leaves, I’m using white and natural colored thread from Red Heart, Snow Pea, and Green from Hobby Lobby’s Artiste Line

I’ve personally crocheted each of these leaf patterns and I’m certain you will enjoy them too! Ok, let’s jump into this wonderful list of 11 Crochet Stitches that Look Like Leaves!

Related Posts:

#1 Lacy Leaves Crochet Stitch

Learn the Lacy Leaves Crochet Stitch here.

The Lacy Leaves Crochet Stitch is a chart only pattern with a leaf divided into a few other leaflets. The leaves are surrounded by a frame of 3 double crochet shells. 

#2 Crochet Leaf Stitch

Learn the Crochet Leaf Stitch here.

The Crochet Leaf Stitch from MyPicot, is a repeating, zig zag pattern that boasts a simple, undivided leaf. This stitch is made by increasing on the sides of the leaf until you reach the designated amount of stitches, then decreasing until you make the tip of the leaf. All of the leaves are separated by a chain 2, giving the leaves a little bit of a lacy look. 

#3 Leaf Stitch

Learn the Leaf Stitch here.

The Leaf Stitch is another crochet stitch that looks like a leaf by MyPicot. This stitch works up in 7 rows and then repeats itself. With the leaf stitch, you’ll create a base (stem) for the leaf, and then create puff stitches into the base to create the leaf-like look. 

#4 Turkish Leaf Stitch

Learn the Turkish Leaf Stitch here.

I actually don’t know what the name of this leaf stitch pattern is called, however, when clicking on the link above, the pattern is from a Turkish website, so that’s what I’m going with! This crochet leaf stitch is a chart only pattern, there are no written instructions that I can find. I love how this leaf works up, especially with the lacy chains and the shells that make it appear like there are strips in the work. 

#5 Oak Leaf Crochet Stitch

Learn the Oak Leaf Crochet Stitch here.

This is another lacy crochet stitch that resembles a leaf from an oak tree. The oak leaves are created by building up on double crochets from the base, and then creating the rounded leaf edges by dc3tog, chaining 2, and then double crocheting into the same stitch as the 3rd double crochet in the dc3tog. The leaves are then surrounded by a pretty, 3 double crochet cluster border in a diamond shape. 

#6 Easy Crochet Leaf Stitch Pattern

Learn the Easy Crochet Leaf Stitch Pattern here.

The Easy Crochet Leaf Stitch Pattern by CrochetBeja is a textured crochet stitch that looks like a simple leaf.

I love the way this stitch works up, and it gets easier once you understand what is happening in the pattern, but her blog is in Spanish, and her tutorial video is in Spanish as well. So unless you can understand Spanish, you might have a little trouble!

I don’t speak the language, but I was able to follow along with her video by slowing the playback speed down. She has a chart that is available as well, but in my opinion, it doesn’t make a lot of sense until you work a few rows in her video.

You’ll be utilizing front post and back post double crochets in this pattern, which give the crochet leaf the appearance of “popping” out of the fabric. 

#7 Big Lacy Leaf Stitch

Click to learn the Big Lacy Leaf Stitch here.

The Big Lacy Leaf Stitch is a chart only pattern that depicts large leaves separated by long chains. In this pattern you’ll be performing many yarn overs to create the body of the leaves. This crochet pattern has arrows pointing in the correct direction to help you read the chart.

#8 Twig Stitch 

Click to learn the Twig Stitch here.

The Twig Stitch is a crochet stitch with leaves that are joined at the top by the next leaf to the left and right. This stitch is similar to #2 in this list, but is not in an offset zigzag pattern. This is a very pretty lacy leaf stitch, however the video that is available is in Spanish. Again, if you do not speak the language, I suggest slowing down the playback speed in order to follow along.

#9 Extreme Drop Leaf Stitch

Click to learn the Extreme Drop Leaf Stitch here.

The Extreme Drop Leaf Stitch by Nana’s Crafty Home, is a textured, compound leaf stitch. This crochet stitch works the best when using two different yarn colors, so that the leaves can stand out. To create the leaves, you’ll be crocheting ch 1 spaces in the 4 rows leading up to the leaf row, and then creating puff stitches in those spaces. It can be tricky pulling your hook through all the loops at once on the leaves, so I suggest pulling up loops loosely if needed.

#10 Beautiful Crochet Leaves Stitch

Click to learn the Beautiful Crochet Leaves Stitch here.

This is a crochet stitch that looks like a lacy, lattice filled with leaves. This is a video tutorial, so slow down the playback speed if needed. The video creator has placed how many chains you need in the video, which is nice so you’re not counting the amount of times they chain! This is the perfect stitch for any lacework pattern you’d like to create.

#11 Small Talk Shawl

Click to learn the Small Talk Shawl here.

The Small Talk Shawl, by Cheri McEwen, displays drooping, lacy, crochet leaves in a half drop repeating pattern. If you’re not interested in crocheting a shawl, after you learn how to make her leaves, you can take the leaf pattern and design your own type of fabric if you wish. I really like her crochet leaf pattern, she uses an interesting decrease technique that makes the leaf appear more open and airy.

I hope you enjoyed this list of 11 Crochet Stitches that Look Like Leaves! I know that whatever you crochet, it’ll look great with these beautiful leaves. Remember, that crochet is all about creativity and personal flair, so feel free to experiment with different colors, yarn weights, and hook sizes. 

Happy crocheting! Until next time!

Other Posts You May Like:

How to Crochet With Parkinson’s Disease

Crocheting can be a fun and fulfilling hobby, but for those facing the challenges of Parkinson’s disease, it may require a few adjustments. In this post, we’ll explore nine valuable tips on how to crochet with Parkinson’s disease in order to make it more enjoyable and easier to navigate.

As a nurse who loves to crochet, I have seen patients suffering in varying degrees from the disease. And while I may not have the disease myself, I understand the frustrations that may arise when struggling to use fine motor skills.

This post is not meant to replace any sort of treatment regimen you may be following and please always consult your doctor for questions or concerns. 

What is Parkinson’s Disease?

Parkinson’s disease is a neurodegenerative disorder that primarily affects movement control (obviously not great for those who love to crochet!). When certain nerve cells in the brain that are responsible for producing dopamine get damaged or die off, symptoms of Parkinson’s disease can develop. Dopamine is important for coordinating smooth and controlled muscle movements.

Tremors (shaking), stiffness, slowness of movement, and difficulty with balance and coordination are a few symptoms of Parkinson’s disease. Over time these symptoms may progress and impact a variety of activities of daily life for the individual. 

Currently there is no cure for Parkinson’s disease, but various treatments including medications and therapies can help with symptoms and improve quality of life for those living with the condition.

Why is Parkinson’s Disease a Challenge for those Who Love to Crochet?

There are several reasons why Parkinson’s disease can pose a challenge to those who enjoy crocheting:

  • Fine Motor Skills Impairment: Parkinson’s disease can affect fine motor skills, which makes it difficult for performing detailed hand movements and holding yarn. 
  • Tremors: Tremors are a common symptom and can cause involuntary shaking of the hands, which makes it hard to maintain tension and control while crocheting.
  • Stiffness and Rigidity: Parkinson’s disease may lead to stiffness and rigid muscles, which makes fluid movements in the wrist difficult to do.
  • Fatigue: Those with the disease may find that they fatigue more easily. Crocheting for extended periods may exacerbate this fatigue, requiring frequent breaks.
  • Reduced Grip Strength: Holding crochet hooks and the yarn requires a little bit of grip strength, Parkinson’s can reduce this strength, making it hard to hold onto crochet hooks and yarn appropriately.
  • Cognitive Challenges: Some people may experience cognitive decline with Parkinson’s disease, which affects their ability to follow complex crochet patterns or they may experience difficulty in remembering steps in the patterns.

Despite these challenges, many people with Parkinson’s disease can experience a sense of accomplishment and enjoyment in continuing to crochet. Let’s explore a few ways that those with the disease can make crocheting easier to do and more enjoyable.

Related Posts:

Please note that some of these links may be affiliate links. That means that if you click on these links and make a purchase, I may receive a commission at no extra cost to you. You can find more information about our disclosure policy here. Thank you for your support.

1. Use weighted crochet hooks

Weighted crochet hooks will help with grip strength, as holding light objects (like silverware for example), can be difficult. Ergonomic crochet hooks might be helpful, but may not give the longest or the best support. Try using a weighted crochet hook like this one for crocheting with Parkinson’s disease.

2. Crochet with bulky yarn 

Using thicker or bulkier yarn can help relieve the burden of using fine movements required to hold on and move the strands around. You can also try to double stranding smaller yarn sizes if a bulky yarn size isn’t available.

3. Try a ring hook

Try using a ring hook for crocheting with Parkinson’s disease. A ring hook can help reduce the amount of grip strength that is needed to hold the yarn and keep a consistent tension. However, depending on the severity of the disease, an individual may need assistance placing the yarn through the hook in the beginning.

4. Use a support pillow

If a person wit h Parkinson’s disease finds themselves struggling with holding the yarn and the crochet project at the same time, they may benefit from using a support pillow under the arms. The extra support will help with tremors and holding the fabric. As silly as it sounds, using a breastfeeding pillow may be helpful, as these pillows are made with the idea to support the arms, or try using a pillow or two under both arms.

5. Continue taking medication as prescribed

Many people with Parkinson’s disease find relief in some of their symptoms with medication. Taking your medication as prescribed by your medical doctor can help reduce tremors and other symptoms that make it difficult to crochet.

6. Eat well and exercise

A well balanced and nutritious diet, as well as regular exercise play a crucial role in managing Parkinson’s disease. Try eating a variety of fruits and vegetables, lean protein, healthy fats, and calcium rich foods. Stay hydrated by drinking plenty of water, and cut out processed foods. Exercise can help improve mobility, coordination, and reduce rigidity.

7. Take breaks

Pacing yourself and taking breaks helps avoid fatigue. Try performing stretching exercises during breaks to help alleviate any stiffness.

You can try wrist flexion and extension stretches, rotating your forearms back and forth (think like giving someone a thumbs up and a thumbs down), or spreading the fingers apart with a resistance band.

8. Know your limits 

Depending on the progression of the disease, you may be able to crochet larger or more complex projects.

However, if you find yourself getting frustrated, it’s ok to crochet small, simple projects. Try picking out crochet patterns that use one type of stitch.

Small, simple crochet patterns include: 

  • Coasters
  • Washcloths
  • Bracelets
  • Scrunchies
  • Headbands
  • Face Scrubbers

9. Be patient with yourself and stay positive

Be patient with yourself and try to keep a positive mindset. It’s easy to despair and focus on the negative aspects of the disease. Celebrate your progress and the little wins in life.

Also try to do 3 things that make you happy every day. Staying happy can help you maintain a positive outlook. This can include activities like:

  • Socializing and engaging with others
  • Going outside and walking in the sunshine
  • Listening to your favorite music or podcast
  • Enjoy a favorite snack or beverage
  • Reading a book or watching your favorite TV show

I hope you enjoyed these tips on how to crochet with Parkinson’s disease. From using weighted crochet hooks to knowing your limits, these are all ways that can make crocheting much more enjoyable.

Remember that even though these tips may help you to crochet, it’s important to consult your doctor or healthcare team if you have any questions or concerns about your condition.

And if you find yourself still struggling and frustrated crocheting with Parkinson’s disease, it’s ok to put the hook and yarn away for a while.

Other Posts You May Like:

15 Crochet Spring Doily Patterns

Hello everyone! Today, I’m excited to share with you a carefully curated collection of 15 Crochet Spring Doilies!

As we say goodbye to the chilly winter months and welcome the warmth of spring, I’ve been thinking of ways to add a little spring decor into my home.

In my search for the perfect spring-inspired crochet pattern, I stumbled upon a variety of doilies that remind me a lot of spring. These doilies are made to help accent vases of blooming flowers, plates, saucers, or even grace your walls as crochet doily art!

Each doily in this collection has, what I believe, is a floral or feminine theme. Some feature an adorable shelled edge that adds a perfect touch of cuteness, which I think is ideal for the springtime aesthetic.

For these crochet spring doilies, I’ve chosen a variety of colors from Hobby Lobby’s Artiste Crochet Thread line. While I’m not affiliated with Hobby Lobby, I really like this particular thread line for its affordability per yard and the wide selection of beautiful colors it offers.

Anyways, if you’re on the lookout for a crochet doily pattern to welcome the spring season, you’re in the right place! This list is tailor-made for those seeking inspiration for their next crochet spring project. I hope it inspires you to make your own beautiful doily!

Related Posts:

The Flower Wheel Doily is a short and sweet doily pattern that is embedded with three petaled flowers. It’s a cute little doily that would be perfect to place underneath plates or saucers during afternoon tea time!

2. Simple Doily

Learn how to crochet the Simple Doily here.

The Simple Doily by Nancy Hearne is a small, elegant doily, perfect to place under your favorite flower vase. It’s a short 15 round doily that utilizes a combination of double crochet clusters, popcorn stitches, and chains. 

3. Spring Leaf Doily

Learn how to crochet the Spring Leaf Doily here.

The Spring Leaf Doily is a beautiful 24 round crochet doily that displays cute, 3 pronged leaves in a circular fashion. The way that you create a mesh around the center and then fill in with the leaf motif, gives it an elegant look. This doily is quite large when finished, and would be perfect underneath a flower vase or under a large serving plate. 

4. Tulip Mandala

Learn how to crochet the Tulip Mandala here.

The Tulip Mandala is a fun, spring time doily pattern embedded with tulip motifs. This pattern is created for free by Ella Laitila. She uses a larger yarn and hook size, but I think it looks so beautiful in crochet thread, which I have used in the picture above. I think this floral doily is great to use as a decoration during the spring months!

5. Tea Rose Doily

Learn how to crochet the Tea Rose Doily here.

The Tea Rose Doily is a simple floral doily by KristinesCrochets. This doily starts out by making a cute flower in the middle, surrounded by a thick line of double crochets, then a middle of mesh squares, and finally a pretty scalloped border. She is using a larger sized yarn and hook in her pattern than crochet thread, but I think it looks really pretty with the smaller thread! 

6. Easy Round Doily Pattern

Learn how to crochet the Easy Round Doily Pattern here.

The Easy Round Doily Pattern is a beautiful crochet doily. I honestly wish it had a prettier name, but unfortunately I cannot find who made this pattern. This is a chart only pattern, meaning there are no written instructions, but the chart is well done and easy to follow. This would be a perfect doily to use as a centerpiece for your table during the springtime! 

7. Springs Arrival Crochet Doily

Learn how to crochet the Springs Arrival Crochet Doily here.

The Springs Arrival crochet doily is created by Gemma Owen and has a wonderful floral and leaf theme to the pattern. I love her use of color throughout her doily pattern, however I decided to use a monocolor. If you want to use one color throughout, you’ll have to slip stitch around to different spots in the next round, as the pattern requires you to cut your yarn and attach a new color in a place other than the joining stitch.

8. Nosegay Doily

Learn how to crochet the Nosegay Doily here.

The Nosegay Doily is a vintage crochet doily that was published in Women’s Day magazine in 1951. This is a perfect springtime crochet doily, as the whole thing looks just like a spring flower. I will warn you however, as pretty as this crochet doily is, it’s a very large and long pattern. It has a total of 26 rounds, with most of it being a combination of double crochets or chains. As a matter of fact, don’t be like me and try to get away with using one 350 yard roll of crochet thread! I wasn’t able to totally finish the doily, and I didn’t like the look of using a different color to finish it, so here is how far I could make it!

9. Blue Rose Doily 

Learn how to crochet the Blue Rose Doily here.

The Blue Rose Doily is a gorgeous, delicate crochet doily designed by Rosanne Kropp and published in Crochet! magazine in March 2003. This was a really interesting doily to make, as you’ll have to crochet individual roses separately, attach them to the previous round, and then crochet around. Her pattern uses one color, but I love using a green and blue colored thread to make the leaves and roses pop. 

10. Model 14 Doily

Learn how to crochet the Model 14 Doily here.

Spring Crochet Doilies

The Model 14 Doily is a pretty, 22 round crochet doily. I love how simple, yet elegant this crochet doily is. I am unable to find written instructions for this pattern, but the link to this pattern takes you to the chart for this doily. The chart has information in French, but it’s not needed if you know how to read crochet charts. Otherwise, you can use Google lens to translate the photo for you.

11. Mine Rosinha Towel Doily

Learn how to crochet the Mine Rosinha Towel Doily here.

The Mine Rosinha Towel Doily is a short, 9 round doily that is perfect for placing under an afternoon cup of tea. It’s a cute little doily that is surrounded by a shell of picots. This is another chart-only pattern, but it is easy to read. 

12. Crochet Pear Blossoms Doily

Learn how to crochet the Crochet Pear Blossoms Doily here.

The Crochet Pear Blossoms Doily, from the Crochet For You Blog, is a cute, feminine crochet doily with only 15 rounds. I love how the little clusters look like blossoms and the last row adds a nice, elegant touch to the doily.  

13. Heavenly Flower Doily

Learn how to crochet the Heavenly Flower Doily here.

The Heavenly Flower Doily by Ramalakshmi Pasumarthy, is a crochet doily that will remind you of exactly that, a heavenly flower! This free doily pattern is a great accent in the home to use during those spring months. 

14. Tulip Doily

Learn how to crochet the Tulip Doily here.

The Tulip Doily is a wonderful spring doily pattern, and would be perfect for putting underneath your own vase of tulips! This doily starts with a large, 8 petaled flower in the middle and then splits off into little tulip flowers at the edges.

15. Doily No. 1

Learn how to crochet the Doily No. 1 here.

This is another sweet and simple doily with a Japanese designer. This is a chart only pattern, but again, is easy to follow along. I love how this doily has big shells around the edges, especially since it gives it the appearance of being a flower.

I hope you enjoyed this list of 15 Crochet Spring Doilies and that they bring a refreshing breath of springtime goodness into your home! 

Are you envisioning it under a vase of freshly picked flowers or gracing your table during a delightful afternoon tea? However you make your doilies, I’m sure they will be lovely!

Thank you for reading, until next time!

Other Posts You May Like:

21 Stunning Crochet Lace Stitches

Hello everyone, today I have 21 Stunning Crochet Lace Stitches that you have to try if you love crocheting lace!

Are you looking for lacy, openwork, or airy crochet stitches? Need a little inspiration for your next crochet lace project? This list is perfect for you!  

What sort of projects can you crochet with lace? You can use these stitches for things like bags, table cloths, curtains, lacy scarves, shawls, garments, or even veils! Making lace is a lot of fun and I’ve personally made crochet lace patterns like a Gothic Table Runner and an Infinity Veil.

I have crocheted all 21 of these crochet lace stitches myself, however, some of them don’t have a written pattern, and are charts/diagrams only. A few of these stitch patterns I could not find the original creator or the website, but the charts are available as pins on Pinterest. If you know any of these stitch patterns or the creator, please let me know in the comments below so I can properly credit them.

Today I am using a variety of crochet thread from Hobby Lobby’s Artiste line. However, you can use any sort of yarn you like, just make sure to use an appropriate sized hook for your yarn size.

Without further ado, here’s a list of 21 Stunning Crochet Lace Stitches that you should try today!

Related Posts:

21 Stunning Crochet Lace Stitches:

1. Solomons Knot 

Click here to learn the Solomon’s Knot Stitch

The Solomon’s Knot stitch (also known as the Lover’s Knot stitch) is a lacy stitch that is so cool to do! I’ve actually crocheted a very pretty Solomon’s Knot veil using this type of stitch. 

When crocheted, this stitch looks like little X’s or diamonds. This stitch is achieved by making really tall single crochets and then single crocheting again into the back loop (3rd loop) of the tall single crochet stitch. You can change the way the stitch pattern looks depending on how high you make your single crochets.

2. Lace Star Flower Stitch

Click here to learn the Lace Star Flower Stitch

The Lace Star Flower stitch is an airy, openwork crochet stitch that looks like a pointed flower or a star. This stitch is one of those stitches that looks harder to do than it actually is. It’s a two row repeat and is achieved by making V stitches, chains, and single crochets.

3. Flower Garden Stitch

Click here to learn the Flower Garden Stitch

The Flower Garden stitch is a flowery, lacy crochet stitch. Use it to feminize crochet projects like market bags or scarves or shawls or make a veil like this one. This stitch is a little more complex with a 4 row repeat and is achieved by making a series of treble clusters, V stitches, and chains. 

4. Fancy Lace Stitch

Click here to learn the Fancy Lace Stitch

The Fancy Lace stitch is a wonderfully simple lace stitch that consists of little mini shells. To crochet the stitch, you will make 2 double crochets, chain 2, and then 2 more double crochets into the same stitch, then repeat. It’s so easy…and fancy!

5. Picot Trellis Stitch

Click here to learn the Picot Trellis Stitch

The Picot Trellis stitch is an interesting, open crochet stitch that uses picots and chains to create a mesh like fabric. A picot is made by single crochet into a stitch, chaining a number of chains (in this pattern it’s a chain 3), and then single crocheting into the same stitch. This is another easy, two round repeat stitch pattern.

6. Y Stitch

Click here to learn the Y Stitch

The Y stitch is a fun combination stitch that looks just like the letter Y! This stitch is made by treble crocheting, chaining 1, and then double crocheting into the post of the same treble crochet just made. 

7. Treble Cross Stitch

Click here to learn the Treble Cross Stitch

The Treble Cross stitch is an X shaped stitch that is tall and lacy. This stitch is achieved by crocheting two stitches together and then doing a similar technique seen with the Y stitch back into the middle of what is the X. It’s pretty neat!

8. Eyelet Mesh Stitch

Click here to learn the Eyelet Mesh Stitch

The Eyelet Mesh stitch is a light, open crochet stitch that creates little eyelets as you work. An eyelet is defined as a small hole, edged with embroidered stitches as part of a design. In this case the eyelet is created by make a wide V stitch and then single crocheting into the top of the V stitch chain space to make those “embroidered” stitches. It’s a simple 2 row repeat with double crochets, single crochets, and chains being the only types of stitches used.

9. Crochet Leaf Stitch

Click here to learn the Crochet Leaf Stitch

The Crochet Leaf stitch is a more complex crochet lace stitch that looks like two little leaves coming off a stem. This stitch does not have a written pattern, but a chart is provided with the repeat formula outlined to make the pattern as long or short as you’d like.  

10. Crochet Open Boho Lace Stitch

Click here to learn the Open Boho Lace Stitch

This is another lacy stitch that is a chart only pattern. I honestly don’t know if this particular stitch has an official name, but I did find a crochet boho sweater pattern that used this same stitch, so I’ll just call it the Boho Lace stitch for this article. It’s a really easy repeat and works up so nicely. This pattern consists of V stitches, chains, and single crochets.

11. Shells and Chains Stitch

Click here to learn the Shells and Chains Stitch

The Shells and Chains Stitch is a beautiful pattern that consists of an arrangement of shells and lacy chains. This pattern is a chart only, but once a few rows are worked, you’ll whip this up in no time.

12. Diamond Mesh Stitch

Click here to learn the Diamond Mesh Stitch

The Diamond Mesh stitch is a classic crochet lace stitch. You’ll see this type of stitch in many crochet doily and shawl patterns and is easily customizable by increasing or decreasing the amount of chains between single crochets. This pattern is in UK terms, not US, so keep that in mind (when the pattern says double crochet, that actually means single crochet in US terms).

13. Spider Lace Stitch

Click here to learn the Spider Lace Stitch

The Spider Lace stitch looks exactly like a spider in a window (I guess technically it has 6 legs, not 8, but we’re rolling with it). This stitch uses a combination of mesh stitches, chains, and a double crochet cluster. 

14. Lace Flower Stitch

Click here to learn the Lace Flower Stitch

The Lace Flower stitch is created by crocheting, cute little puff stitches that make up three flower petals, surrounded by chains. 

15. Zigzag Lace Stitch 

Click here to learn the Zigzag Lace Stitch

The Zigzag Lace stitch is a fun crochet stitch pattern. You either chain 2 or chain 6 and place double crochets in such a way that it creates a zig zag effect.

16. Lacy Clubs Stitch

Click here to learn the Lacy Clubs Stitch

I’m actually not sure what this stitch is officially called, but as I was crocheting this swatch, it reminded me of the suit of clubs in traditional card games. This is a chart only pattern, but I found that crocheting into the chains themselves (not the spaces) really helped keep the club together. 

17. Geometric Circles Stitch

Click here to learn the Geometric Circles Stitch

Another mystery stitch, in which I am unsure of the name, so I’m calling it the Geometric Circle stitch. This is a simple crochet pattern in which you will create little “spoked” circles that make an overlapping illusion, so it’s kind of fun to look at if I’m going to be honest. This stitch pattern is made by chains and double crochets and is pretty easy to remember after crocheting a few rows.

18. Open and Closed Squares Stitch

Click here to learn the Open and Closed Squares Stitch

This openwork crochet stitch consists of tiny, open squares, and larger, open squares. It almost reminds me of a retro tile pattern. In this stitch pattern, I suggest again, crocheting into the chains, not into the chain spaces.

19. Retro Lace Stitch

Click here to learn the Retro Lace Stitch

The Retro Lace stitch pattern is another geometric lace stitch that consists of chains, single crochets and treble crochets. It’s another stitch pattern that is easy to do once you get into a rhythm. 

20. Little Lace Flowers Stitch

Click here to learn the Little Lace Flowers Stitch

This is a cute, lacy crochet stitch that creates little, 3 petaled flower motifs. You’ll chain between the flower motifs to give this stitch pattern a lacy look. This is a pattern where I would recommend to single crochet the flower petals into the chains themselves and not the chain spaces, so that the finished fabric looks more polished.

21. Shell Lattice Stitch

Click here to learn the Shell Lattice Stitch

I hope you enjoyed this list of 21 Stunning Crochet Lace Stitches and that they inspire you to create something great! 

Other Posts You May Like

17 Thick Crochet Stitches to Try for Your Next Project

Hello everyone! Today, I’ve compiled a list of 17 Thick Crochet Stitches that will add warmth and coziness to your next project! 

As November brings colder weather, I’ve been thinking of ways to create denser, chunkier fabrics in my crochet work. While using thicker yarn is an obvious choice, sometimes we want to use what we already have on hand or avoid buying new yarn.

So, I’ve put together a collection of thick crochet stitches that can help you achieve a warmer hat, blanket, scarf, or whatever your heart desires! 

Many of these stitches use layering effects, multiple yarn overs in the same stitch, or crocheting around stitches a row or two below.  

Enjoy the warmth and texture these stitches can bring to your crochet creations!

Related Posts:

Please note that some of these links are affiliate links. That means that if you click on these links and make a purchase, I may receive a commission at no extra cost to you. You can find more information about our disclosure policy here. Thank you for your support.

#1 Puff Stitch

Learn how to crochet the Puff Stitch here.

Yarn Pictured: Mainstays 100% Cotton Yarn in Daylily Pink

The puff stitch is one way to help thicken up your crochet project. The puff stitch creates a raised, textured, “puff,” and is often added for extra interest or dimension. The technique involves yarning over and inserting the hook into the next stitch (usually 3, 4 or more times), and pulling through all the loops at once.

#2 Popcorn Stitch

Learn how to crochet the Popcorn Stitch here.

Yarn Pictured: Red Heart Super Saver 4 Medium Acrylic in Dusty Gray

The popcorn stitch is a fun way to add density by creating little round balls that look sort of like popcorn kernels. These little “popcorns” are great for making the cutest blankets and baby items. To crochet a popcorn stitch, begin by executing a set number of double crochets, usually five or more. After the final double crochet, remove your hook from the loop, insert it into the first double crochet, retrieve the loop from the last double crochet, and pull it through.

#3 Bullion Stitch

Learn how to crochet the Bullion Stitch here.

Yarn Pictured: Yarn Bee Soft Secret in Navy

The bullion stitch, also known as the roll stitch, creates cute, little ‘coils’ into your crochet projects. I’ve personally crocheted a few bookmarks using this stitch, and its unique texture adds an elegant touch to the work.

To do the bullion stitch, wrap the yarn around your hook (typically at least 5 times, although some patterns may vary), insert it into the next stitch, yarn over, and then pull through all the loops.

While the first two loops are usually straightforward, the following ones can be a bit challenging. To ease the process, pulling the loops away from the hook as you draw through can be quite helpful.

#4 Bobble Stitch

Learn how to crochet the Bobble Stitch here.

Yarn Pictured: Peaches and Creme Solid 4 Medium Cotton Yarn in White

The bobble stitch is a cluster of stitches (usually double crochets) that makes a ball texture similar to the popcorn stitch. However, the technique for creating the bobble stitch differs. Typically these stitches are created by double crocheting 4-5 times in the same stitch, but you hold back the last pull through for each double crochet. After the last double crochet is made, you pull through all of the double crochets to create the bobble.

#5 Jasmine Stitch

Learn how to crochet the Jasmine Stitch here.

Yarn Pictured: Lion Brand Feels Like Butta Yarn in Pale Grey

The jasmine stitch is a super thick, super dense crochet stitch. It’s also one of (in my opinion) the hardest crochet stitches to make. The technique results in beautiful flower shapes and each petal is created by an alternative puff stitch technique. If you’re looking to add warmth to your project or maybe just use up a bunch of yarn fast, the jasmine stitch is the perfect choice.

#6 Crocodile Stitch

Learn how to crochet the Crocodile Stitch here.

Yarn Pictured: Yarn Bee Soft Secret in Tobacco

The crocodile stitch stands out as a distinctive crochet technique, creating layers of fabric that resemble reptile or fish scales (or feathers in some patterns), providing an interesting 3D effect to your projects.

While it’s an enjoyable stitch to create, it can pose a bit of a challenge initially. The process involves crocheting a row of ‘ladders’ and then double crocheting around the rungs of the ladder row in a circular fashion.

#7 Thermal Stitch

Learn how to crochet the Thermal Stitch here.

Yarn Pictured: Peaches and Creme Ombre 4 Medium Cotton Yarn in Oasis

The thermal stitch earns its name from how warm it will keep you during those cold months! It’s a crochet stitch that is double layered, making it dense and sturdy. It’s the perfect stitch for crochet projects that are going to be subject to any sort of wear and tear (potholders, dishcloths, bags, rugs, etc.). This stitch requires you to crochet in the back loops of the current row and then into the loop of the row directly below.

#8 Waffle Stitch 

Learn how to crochet the Waffle Stitch here.

Yarn Pictured: Yarn Bee Soft Secret in Cocoa

The waffle stitch is so enticing; you might find yourself tempted to take a bite out of your work (just kidding!). But in all seriousness, the waffle stitch not only resembles a delicious waffle but also promises to keep you warm throughout the winter.

Created by a combination of front post double crochets and regular double crochets, this cozy crochet stitch adds both texture and visual appeal to your projects.


#9 Basket Weave Stitch 

Learn how to crochet the Basket Weave Stitch here.

Yarn Pictured: Yarn Bee Soft Secret in White

The basket weave stitch is a layered technique that showcases a woven texture similar to a handmade basket. To achieve this stitch, you repeat a sequence of front post and back post double crochets for a few rows, and then switch the two stitches. The result is a visually appealing pattern that adds depth and interest to your crochet projects.

#10 Alpine Stitch

Learn how to crochet the Alpine the Stitch here.

Yarn Pictured: Hobbi Yarn Rainbow Cotton 8/4 in Natural White

The alpine stitch is a distinctive technique that makes a solid, warm fabric, reminding me of the imagery of trees seen from an aerial view on a mountainside. To make this stitch, you alternate between rows of single crochets and rows of front post double crochets worked into stitches two rows below. The result is a textured pattern that looks like a mountainous landscape, providing both visual interest and coziness to your crochet projects.


#11 Bean Stitch

Learn how to crochet the Bean Stitch here.

Yarn Pictured: Peaches and Creme Stripey 4 Medium Cotton Yarn in Linen

The bean stitch is a wonderfully cozy stitch. It’s a simple pattern that creates a fabric that looks like little beans in a zig-zag fashion. This is made by making puff stitches and single crochets, it’s that easy! Plus, who doesn’t love beans!? 


#12 Rice Stitch 

Learn how to crochet the Rice Stitch here.

Yarn Pictured: Hobbi Yarn Rainbow Cotton 8/4 in Beige

The rice stitch is a dense crochet pattern, similar to the basket weave stitch, but with a twist. In this stitch, the alternation between front post double crochets and back post double crochets occurs more rapidly, resulting in a fabric that resembles small grains of rice. 


#13 Bead Stitch

Learn how to crochet the Bead Stitch here.

Yarn Pictured: Red Heart Super Saver 4 Medium Acrylic in Real Teal

The bead stitch is a gorgeous and thick stitch that literally looks like beads. This yarn-eating stitch is simply made by making a double crochet and then basically puff stitching around that same double crochet. 


#14 Waistcoat Stitch 

Learn how to crochet the Waistcoat Stitch here.

Yarn Pictured: Hobbi Yarn Rainbow Cotton 8/4 in Brown

The waistcoat stitch is a dense crochet stitch that consists solely of single crochets, a surprising choice for creating thickness. The technique behind this stitch involves, instead of entering the top of the next stitch in the traditional manner, inserting the hook directly into the ‘legs’ of the next stitch. 

While mastering this stitch can be somewhat challenging, especially without adjusting the hook size or maintaining a loose tension, the result is a fabric that not only appears thick but also looks like knitting. When worked in the round, the little knitted V’s align more evenly, adding a neat finish to the project.


#15 Thick Marguerite Stitch 

Learn the Thick Marguerite Stitch here

Yarn Pictured: Hobbi Yarn Rainbow Cotton 8/4 in Petunia Pink

The thick marguerite stitch is such a cute stitch that resembles little stars (and it’s a variation of the star stitch). It creates a thicker fabric than the normal version by yarning over an extra time and helping to bulk up the stitch. It reminds me of the jasmine stitch, only much easier.


#16 Feather Stitch

Learn how to crochet the Feather Stitch here.

Yarn Pictured: Hobbi Yarn Rainbow Cotton 8/4 in Green

The feather stitch is a fun and layered crochet technique that, after a couple of rows, mimics the appearance of feathers on a folded bird wing. The method of creating the feather stitch is similar to the puff stitch, but with a twist—your hook is inserted into different positions in both the current row and the row below. This approach results in a textured pattern that resembles the beauty of feathers.


#17 Celtic Weave Stitch 

Learn how to crochet the Celtic Weave Stitch here.

Yarn Pictured: Hobbi Yarn Rainbow Cotton 8/4 in Yellow

The celtic weave stitch is a thick crochet stitch that looks like a diagonal woven basket. Achieved by crisscrossing front post treble crochets in one row and then executing back post treble crochets in the next, this stitch creates a textured fabric similar to traditional Celtic patterns.

Other Posts You May Like:

I hope that you enjoyed this list of 17 Thick Crochet Stitches! Whether you’re working on a cozy blanket, a stylish scarf, or a snug hat, these stitches are sure to bring warmth to you and your loved ones during the colder months!

Until next time!

Gothic Crochet Table Runner Pattern

Hello everyone, today I’m excited to present my latest crochet pattern, the “Gothic Crochet Table Runner.” 

If you’re looking to add a bit of gothic decor to your home, you’ll absolutely love this pattern! The black yarn and the lacy design will transform your dining or coffee table into a statement piece, plus you can tell all your guests you made it yourself! Talk about impressive.

The center of the table runner was inspired by the Gothic Crochet Stitch by astra.lebedeva2019 on Instagram. I loved the way these diamonds are created in that pattern, however for the tiny crochet thread we will be using, I wanted to make the diamonds look more lacy and a little thicker. 

This is a beautiful crochet table runner pattern, created with black crochet thread, however, it is another crochet pattern that takes time to complete and it is designed with crocheter’s who have an intermediate to advanced skill set. 

I didn’t time myself, and I’m a busy mom of little kids, so you’ll probably get it finished faster than me! If I had to guess, this probably took me a month to finish, of inconsistently crocheting 1-2 hours every day. Your time may vary obviously!

Related Posts:

I’ve adjusted the pattern instructions to allow you to make your table runner as long as you want. I don’t recommend making the short side longer than what I’ve described below, I think it makes the table runner look too wide on that side.

But seriously, look at how pretty this thing is! 

Now as a reminder, I try my best to make pattern instructions accurate, but I AM just a mom who likes to crochet, so please let me know if you see any errors by commenting below. 

With all that, let’s get started on this Gothic Crochet Table Runner Pattern!

Please note that some of these links are affiliate links. That means that if you click on these links and make a purchase, I may receive a commission at no extra cost to you. You can find more information about our disclosure policy here. Thank you for your support.

Materials Needed:

Abbreviations Used:

  • St(s) – stitch(es)
  • Ch(s) – chain(s)
  • Sl st – slip stitch
  • Sc – single crochet
  • Dc – double crochet
  • Fpdc – front post double crochet
  • Trc – treble crochet

Special Stitches:

Puff Stitch – YO (yarn over), insert hook into designated st/space, pull up a loop x 5 times (11 loops on your hook), YO, pull through all but the last loop (2 loops on your hook), YO, pull through last 2 loops.

Triangle Increase/Decrease – I will discuss these two stitches in detail below. Essentially, this is a group of trcs/dcs that create the top or bottom part of our diamonds.

Special Instructions:

  • I do not have st counts at the end of the rows. This is to allow you freedom to make your table runner as long or short as you’d like.
  • Instructions in () are grouped this way to make it easier to read and is usually written this way to indicate a series of sts made in the same st.
  • There is a bit of math we will have to do later, but don’t worry, I will walk you through it as we get to those spots in the pattern.

Gothic Crochet Table Runner Pattern

Ch 53

Row 1: *YO twice, insert into 8th ch from hook, pull up a loop, YO and pull through 2 loops (3 loops on your hook), skip a ch.

YO insert your hook into next ch, pull up a loop, YO and pull through 2 loops (4 loops on your hook), skip a ch.

YO insert your hook into next ch, pull up a loop, YO and pull through 2 loops (5 loops on your hook), skip a ch.

YO insert your hook into next ch, pull up a loop, YO and pull through 2 loops (6 loops on your hook).

YO, pull through 4 loops, YO and pull through 2 loops, YO and pull through 2 loops again. This is your triangle decrease stitch.

Ch 2, skip 2 chs, trc into next ch, ch 1, dc into the first two “loops” in the leg of the trc you just crocheted (see pic below), ch 1, dc into same space, ch 1, dc into same space again. This is your triangle increase stitch

Ch 2, skip 2 chs*, repeat from *to* trc into the last ch (4 triangle decreases and 3 triangle increases)

triangle increase dc placement
First two "loops" of the trc in Row 1
GCTR Row 1
Row 1

Row 2: Ch 6 (counts as a trc and ch 2), turn, for this row, we will be making triangle decrease stitches on top of the previous row’s triangle increase stitches and vice versa. 

The last stitch from row 1 should have been a triangle decrease stitch, so for row 2, we will begin with a triangle increase stitch.

Skip the next ch 2 space, make a trc, but place it under the next stitch (not into it as you normally would). I find it helpful to think of this space as the “neck” of the last row’s triangle decrease stitch. Just find a space to insert your hook into the neck and trc there. If you trc into the stitch normally, the diamonds we are trying to create will look off-center. See pic below for a visual on the placement.

Triangle increase stitch as you did in row 1. Ch 2, now we will make a triangle decrease into the next triangle increase. Make a triangle decrease stitch as we did in row 1, using only the dcs and trc sts and skipping the ch 1 spaces between. 

If crocheted correctly, this will give us our first diamond shape. 

Ch 2 and repeat these two stitches with a ch 2 between each triangle increase and decrease After the last ch 2, finish your row by skipping 2 chs and trc into the next ch.

Row 3: Ch 6, turn, the first st below should be a triangle increase stitch, so we will begin with a triangle decrease stitch. ch 2, and triangle increase into the next triangle decrease like we did in row 2. There is no difference in this row compared to row 2, other than starting with a different triangle stitch. 

Repeat Rows 2-3 until you reach 62 rows or increase the length with a repeat of 12 rows, do not cut yarn.

Border:

Now we will be creating the border around our length of lacy diamonds. We need to do a few simple rows of sc around to create a nice, thick line, a few rows of mesh squares, and then we’ll finish with an intricate pattern consisting of a variety of stitches.

***Important note on length adjustments***

The last row of our scs border needs to follow a repeat of 27+24 sc (do not count the corner sts). We will be doing 3 rows total of sc. For each row, the sc will increase by two. 

So, for example, on the short side of our rectangle, we need to have a total of 47 sc on the first row. This will increase to 49 sc on the next row, and then to 51 sc on the last row. 27+24 = 51 sc.

This is where stitch markers come in handy on the long side to help you count. Just make a series of 27 sc and make sure that you can fit 24 more on the very last row of sc (row 3).

It seems like a lot, but this is the only way your beautiful border is going to fit. Avoid the headache later by getting the math right early, because we both know that we don’t have the time or patience to frog everything :).

Row 1: Ch 1 (does not count as a st), sc into the same st, ch 1 (place a stitch marker here to help identify the corners later, otherwise just pray you can find it later lol), sc again into the same st. Now turning down the side, we will be placing a series of 3 sc into the sides of either the turning chs or the trcs from the previous rows.

The last sc you made counts as part of that series of 3, so place 2 more sc into the side of the trc. See pic for a better visual below.

You will have to skip a ch when you reach the starting chs, and that is ok.

sc border placement

When you get close to the next corner, I found it easier to count 2 chs away from the triangle increase/decrease from the starting row and placing my corner st of (sc, ch 1, place a stitch marker, sc) into the next ch away. 

Now going down the next side (this should be the underside of our starting ch), place 1 sc into each ch 2 space, 1 sc into each of the bottoms of the 4 trc that make up the triangle decrease, 1 sc into each ch 2 space, and then 1 sc into the bottom of the triangle increase. Continue this way until you reach the next corner (the 3rd ch after you make 2 sc in the last ch 2 space) and (sc, ch 1, place a stitch marker, sc) in the same ch. 

***Make sure you have the same number of sts on each side***

Continue making sc around the next side and creating another corner st of (sc, ch 1, sc). 

Once you get back to the top of your work, sc into each st, but skip the ch 1s in the triangle increase stitches (it looks too wavy if you do).

Sl st to first sc.

Row 2: Ch 1 (does not count as a st), sc in same st, (sc, ch 1, place st marker, sc) into next ch 1 space, then make 1 sc in each st across (try not to skip the st right after you finish your corner st, sometimes it gets a little hidden). Continue making sc and your corners in this fashion. Sl st to first sc.

Row 3: Ch 1 (does not count as a st), sc in same st, sc in next st, make a corner st in the next ch 1 space (sc, ch 1, sc). Continue making sc and corner sts as you did in row 2. Sl st to first sc. 

***Take the time here to double check your st counts , remember, your last row needs to have a repeat of 27+24 not including the ch 1 corners. If you need to, it’s ok to add or skip scs to achieve the repeat formula.***

Now we will be making our mesh square rows.

Row 4: Sl st into next few sts until you reach the corner ch 1 space, sl st into the ch 1 space, ch 8 (counts as dc and ch 5), dc in same space, *ch 2, skip 2 sts, dc in next st* repeat from *to* all the way around. (dc, ch 5, dc) in the next ch 1 corner spaces. Sl st to top of 3rd ch of our starting ch 8.

***For my short side, I have 13 mesh squares and on my long side I have 58 mesh squares (not including the ch 5 corners) Your long side number may be different if you increased or decreased the length.***

Row 5: Ch 5, (counts as dc and ch 2), (dc, ch 5, dc) in next ch 5 corner space. *Ch 2, dc in next dc.* Repeat from *to* around, making (dc, ch 5, dc) in the ch 5 corner spaces. Sl st to 3rd st of starting ch 5.

Row 6: Ch 5, dc in next dc, ch 2, (dc, ch 5, dc), *ch 2, dc in next dc.* Repeat from *to* around, making (dc, ch 5, dc) in the ch 5 corner spaces. Sl st to 3rd st of starting ch 5.

***Go ahead and stop again, let’s count our mesh squares. Our last row of mesh squares needs to follow a repeat formula of 9+8 squares, not including the corners. I have 17 squares on my short side and 62 squares on my long side. Your border will not fit if we don’t follow this formula.***

GCTR Mesh Squares
Row 6

Row 7: Sl st in each ch and st until you reach the first corner and sl st into the ch 5 space.

(Ch 3, 2 dc, ch 5, 3 dc, ch 5, 3 dc) in same ch 5 space. Ch 4, *skip over next dc and ch 2, skip over next dc and ch 2 again, sc into next dc (should be the 3rd dc away from the corner space), [skip ch 2 space, (3 dc, ch 1, 3 dc) in next dc, skip ch 2 space, sc in next dc] x 2 times, ch 4, skip the next 2 mesh squares, in the next square, (3 dc, ch 5, 3 dc), ch 4.*

Repeat from *to* until you reach the next corner space, skip over last two mesh squares, (3 dc, ch 5, 3 dc, ch 5, 3dc) in the same ch 5 corner space. Continue this way until you reach the beginning ch, sl st into top of starting ch 3.

GCTR Row 7
Row 7

Row 8: Ch 3, (fpdc around next dc, dc in next dc, ch 4, sc in ch 5 space, ch 4, dc in next dc, fpdc around next dc, dc in next dc, ch 4, sc in ch 5 space, ch 4, dc in next dc, fpdc around next dc, dc in next dc), ch 4, skip ch 4 and next 3 dc,

*sc in ch 1 space, skip 3 dc, and place (3 dc, ch 2, 3 dc) in the next sc (between the two shells), skip 3 dc and sc in ch 1 space, ch 4, skip 3 dc and ch 4, (dc in first dc, fpdc in next dc, dc in last dc, ch 4, sc in ch 5 space, ch 4, dc in next dc, fpdc around middle dc, and dc around last dc), ch 4.*

Repeat from *to* until next corner space and (dc, fpdc around next dc, dc in next dc, ch 4, sc in ch 5 space, ch 4, dc in next dc, fpdc around next dc, dc in next dc, ch 4, sc in ch 5 space, ch 4, dc in next dc, fpdc around next dc, dc in next dc) in the corner. Continue this way until you reach the beginning ch, sl st into top of starting ch 3.

GCTR Row 8
Row 8

Row 9: Ch 3 (fpdc around fpdc, dc in next dc, ch 4, 2 sc in ch 4, sc in next sc, 2 sc in ch 4 space, ch 4, dc in next dc, fpdc around fpdc, dc in next dc, ch 4, sc in next sc, 2 sc in ch 4 space, ch 4, dc in next dc, fpdc around fpdc, dc in next dc), ch 5,

*skip to ch 2 space, (2 sc, ch 4, sc, ch 4, sc, ch 4, 2 sc) in ch 2 space, ch 5, skip 3 dc, skip sc and skip ch 4, dc in next dc, fpdc around fpdc, dc in next dc, ch 4, 2 sc in ch 4 space, sc in next sc, 2 sc in next ch 4 space, ch 4, dc in next dc, fpdc around fpdc, dc in next dc, ch 5.*

Repeat from *to* until you reach the corners, (dc in next dc, fpdc around fpdc, dc in next dc, ch 4, 2 sc in ch 4, sc in next sc, 2 sc in ch 4 space, ch 4, dc in next dc, fpdc around fpdc, dc in next dc, ch 4, sc in next sc, 2 sc in ch 4 space, ch 4, dc in next dc, fpdc around fpdc, dc in next dc), ch 5, skip to ch 2 space, (2 sc, ch 4, sc, ch 4, sc, ch 4, 2 sc) in corner spaces.

Continue this way until you reach beginning ch 3. Sl st to top of ch 3.

GCTR Row 9
Row 9

Row 10: Ch 3, (fpdc around fpdc, dc in next dc, *ch 5, skip ch 4, skip 2 sc, [2 sc, ch 4, sc, ch 4, sc, ch 4, 2 sc] in next sc, ch 5*, dc in the 4th ch away in next ch 4, dc in next dc, dc in fpdc, ch 5, dc in same st, dc in next fpdc, dc in 1st ch in next 4 ch.

Repeat from *to,* dc in next dc, fpdc in fpdc, dc in next dc), ch 6,

**skip ch 5, skip first ch 4 “loop,” sc in middle ch 4 “loop,” ch 6, dc in next dc, fpdc around fpdc, dc in next dc, ch 5, skip ch 4, skip 2 sc, [2 sc, ch 4, sc, ch 4, sc, ch 4, 2 sc] in next sc, ch 5, fpdc around fpdc, dc in next dc, ch 6.**

Repeat from **to** until corner spaces, (dc in next dc, fpdc around fpdc, dc in next dc, *ch 5, skip ch 4, skip 2 sc, [2 sc, ch 4, sc, ch 4, sc, ch 4, 2 sc] in next sc, ch 5*, dc in the 4th ch away in next ch 4, dc in next dc, dc in fpdc, ch 5, dc in same st, dc in next fpdc, dc in 1st ch in next 4 ch.

Repeat from *to,* dc in next dc, fpdc in fpdc, dc in next dc) in corner spaces. Continue this way until you reach the beginning, sl st to top of starting ch 3.

GCTR Row 10
Row 10

Row 11: Ch 3, (fpdc around fpdc, dc in next dc, *ch 11, skip over ch 5, skip the set of ch 4 loops, skip next ch 5, and dc in next dc, fpdc around next dc, dc in next dc*, ch 5, puff st in next ch 5 space, ch 5, puff st in same space, ch 5, dc in next dc, fpdc around next dc, dc in next dc. Repeat from *to* once more.)

**Ch 4, puff st in 6th ch in next ch 6, ch 3, skip next sc, puff st in 1st ch of next ch 6, ch 4, dc in next dc, fpdc around fpdc, dc in next dc**, repeat from *to* once more, repeat from **to.**

Continue this way until next corner space, ch 4, dc in next dc and repeat instructions in () for the next corner. Sl st to top of beginning ch 3.

GCTR Row 11 Corner
Row 11 Corner
GCTR Row 11
Row 11

Row 12: Ch 3, (fpdc around fpdc, dc in next dc, ch 4, 2 dc in 5th ch away, 2 dc in next ch, 2 dc in next ch, ch 4, skip next 3 dc, skip 1st ch 5 space, puff st in next ch 5 space, ch 3, puff st in same space, ch 3, puff st in same space again, ch 4, skip next ch 5, skip next 3 dc, 2 dc in 5th ch, 2 dc in next ch, 2 dc in next ch, ch 4, dc in next dc, fpdc around fpdc, dc in next dc),

*ch 4, puff st in ch 3 space, ch 3, puff st in same st, ch 4, dc in next dc, fpdc around fpdc, dc in next dc, ch 4, 2 dc in 5th ch away, 2 dc in next ch, 2 dc in next ch, ch 4, dc in next dc, fpdc around fpdc, dc in next dc.*

Repeat from *to* until next corner space, dc in next dc, repeat instructions in () for corners. Continue this way until beginning and sl st into top of starting ch 3.

GCTR Row 12 Corner
Row 12 Corner
GCTR Row 12
Row 12

Row 13: Sl st into next 2 dc, sl st into next 4 chs, sl st into dc, [ch 3, dc in next 2 dc, ch 9, dc in next 3 dc, ch 4, skip ch 4, puff st into next ch 3 space, ch 3, puff st in same space, ch 9, (puff st, ch 3, puff st) in next ch 3 space, ch 4, dc in next 3 dc, ch 9, dc in next 3 dc],

ch 4, *skip ch 4, skip next 3 dc, (puff st, ch 3, puff st) in ch 3 space, ch 4, skip ch 4, skip 3 dc, dc in next 3 dc, ch 9, dc in next 3 dc, ch 4.*

Repeat from *to* until corner spaces, (puff st, ch 3, puff st), in ch 3 space, ch 4, dc in next dc, repeat instructions in [ ] for corners. Continue this way until beginning and sl st into starting ch 3.

GCTR Row 13 Corner
Row 13 Corner
GCTR Row 13
Row 13

Row 14: Sl st into next 2 dc, sl st into ch 9 space, ch 3, **(ch 1, dc x 8 times [you should have 9 dc]), ch 2, skip 3 dc and sc into ch 4 space, ch 5, (puff st, ch 3, puff st) into next ch 3 space, (ch 3, puff st x 3 times [3 puff sts total]) in ch 9 space,  ch 3, (puff st, ch 3, puff st) in ch 3 space, ch 5,**

*sc into ch 4 space, ch 2, skip 3 dc, (dc, ch 1 x 8 times) in ch 9 space, 1 more dc into same ch 9 space, ch 2, skip 3 dc, sc into ch 4 space, ch 5 (puff st, ch 3, puff st) into ch 3 space, ch 5.*

Repeat from *to* until the next corner, skip 3 dc, dc into ch 9 space, repeat from **to** for corners. Sl st into 3rd ch of starting ch 4.

GCTR Row 14 Corner
Row 14 Corner
GCTR Row 14
Row 14

Row 15: Ch 7 (counts as trc and ch 3), 2 dc into 4th ch away from hook, **(trc into next dc, ch 3, 2 dc into trc just made x3 times), trc into next dc, ch 3, 2 dc into trc just made, ch 3, sl st into same trc, ch 3, 2 dc into same trc again, (trc into next dc, ch 3, 2 dc into trc just made x 3 times), trc in last dc, (you should have 9 trc and 9 “tags”) ch 2**

Skip ch 2, skip ch 5, *(puff st, ch 5, 2 dc into 4th ch away from hook, ch 3, sl st into same ch, ch 1, puff st) into next ch 3 space, (ch 5, 2 dc into 4th ch away from hook, ch 3, sl st into same ch, ch 1)*

Skip next ch 3 space, repeat from *to* twice more, skip next ch 3 space (puff st, ch 5, 2 dc into 4th ch away from hook, ch 3, sl st into same ch, ch 1, puff st) in next ch 3 space. (You should have a total of 8 puff sts and 7 “tags” between the puff sts), ch 2, skip ch 5 space skip ch 2 space, trc into first dc, ch 3, 2 dc into trc just made,

Repeat from **to,** skip ch 2, skip ch 5, (puff st, ch 5, 2 dc into 4th ch away from hook, ch 3, sl st into same ch, ch 1, puff st) in next ch 3 space, ch 2, skip ch 5, skip ch 2, trc in first dc, repeat from **to** again.

Continue this way around until next corner, ch 2, trc into first dc and repeat from beginning for the corners. Sl st to 4th ch in starting ch 7.

GCTR Row 15 Corner
Row 15 Corner
GCTR Row 15
Row 15

Cut yarn with scissors, weave in any ends with tapestry needle.

CONGRATULATIONS!! You made it!!

Blocking:

To block your gothic crochet table runner, soak it in a large bowl of water for 1-2 minutes. Gently squeeze out the excess water.

Now, you can be fancy and use puzzle blocking boards to help you pin your table runner in place. These are great because you can make them as long and wide as you want (great for long crochet projects).

Or you can place it on a large towel/layer a few towels together, then pin it through the towels. 

Leave it to dry for at least 24 hours.

Thank you for checking out the Gothic Crochet Table Runner Pattern. I hope that yours turned out beautifully! If you have questions or if you find a mistake, please let me know in the comments below.

Until next time!

Other Posts You May Like: