CROCHET SKULL PATTERN – Lace of the Dead

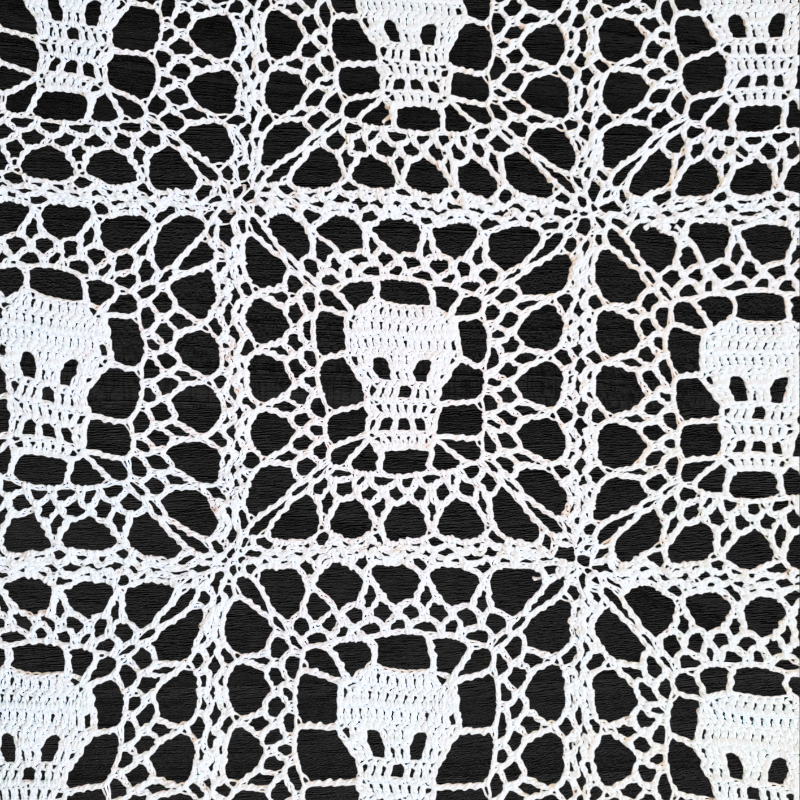
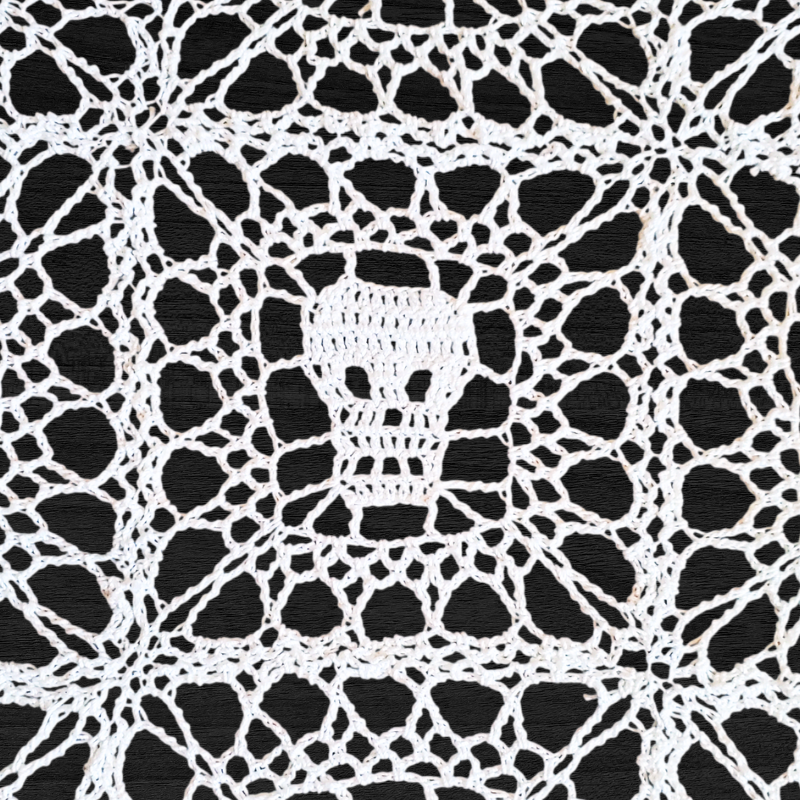
Hey everyone, today I have another crochet skull pattern for you to try, The Lace of the Dead! 

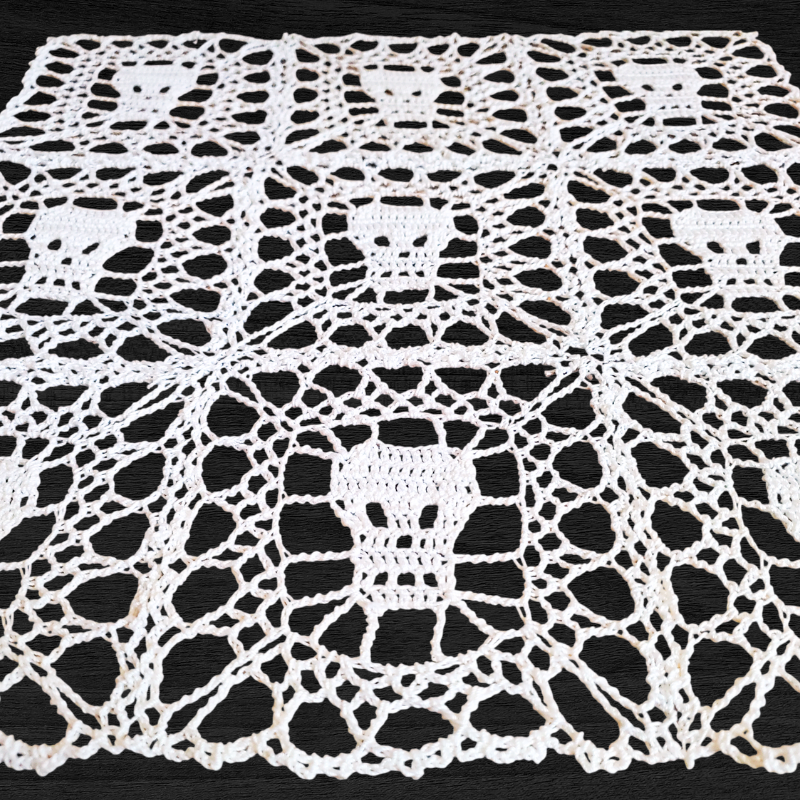
This is a lacy rectangle with a skull motif right in the center. It’s very similar to my Skully Squares Stitch Pattern, but we will be working in rows and in the round.

I think this pattern is awesome, and I hope you do too. It isn’t perfectly square, I think it’s more rectangular in shape, but I bet all you creative out there can think of fun and spooky ways to use this lace!

The Lace of the Dead would look AMAZING as a spooky table runner or as curtains. You could use it in Gothic attire, like in a shawl or shirt. The possibilities are endless!

You will need to join each finished piece together. I sewed mine with the same crochet thread I used to make it. It took me some time to sew them together, but the finished product is worth it in my opinion!

I am using size 10 crochet thread for this crochet skull pattern. You can always use whatever yarn and hook floats your boat, just remember it will be a different size than mine if you do.

Related Posts:
Please note that some of these links may be affiliate links. That means that if you click on these links and make a purchase, I may receive a commission at no extra cost to you. You can find more information about our disclosure policy here. Thank you for your support.

Materials Used:

Abbreviations Used (US Terms)

  • St(s) – stitch(es)
  • Ch(s) – chains
  • Sc – single crochet
  • Dc – double crochet
  • Dc3tog – double crochet 3 stitches together
  • Tr – treble crochet
  • Dtr – double treble crochet
  • Tr2tog – treble crochet 2 stitches together
YOUTUBE VIDEO NOT LOADING? CLICK TO LEARN THE LACE OF THE DEAD CROCHET PATTERN HERE.
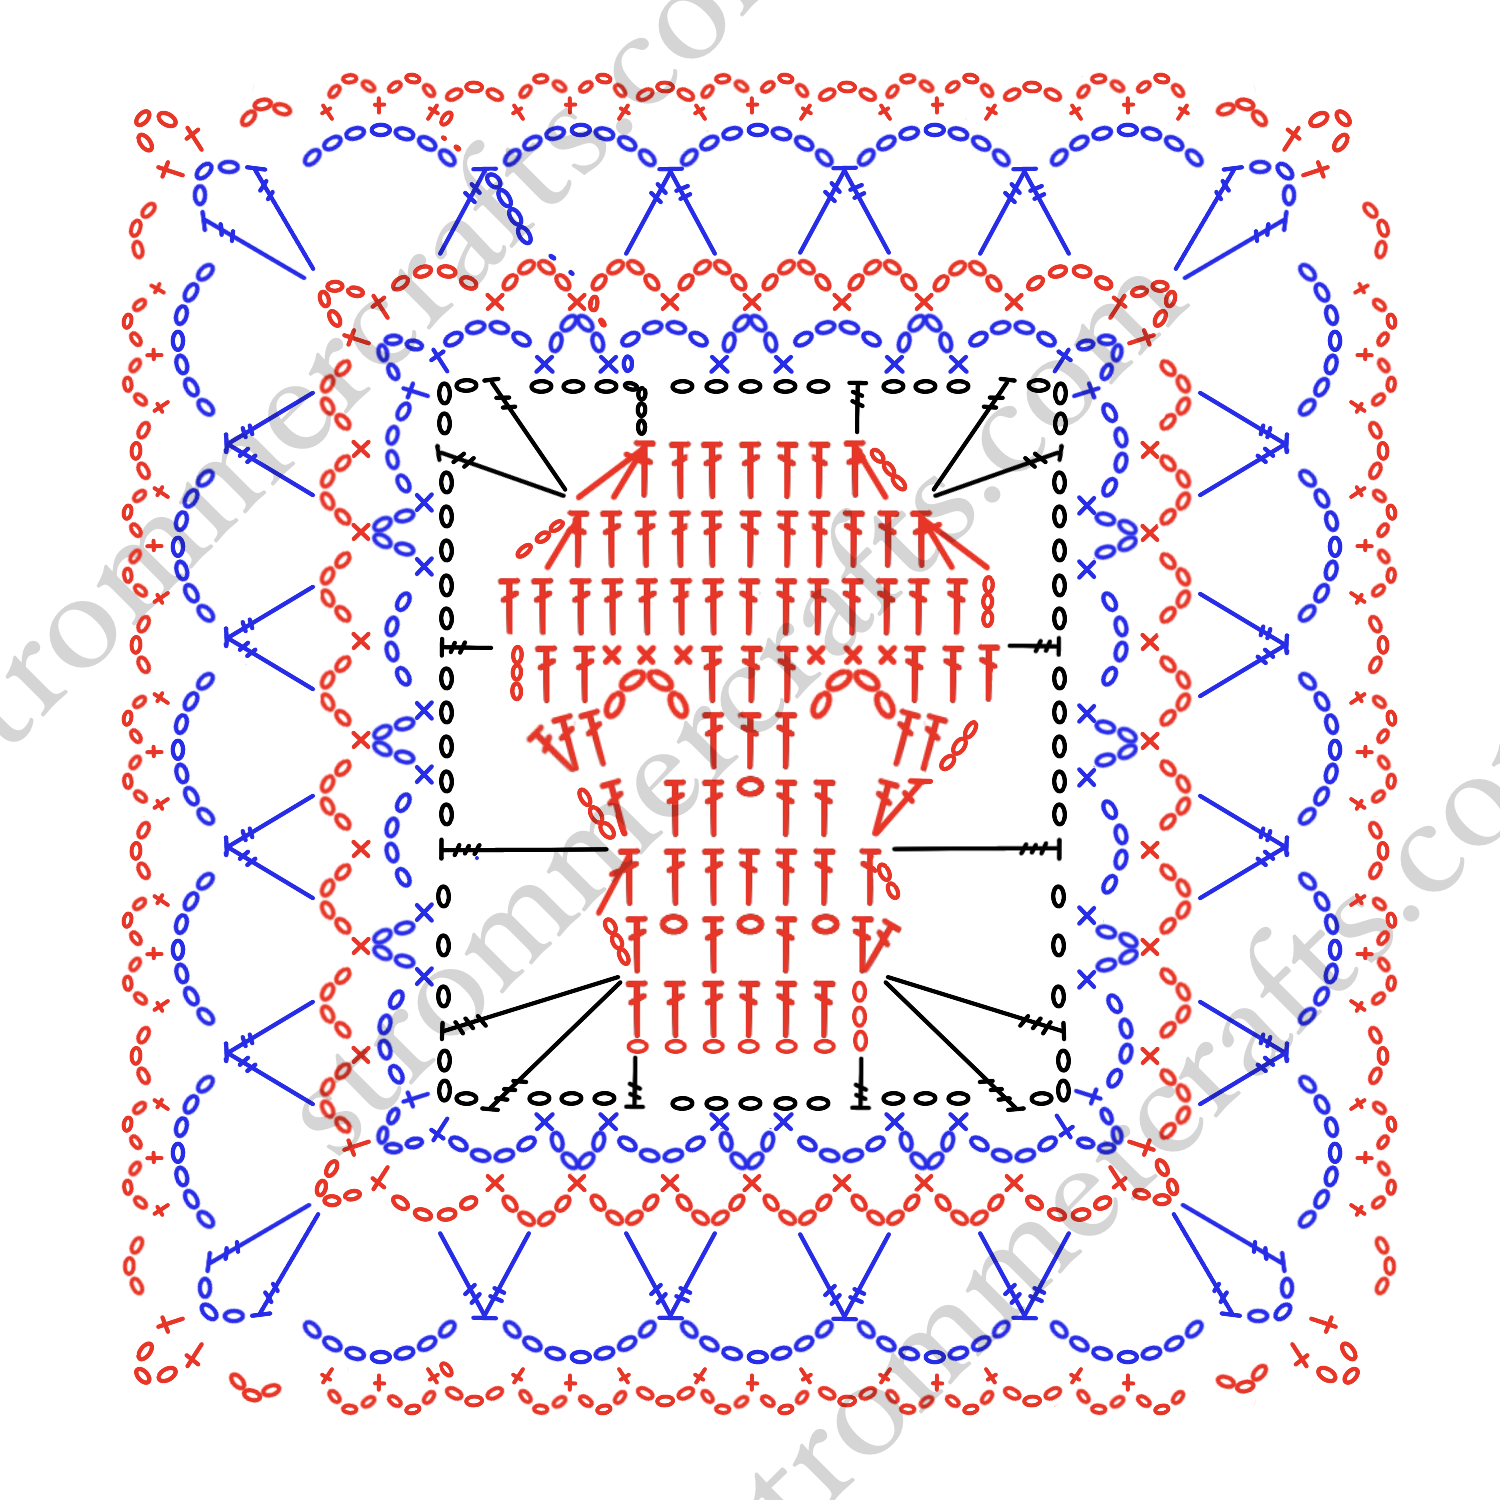
Lace of the Dead Pattern:

To start, we will be making the skull motif first and then work in the round.

Ch 9

Row 1: Dc into 4th ch away from hook, dc into each ch across (7 dc)

Row 2: Ch 3 (counts as dc), turn, dc in same st, ch 1, skip a st, dc in next st. Ch 1, skip a st, dc in next st, ch 1, skip a st, 2 dc in last st. (6 dc, 3 ch 1s)

Row 3: ch 2, dc into next st (the ch 2 and dc count as a 2dctog), *dc into next ch 1 space, dc in next dc* Repeat from *to* across until last 2 sts left, dc2tog in last 2 sts. (7 sts)

Row 4: Ch 3 (counts as dc), turn, dc in same st, dc in next 2 sts. Ch 1, skip a st, dc in next 2 sts, 2 dc in last st. (8 dc, 1 ch 1)

Row 5: Ch 3 (counts as dc), turn, dc in same st, dc in next st, ch 4, skip a st, dc in next st, dc in next ch 1 space, dc in next dc. Ch 4, skip a st, dc in next st, 2 dc in last st. (8 dc, 2 ch 4s)

Row 6: Ch 3 (counts as dc), dc in next 2 sts, 3 sc in next ch 4 space, dc in next 3 sts, 3 sc in next ch 4 space, 3 dc in last 3 sts. (9 dc, 6 sc)

Row 7: Ch 3 (counts as dc), turn, dc in each st across (15 dc)

Row 8: Ch 3 (counts as part of dc3tog), turn, dc2tog in next 2 sts. Dc in next 9 sts. Dc3tog in last 3 sts. (9 dc, 2 dc3togs)

Row 9: Ch 3 (counts as part of dc3tog), turn, dc2tog in next 2 sts. Dc in next 5 sts. Dc3tog in last 3 sts. (5 dc, 2 dc3togs)

At this point we are done with the skull and will start crocheting in the round.

Round 1: Ch 7 (counts as tr and ch 3), Now we will go down the side.

(tr, ch 3, tr) in the top of Row 8s starting dc3tog. Ch 5, tr in top of starting ch 3 in Row 6. Ch 5, dtr in last 2dctog in Row 3. Ch 3, (Dtr, ch 3, dtr) in top of the last dc in Row 1. 

Now turning on the underside, tr into the bottom of that same dc you just crocheted into from Row 1. Ch 5, skip 5 dc, tr into the first dc of Row 1(it is a ch 3). Ch 3.

Now we will go up the next side.

(Dtr, ch 3, dtr) in the top of that starting dc from Row 1 (the top of the ch 3). Ch 3, dtr into first dc2tog in Row 3. Ch 5, tr into the last dc of Row 6. Ch 5, (tr, ch 3, tr) into last dc3tog of Row 8.

Now turning into the next side, tr into the first dc3tog of Row 9. Ch 5, sl st into the 4th ch of our starting ch 7.

Round 2: Sl st into the next ch 3 space. (Sc, ch 4, sc) in the same ch 3 space. Ch 4, (sc, ch 4, sc) in the next ch 3 corner space.  

Ch 4, (sc, ch 4, sc) in next ch 5 space. Ch 4, (sc, ch 4, sc) in next ch 5 space. Ch 4, (sc, ch 4, sc) in next ch 3 space. 

Ch 4, (sc, ch 4, sc) in next ch 3 corner space. Ch 4, (sc, ch 4, sc) in next ch 3 space. Ch 4, (sc, ch 4, sc) in next ch 5 space. Ch 4, (sc, ch 4, sc) in the next ch 3 space.

Ch 4, (sc, ch 4, sc) in next ch 3 corner space. Ch 4, (sc, ch 4, sc) in next ch 3 space. Ch 4, (sc, ch 4, sc) in next ch 5 space. Ch 4, (sc, ch 4, sc) in next ch 5. 

Ch 4, (sc, ch 4, sc) in next ch 3 corner space. Ch 4, (sc, ch 4, sc) in next ch 3 space. Ch 4, (sc, ch 4, sc) in next ch 5 space, ch 4 sl st to 4th ch of starting ch 7.

Round 3: Sl st into ch 3 space. Ch 1, sc in same ch 3 space. Ch 4, sc in next ch 4 space. Ch 4, (sc, ch 4, sc) in next ch 4 corner space.

*Ch 4, sc in next ch 4 space*

Repeat from *to* until the ch 4 corner spaces. (Sc, ch 4, sc) in those spaces. Sl st to beginning sc.

Round 4: Sl st into next 2 chs. Ch 4, tr in next ch 4 space. Ch 7, (tr, ch 3, tr) in next ch 4 corner space. 

*Ch 7, tr2tog with the first leg in the next ch 4 space and the second leg in the next ch 4 space.*

Repeat from *to* until the corner space. (Tr, ch 3, tr) in ch 4 corner spaces. Sl st to first tr made this round.

Round 5: Sl st into next 2 chs. Ch 1, (sc, ch 3, sc, ch 3, sc) in the same ch 7 space. Ch 3, (sc, ch 3, sc) in next ch 3 corner space. 

*Ch 3, (sc, ch 3, sc, ch 3, sc) in next ch 7 corner space.*

Repeat from *to* around until corner spaces. (Sc, ch 3, sc) in ch 3 corner spaces. Sl st to first sc made.

Cut thread with scissors, weave in any loose ends with tapestry needle. 

I suggest blocking your work first and then sewing the squares together. I used the same crochet thread and my tapestry needle, but you can use any thread you like.

That’s all for the latest crochet skull pattern, the Lace of the Dead! I hope you guys enjoyed this pattern. 

Other Posts You May Like:
Crochet Skull Pattern Lace of the Dead

2 Row Repeat Crochet Lace Stitch Pattern – X’s and Squares Stitch Pattern

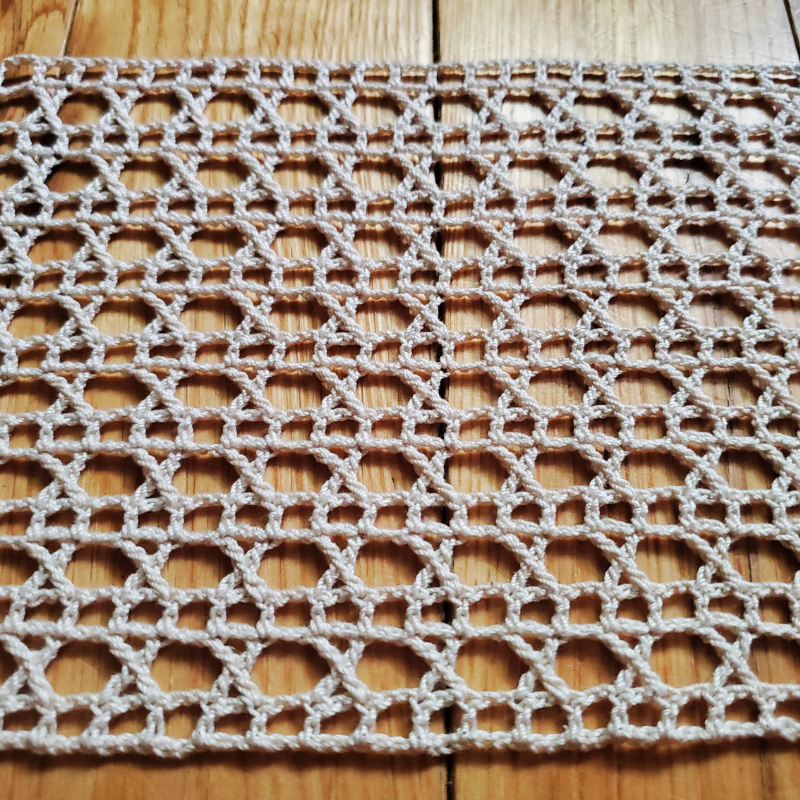
Hey everyone, today I am sharing a new crochet lace stitch pattern with you! This is the X’s and Squares Stitch.

It’s a lacy and openwork crochet pattern that has 2 row repeat, which makes remembering how to do the pattern SO EASY.. 

One row is straight mesh, and the alternate row is a unique X stitch, which I will show you how to do!

This pattern is perfect for lacy shawls, curtains, tablecloths, or just anything that needs lace! 

I am using size 10 crochet thread for this crochet lace stitch, but you don’t have to if you have another yarn or hook that you prefer! I love crocheting with thread, but I know that’s not everyone’s cup of tea!

Related Posts:

Crochet Lace Stitch Pattern

Please note that some of these links may be affiliate links. That means that if you click on these links and make a purchase, I may receive a commission at no extra cost to you. You can find more information about our disclosure policy here. Thank you for your support.

Materials Used:

Abbreviations Used (US Terms)

  • St(s) – stitch(es)
  • Ch(s) – chains
  • Dc – double crochet
  • Tr – treble crochet
  • YO – yarn over
YOUTUBE VIDEO NOT LOADING? CLICK TO LEARN THE Xs AND SQUARES CROCHET STITCH HERE.

X’s and Squares Crochet Lace Stitch Pattern

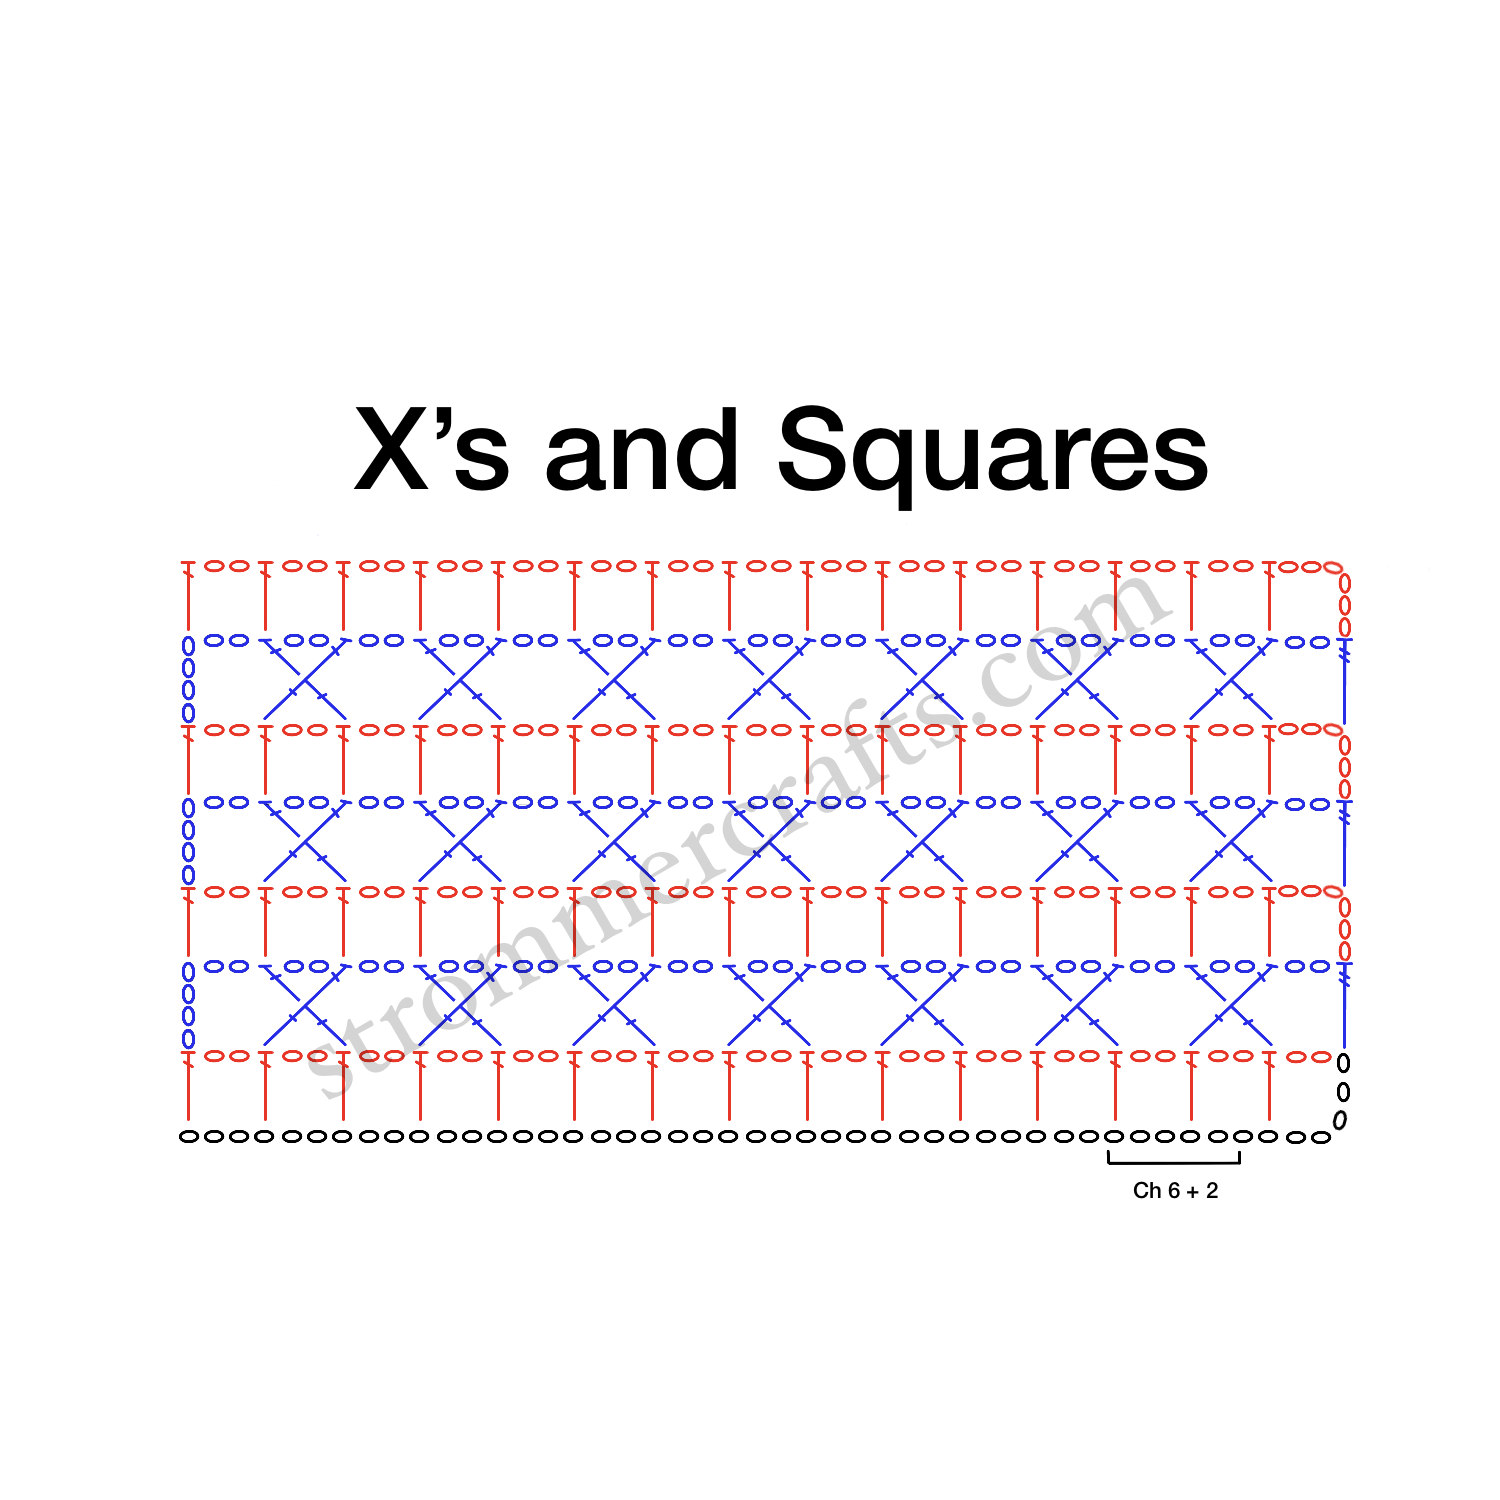
Ch 6+5

All that means is to chain 6 over and over again until you’re happy with the length, and then add 5 more chains to the end of that.

Row 1: Dc into 8th ch away from hook. *Ch 2, skip 2 chs, dc in next ch.* Repeat from *to* across.

Row 2: Ch 6 (counts as tr and ch 2), *skip next ch 2, in the next dc we will start an X stitch. YO twice and insert hook into that next dc, pull up a loop, YO pull through 2 loops, YO, skip the next ch 2 and insert hook into next dc, pull up a loop, YO and pull through 2 loops. You should have 4 loops on your hook. YO and pull through 2 loops x3 times. 

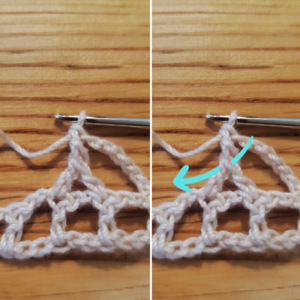
Ch 2, now we will make a dc into the two front loops (the top of where a normal dc2tog would meet) in our X stitch. See pic below. That is our first X stitch.

Crochet X stitch front 2 loops

Ch 2*

Repeat from *to* you’ve made the last X stitch, ch 2, skip next ch 2 space, tr in 3rd ch of ch 6.

Row 3: Ch 6 (counts as dc and ch 2), *skip ch 2 space, dc into next dc (the first part of the X stitch)  ch 2, skip next ch 2 space, dc into next dc (the second part of the X stitch), ch 2*

Repeat from *to* dc into 3rd ch of starting ch 6 of previous row.

Repeat Rows 2-3 until desired length.

Cut thread with scissors weave in any loose ends with tapestry needle.

That’s it for this crochet lace stitch! I hope you enjoyed the X’s and Squares Stitch Pattern! Until next time!

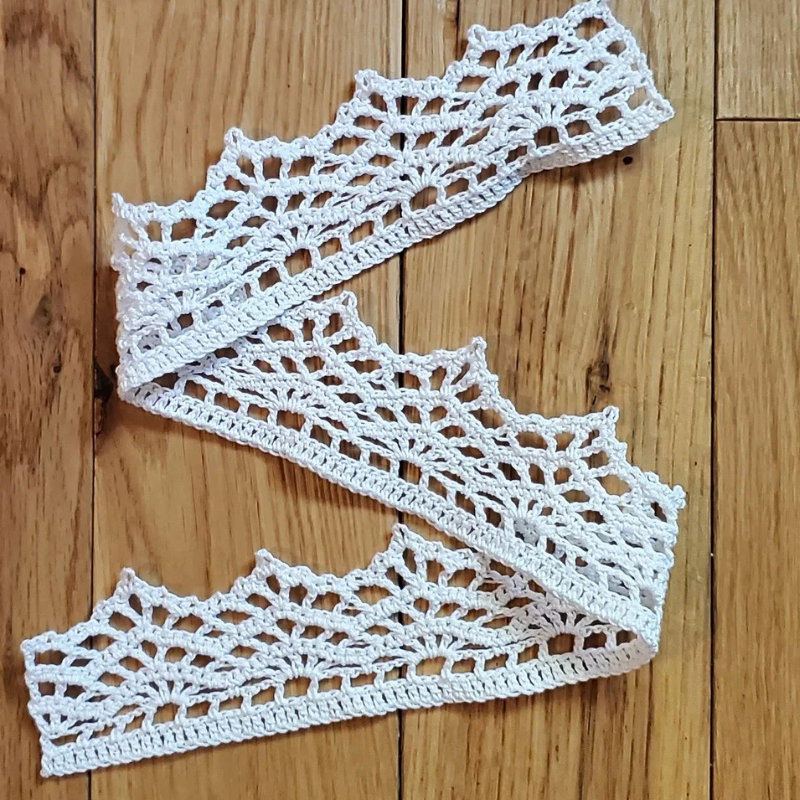
Pointed Crochet Lace Edging Pattern

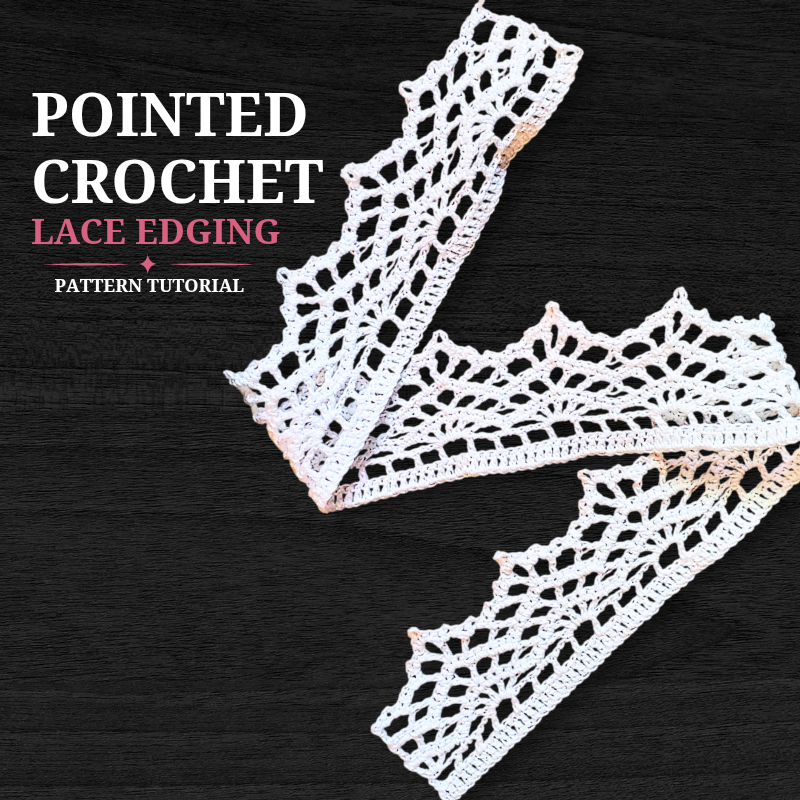
Hey everyone! Today I’m sharing with you another crochet lace edging pattern; the Pointed Crochet Lace Edging!

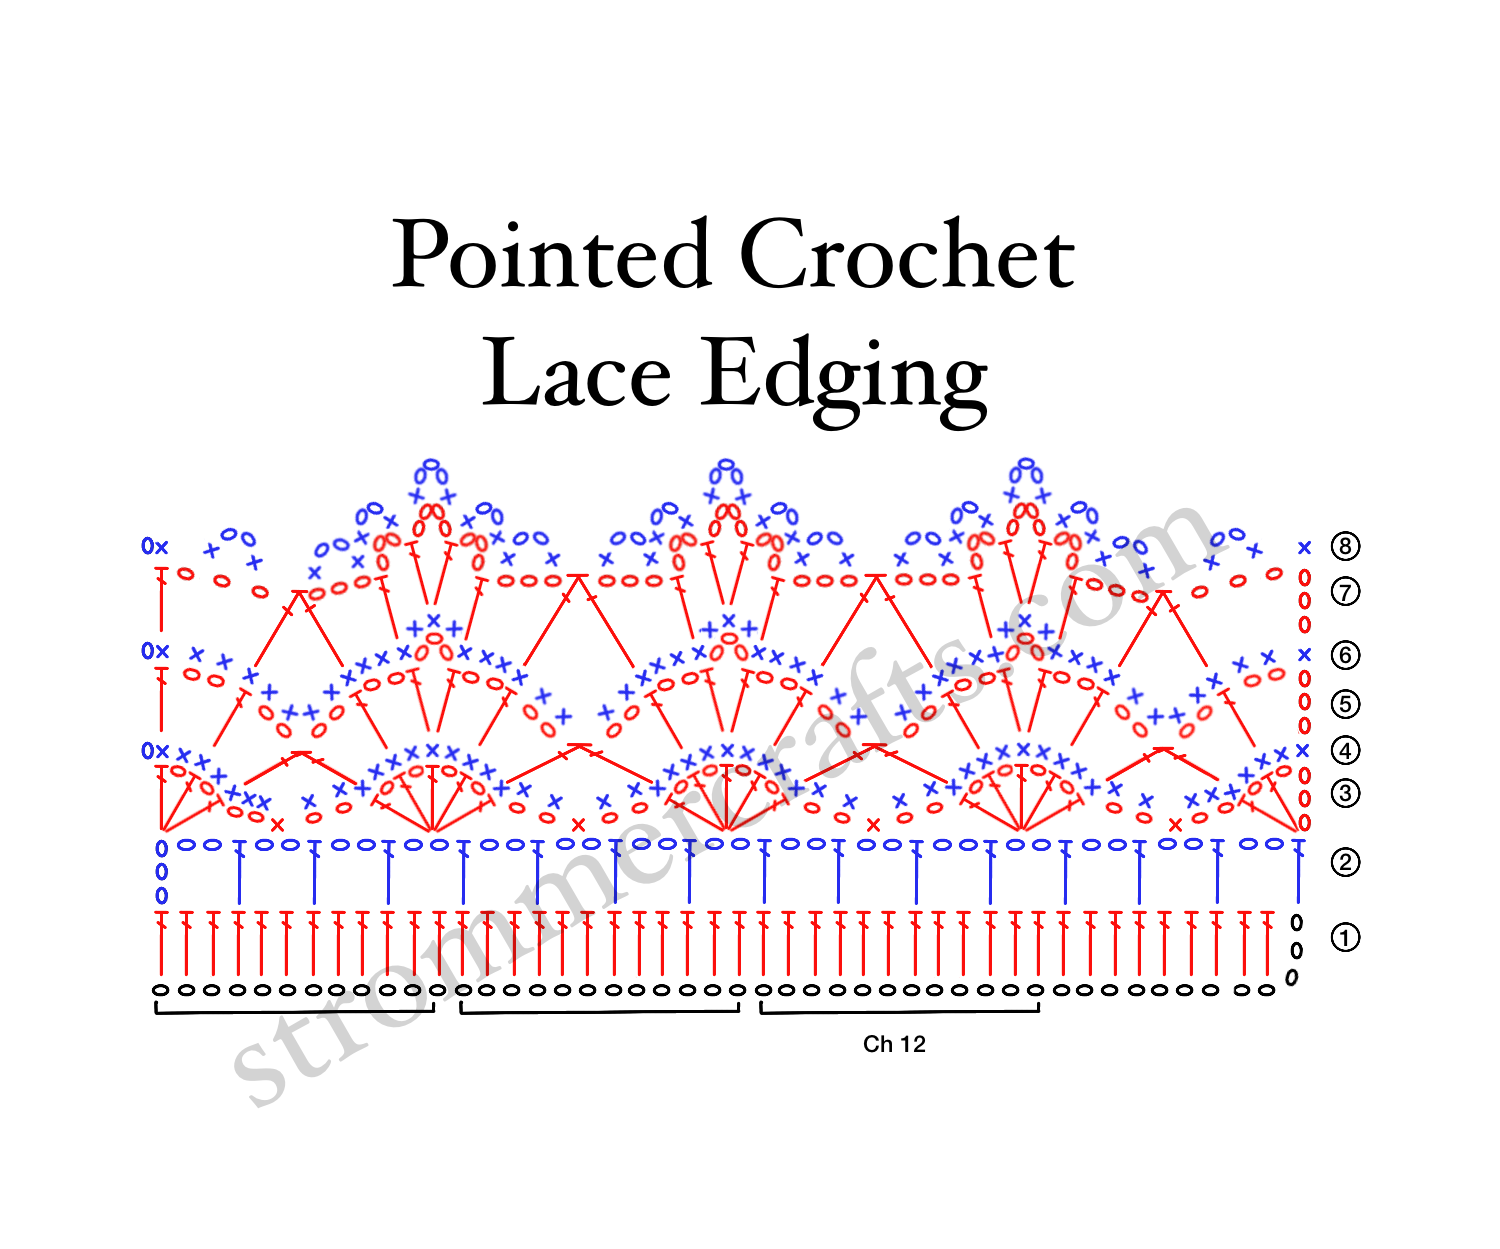
This edging is only 8 rows in height with a chain 12 repeat for the length. 

Use this pattern for all of your edging needs! I think this would look amazing for tablecloths, but you could use it for a variety of other projects that need a little bit of a lacy flair! 

I’m using size 10 crochet thread for this, but I think a smaller thread like size 20 would look great too. 

Related Posts:

Please note that some of these links may be affiliate links. That means that if you click on these links and make a purchase, I may receive a commission at no extra cost to you. You can find more information about our disclosure policy here. Thank you for your support.

Materials Used:

Abbreviations Used (US Terms):

  • Ch(s) – chain(s)
  • St(s) – stitch(es)
  • Sl st – slip stitch
  • Sc – single crochet
  • Dc – double crochet
  • Dc2tog – doubt crochet 2 stitches together
Pointed Crochet Lace Border
YOUTUBE VIDEO NOT LOADING? CLICK FOR THE POINTED CROCHET LACE EDGING PATTERN HERE.

Crochet Lace Edging Pattern

Ch a repeat of 12

Row 1: Dc into 4th ch away from your hook. Dc into each and every stitch across.

Row 2: Ch 5 (counts as a dc and ch 2), turn, skip 2 sts, dc into next st. *Ch 2, skip 2 sts, dc into next st.* Repeat from *to* across.

Row 3: Ch 4 (counts as dc and ch 1), turn, dc in same st, ch 1, dc again in same st. *Ch 2, skip the next ch 2 space, skip the next dc, sc in the next ch 2 space. 

Ch 2, skip next dc, skip next ch 2 space, skip next ch dc, (dc, ch 1, dc, ch 1, dc, ch 1, dc, ch 1, dc) in the next ch 2 space.*

Repeat from *to* until you’ve sc into the second to last ch 2 space. Ch 2, (dc, ch 1, dc, ch 1, dc) in 3rd ch of starting ch 5 from previous row.

Row 4: Ch 1 (does not count as a st), turn, sc in same st. *Sc in each ch 1 and dc across, 2 sc in next ch 2 space, skip next sc, 2 sc in next ch 2 space.*

Repeat from *to* until end. Making sure to place a sc in the starting ch 4 space and a sc in the 3rd ch of the same ch 4.

Row 5: Ch 5 (counts as as dc and ch 2), turn, skip a st, dc in next st, *ch 2, skip a st, dc2tog with the first leg in the next st, skip 4 sts and place second leg in next st. 

Ch 2, skip a st, dc in next st, ch 3, skip a st, (dc, ch 3, dc) in next st. Ch 2, skip a st, dc in next st*

Repeat from *to* 

Finish row with ch 2, skip a st, dc2tog with the first leg in the next st, skip 4 sts and place second leg in next st. Ch 2, skip a st, dc into next, ch 2, skip a st, dc in last st.

Row 6: Ch 1 (does not count as a st), turn, sc in same st. 2 sc in next ch 2 space, sc in next dc, 2 sc in next ch 2 space, skip *dc2tog, (2 sc in next ch 2 space, sc in next dc x2 times), 3 sc in next ch 3 space.

(Sc in next dc, 2 sc in next ch 2 space x2 times)*

Repeat from *to* until end

Skip last dc2tog, 2 sc in next ch 2 space, sc in next dc, 2 sc in next ch 2 space, sc in 3rd ch of starting ch 5 from previous row.

Row 7: Ch 6 (counts as dc and ch 3), turn, *skip 2 sts, dc2tog placing the first leg in the next sc, skip 4 sts and place second leg in next st.

Ch 3, skip 2 sts, dc in next st, ch 3, skip a st, (dc, ch 4, dc) in next st, ch 3, skip a st, dc in next st, ch 3*

Repeat from *to*

Skip 2 sts, dc in last st.

Row 8: Ch 1, turn, (sc, ch 2, sc) in next ch 3 space, *skip dc2tog, [(sc, ch 2, sc) in next ch 3 space x2 times].

(Sc, ch 3, sc) in next ch 4 space, [(sc, ch 2, sc) in next ch 3 space x2 times]*

Repeat from *to* until end.

Skip dc2tog, (sc, ch 2, sc) in next ch 3 space, sc in 3rd ch of starting ch 6 from previous row.

Cut thread with scissors, pull through and weave in any loose ends with your tapestry needle.

That’s all for the Pointed Crochet Lace Edging Pattern. Hope you enjoyed this pattern, until next time.