How to Crochet a Snorlax Lovey (Free Pattern)
Snorlax used Rest!
And hopefully your kiddo will too! This crochet Snorlax lovey pattern was inspired by Courtney M. at Studio Crafti. She made an awesome (and free) Snorlax pattern that I tweaked and turn into a snugly lovey.
Her pattern for the Snorlax can be found here.
I used her pattern for Snorlax’s head and ears, so if you want to crochet this pattern, you’ll need to go to the link above to get started.
I felt that for my lovey, the arms were just a little too short in Courtney’s pattern, so I created my own.
For the head and arms, I continued to crochet in the round. This means when I get to the end of my round, instead of slip stitching and chaining one, I continued the pattern into the beginning stitch of the previous round. You can still slip stitch and chain one if you want to, however with amigurumi-like projects, it looks a lot cleaner if you continue in the round.
You’ll also want something to mark the beginning of your rounds so you can count your stitches accurately. I use stitch markers, but you can use a scrap piece of yarn if you don’t have any.
Okay are we ready? Let’s get started!
You will need:
- Medium worsted weight yarn 4 in these colors:
- Navy blue
- Cream
- Black
- White
- 3.5mm crochet hook (for Snorlax)
- 6mm crochet hook (for blanket)
- Tapestry needle
- Poly-fil for stuffing
- Stitch marker (optional)
- Scissors
Terms used in this pattern:
- mc – magic circle
- sc – single crochet
- dc – double crochet
- st – stitch
- ch -chain
- sl st – slip stitch
- inc – increase (this means to crochet two single crochets in one stitch)
- dec – decrease (crochet two stitches together)
- (x) – the number at the end of the row indicates how many stitches you should have
Follow Courtney’s steps for the head and ears using the 3.5mm crochet hook. Once you’re finished, pull your yarn through and leave a long tail so you have enough yarn to sew the head onto the blanket.
Eyes and mouth
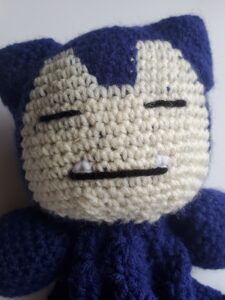
Take your tapestry needle and sew with black yarn for the eyes and mouth (shown below). It’s best to tie both ends together from the inside of the head so that it doesn’t unravel.
Sew the teeth by making triangle shapes above the mouth (shown below).crc
Arms, make 2
Round 1) 6 sc in mc (6)
Round 2) inc in each st around (12)
Round 3) 1 sc, inc *repeat around (18)
Round 4-6) sc in each st around (18)
Round 7) sc 2, inc *repeat around (24)
Round 8-13) sc in each st around (24)
Round 14) dec, 1 sc *repeat around (16)
Start stuffing with poly-fil
Round 15) dec around (8)
Take your hook and pull your yarn through. Leave a long tail to sew later and cut with scissors.
Use your tapestry needle to sew the claws at the end of the arms with the white yarn. To hide your white yarn when finished, pull it through the poly-fil towards the top of the arm. I recommend tying both ends of the white yarn together, so the claws are secured and less likely to get pulled out.

Fold the opening of the arm in half so the stitches line up evenly. Take your tapestry needle and sew the opening together.
Blanket
It can be difficult to see stitches with dark colored yarn. The pictures presented below are crocheted with a lighter color yarn so you can see what’s happening in the pattern.
With Navy Blue Yarn
Round 1) mc
Round 2) ch 3, (this counts as a dc in this and the next rounds) 19 dc in mc (20)
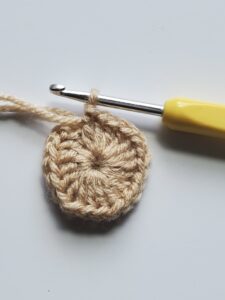
Sl st into the top of ch 3
Round 3) ch 1, sc into same st, skip 1 st, 3 dc into next st, ch3, 3 dc into the same st (this is one point of the star shape)
*skip 1 st, sc into next st, 3 dc into next st, ch3, 3 dc into same st* repeat *to* until you reach beginning sc. Join with a sl st.
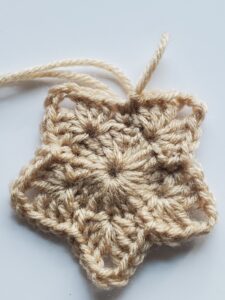
Round 4) sl st into the next 2 st, ch 3, dc into next st, 3 dc in chain space, ch 3, 3 dc into same space, dc into next 2 st, skip next 3 sts (dc, sc, dc).
*dc into next 2 sts, 3 dc in chain space, ch 3, 3 dc into same space, dc into next 2 sts, skip next 3 sts*. Repeat *to*, sl st into top of ch 3 from beginning
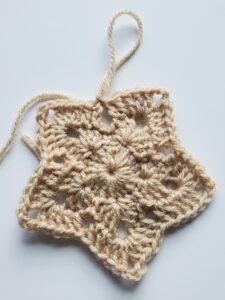
Round 5) Sl st into next st, ch 3, dc into next 3 sts, 3 dc in chain space, ch 3, 3 dc into same space, dc into next 4 sts, skip next 2 sts.
*dc into next 4 sts, 3 dc in chain space, ch 3, 3 dc into same space, skip next 2 sts*. Repeat *to*, sl st into top of ch 3 from beginning.
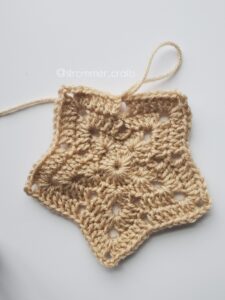
Continue in this fashion, essentially growing the star by increasing dcs up and down the sides, growing the corners by doing 3dc, ch 3, and 3 more dc in the same spot. Remember to sk 2 sts at the bottom of the corners.
Grow your star until you have completed a total of 12 rounds with the navy blue yarn, switch to cream yarn and complete 2 more rounds.
To complete, sew the head and arms of Snorlax into the middle of your star blanket with your tapestry needle. Thread your needle into each and every stitch of Snorlax’s head to make sure it stays secure.
Congratulations! You have your very own crochet Snorlax lovey!

