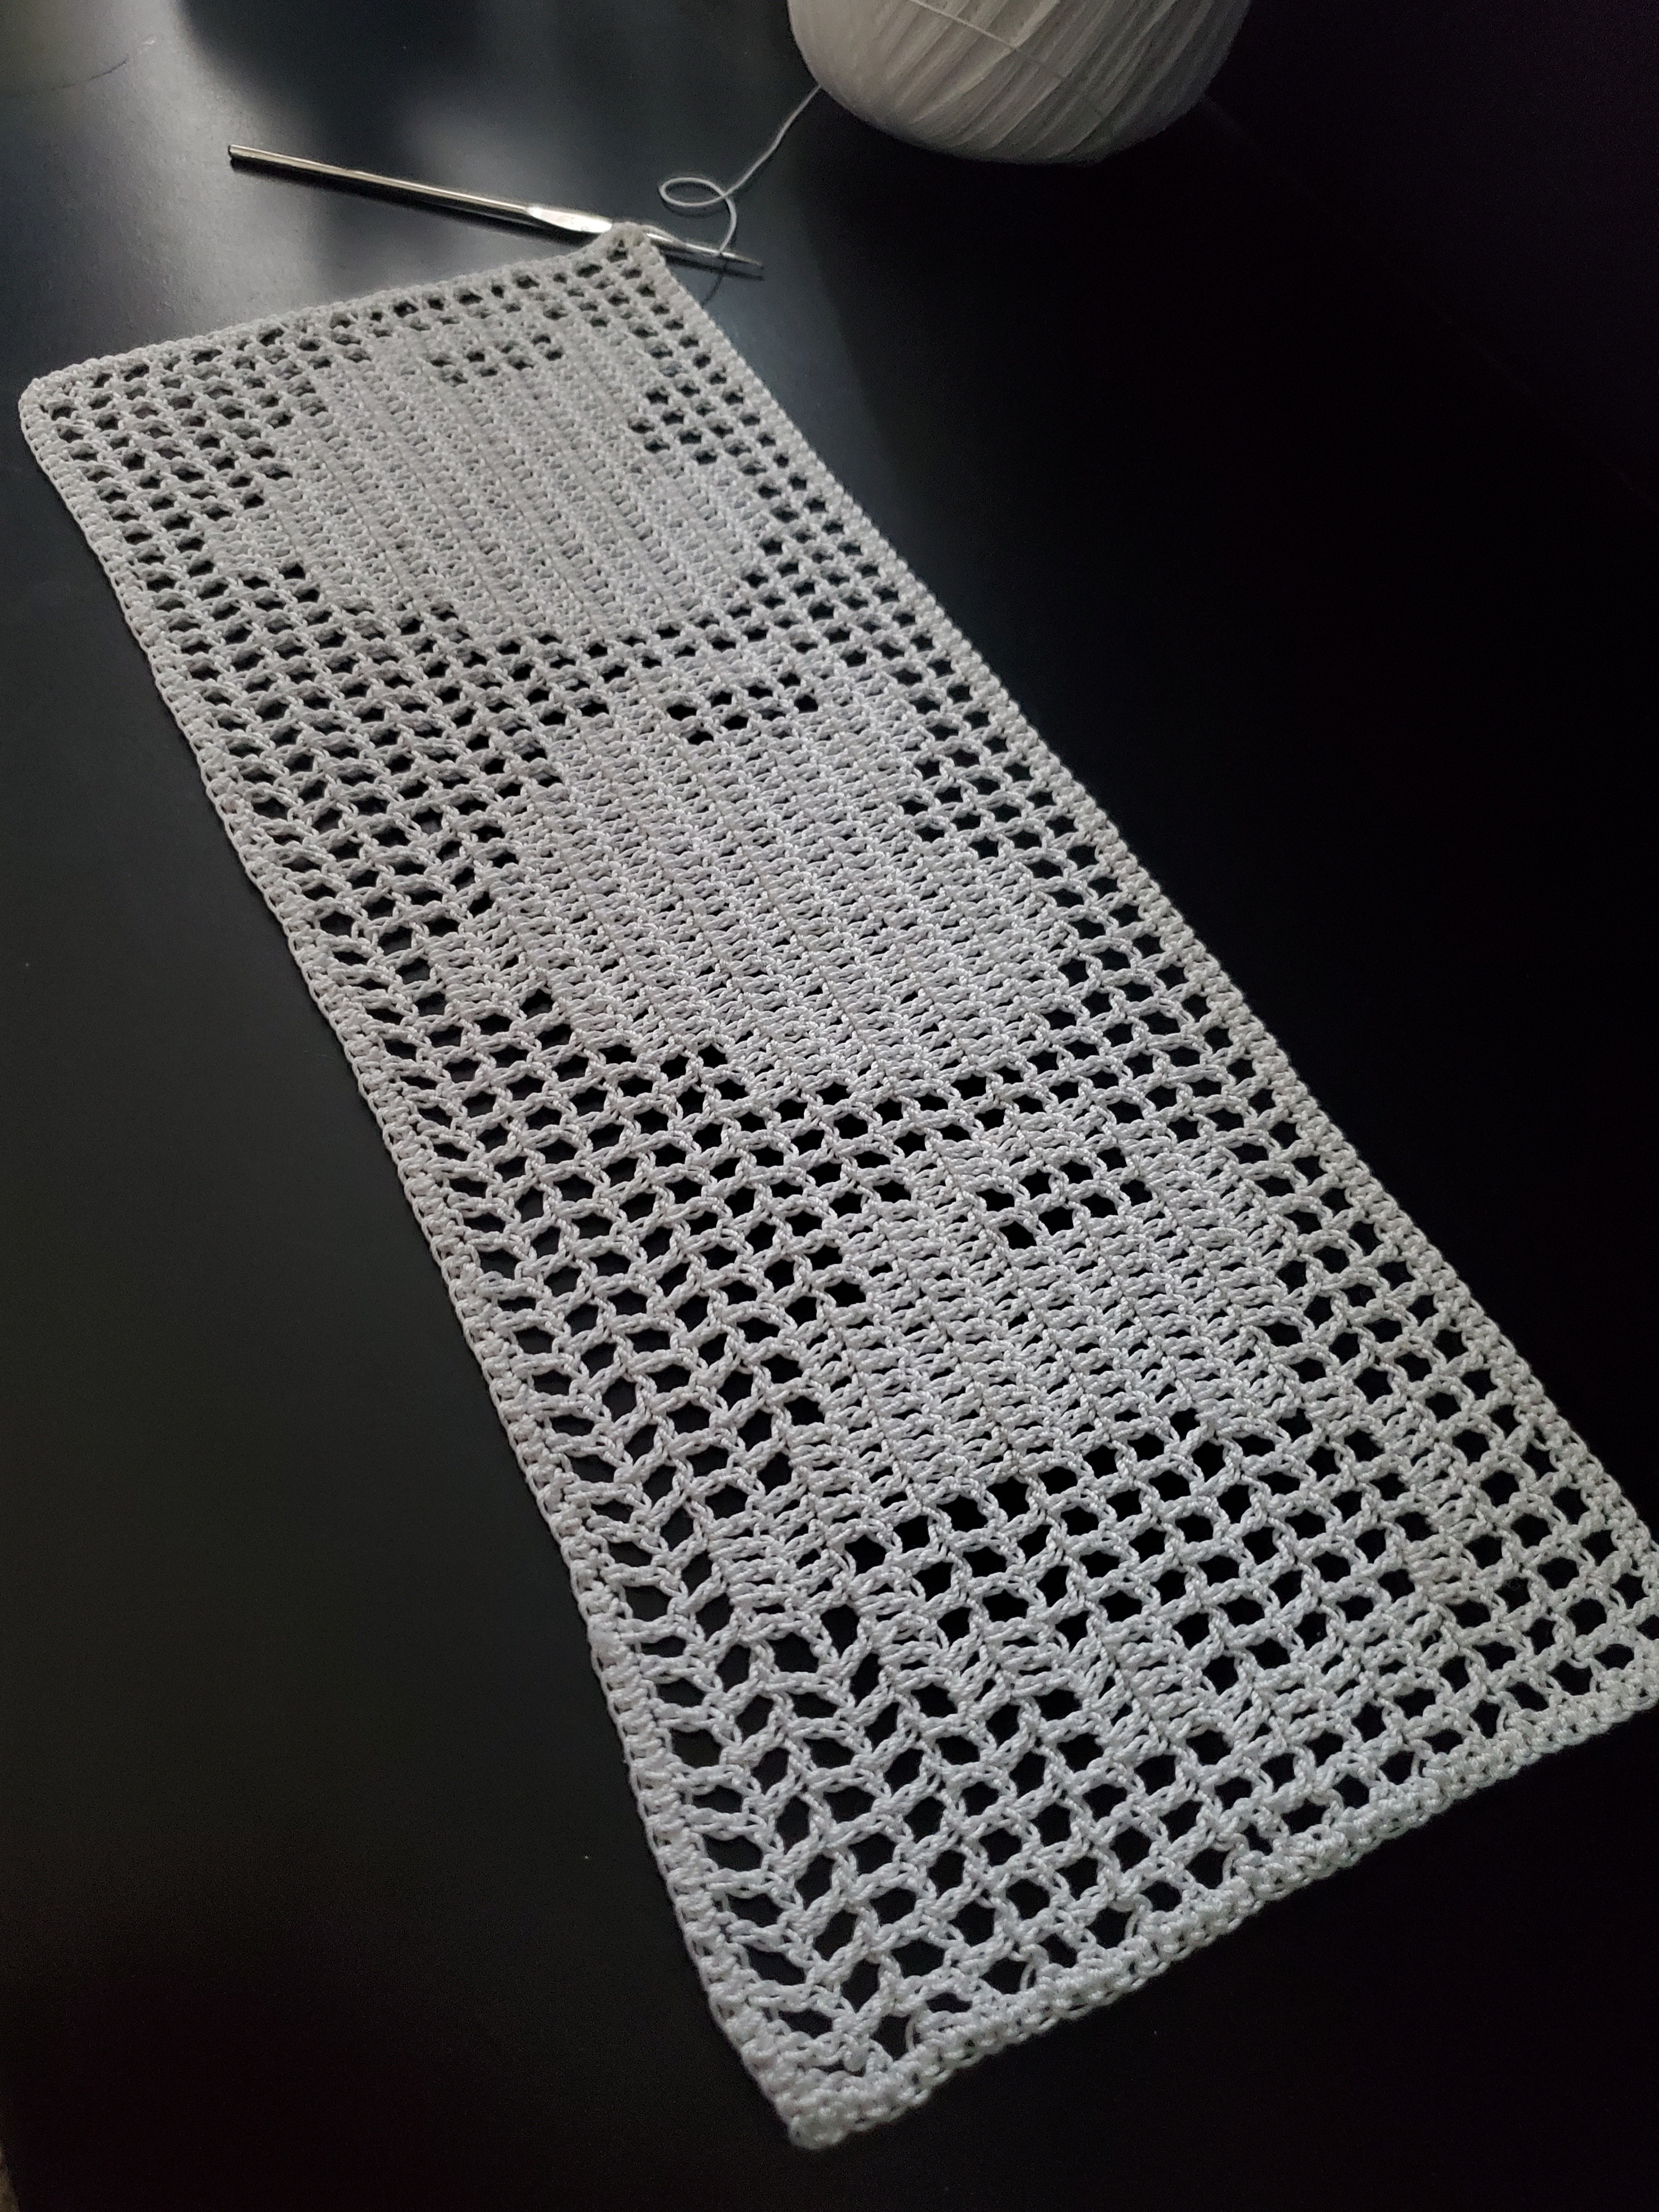
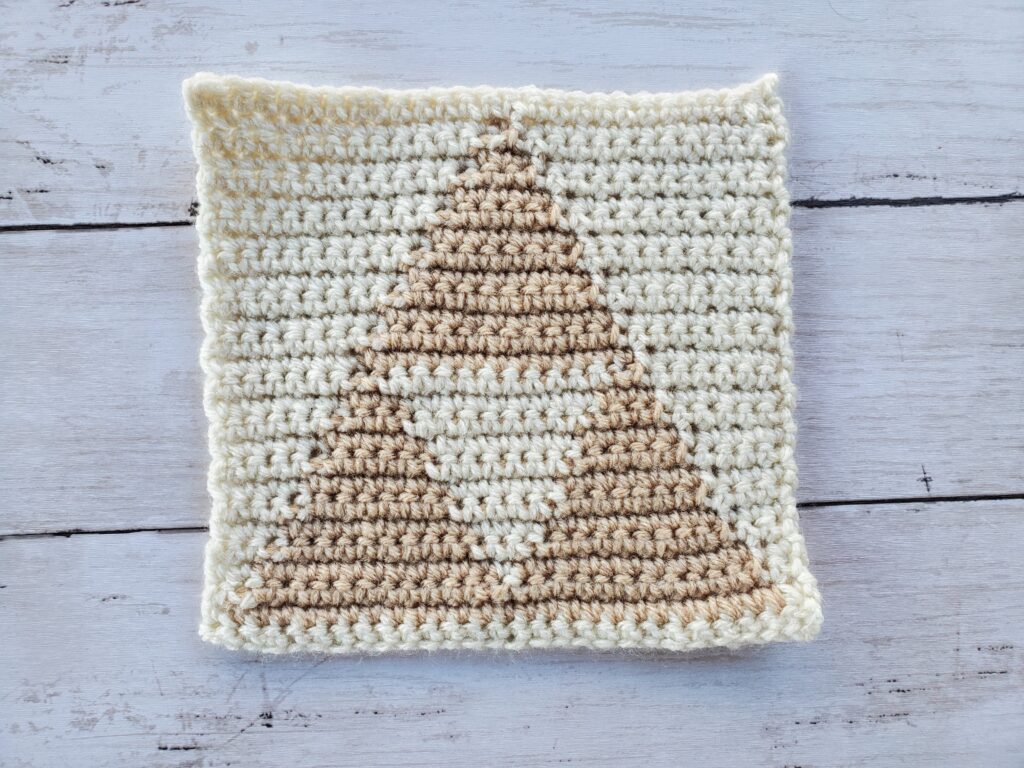
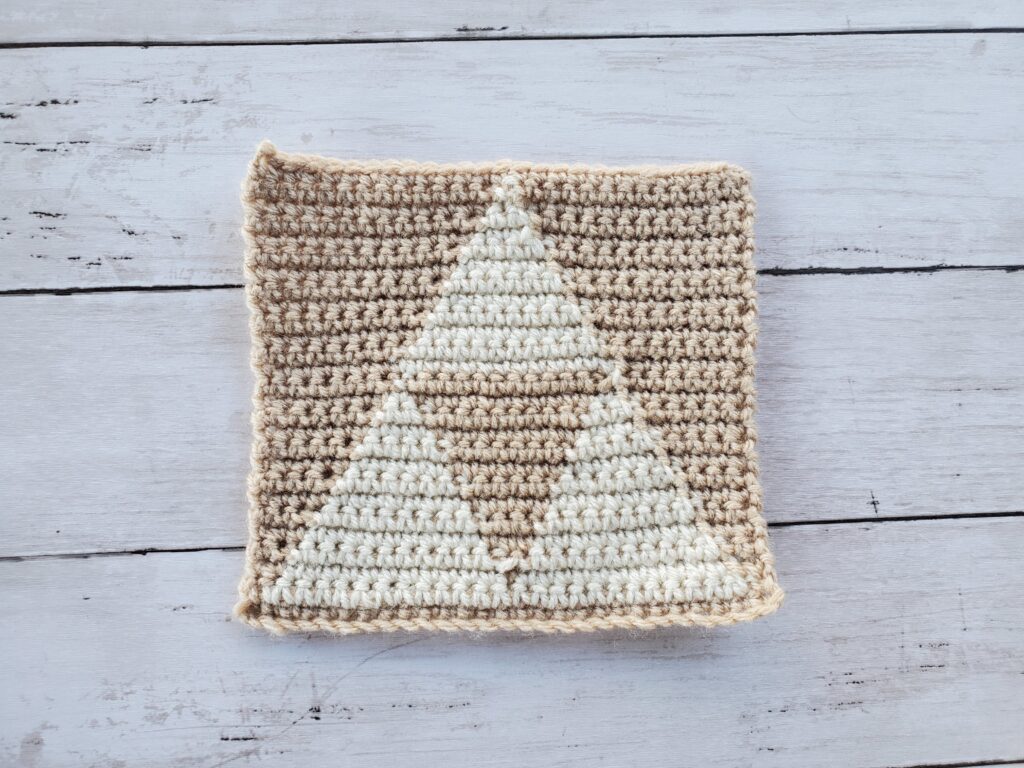
Crochet Legend of Zelda Doily

Hello everyone, today I have a new crochet pattern I would like to share with you, a Crochet Legend of Zelda Doily!

I’ve been feeling nostalgic lately and although I don’t play as much as I used to, I’m still a big fan of The Legend of Zelda series. So I thought I would combine my hobby of crocheting, with my love for one of my favorite video games and created this pattern.

This pattern displays the iconic Triforce symbol inside a mesh, surrounded by a more solid border and then finished with a shell picot combo.

This doily is a small square, measuring about 7” x 7” after blocking. Perfect for displaying in a picture frame or placing under decorative pieces.

I decided to play around with this pattern using three different yarn colors. I thought a gold and a dark green would best represent the Zelda franchise, along with a classic white thread. The gold reminds me of the actual Triforce and the dark green, of the forest Link comes from (or his traditional clothes!)

Related Posts:

Filet Crochet Technique 

I am using a technique called filet crocheting. It’s a way of crocheting where you use “open” or “solid” squares to make a picture or design.

If you know how to do this technique, you can skip down to the pattern, however if you do not, no worries! I went ahead and wrote out instructions for those who are not familiar with filet crocheting. After a few rows, you will understand how this is performed easily.

You will either use a series of (dc, ch 1, skip a st, dc into the next st) to create a open square OR 3 dc in the next 3 sts to make a solid square. 

That’s it, it seems easy enough, but if you are making a picture, a chart is very helpful to use to keep you on track.

I am using the free version of StitchFiddle to create a chart that has the Triforce design I want. I will have the chart below if written instructions make your head hurt (I know they hurt mine sometimes!).

What Do You Use Doilies For?

I use my doilies as decorations in the house. I typically use them underneath candles, or small centerpieces to make them feel more complete. 

Placing this Crochet Legend of Zelda Doily in a picture frame and hanging it on the wall would add some cool and unique decor to your home.

You could also gift this to a family member, significant other, or friend that enjoys the game series. 

Do I Need to Block This?

Yes, it is preferred to block this doily.

When you are crocheting doilies, it’s recommended to block your work when finished so it lays totally flat. Some people like to spray a starch solution on them so they are more stiff. 

Here is how I block my doilies:

  • Get blocking board(s), pins, a bowl of water and a towel.
  • Place the doily in the water bowl and let it soak for a minute or two.
  • Take the doily out, let the water drip back in the bowl (do not wring it out), place on towel and pat it dry.
  • Place on blocking board and pin to size that you desire.
  • Let it dry for a day or two.

If you don’t have a blocking board, that is totally okay, this doily isn’t super big, so if you have a large enough piece of cardboard or even a pizza box, you can pin it on there. I’ve pinned many doilies that way and all have come out great.

Please note that some links in this post may be affiliate links. That means that if you click on these links and make a purchase, I may receive a commission at no extra cost to you. You can find more information about our disclosure policy here. Thank you for your support.

Materials Needed:

Abbreviations Used:

  • Sl st – slip stitch
  • Ch – chain
  • Sc – single crochet
  • Dc – double crochet
  • Ch 3 Picot – (ch 3, sl st into 3rd ch from hook)

Special Instructions:

  • Starting Ch 4s count as a dc and ch 1 unless specified otherwise.
  • Solid square = 3 dc in a row
  • Open square = dc, ch 1, skip a st, dc in next st
  • Instead of a stitch count for each row, I am using the number of open or solid squares you should have in ().
  • Some of these rows will mirror the row before it, meaning that solid squares are placed on solid squares and open squares are placed on open squares.

Here is a crochet diagram of this pattern. I made this myself in Canva and I have discovered that making diagrams/charts is extremely difficult! It’s not perfect, but those who like to see a picture of the pattern will appreciate this. The border is included as well.

Here is a chart that I used to help me make the inside of this pattern. Info for the border is found below. Yellow squares indicate a solid square and the white squares indicate an open square.

Crochet Legend of Zelda Doily Pattern

Ch 47

Row 1: Turn, dc into 7th ch from hook. Ch1, skip 1 ch, *dc into next ch, ch 1, skip 1 ch, dc into next* Repeat from *to*. The last ch should end with a dc. (21 open squares)

Row 1

Row 2: Ch 4 (counts as dc and ch 1), turn, skip ch 1, *dc into next dc, ch 1, skip ch 1, dc into next dc* Repeat from *to* (21 open squares)

LOZR2

Row 3: Ch 4 (counts as dc and ch 1), turn, skip ch 1, dc into next dc, ch 1, skip ch 1, dc into next dc, *dc into ch 1 space, dc into next dc* Repeat from *to* for a total of 17 squares, you will have 2 more squares from row 2, ch 1, skip ch 1, dc into next, ch 1 skip ch 1, dc into last dc. (17 closed squares, 4 open squares)

Row 4: Ch 4 (counts as a dc and ch 1), turn, skip ch 1, dc into next dc, ch 1, skip ch 1, dc into next 35 sts, ch 1, skip ch 1, dc into next dc, ch 1, skip 1 ch, dc into next ch. (17 closed squares, 4 open squares)

Row 5: Ch 4, (counts as dc and ch 1), turn, skip ch 1, dc into next dc, ch 1, skip ch 1, dc into next dc, ch 1, skip a st, dc into next st for a total of 3 open squares, *(dc into next 14 sts for 7 solid squares)*, ch 1, skip a st, dc into next dc. Repeat from *to.*

Ch 1, skip a st, dc into next dc, ch 1, skip ch 1, dc into next dc, ch 1, skip a ch, dc into next ch (14 solid squares, 7 open squares)

Row 6: Ch 4, (counts as dc and ch 1), turn, skip ch 1, dc into next dc, (ch 1, skip ch 1, dc into next dc x2), dc into next 14 sts, ch 1, skip ch 1 space, dc into next 15 sts, (ch 1 skip ch 1, dc into next dc x3 times). (14 solid squares, 7 open squares)

Row 7: Ch 4, turn, skip ch 1, dc into next dc, (ch 1, skip ch 1, dc into next dc x2), ch 1, skip a st, dc into next (4 open squares made). Dc into next 10 sts, ch 1 skip a st, dc into next st, ch 1, skip ch 1 space, dc into next st, ch 1, skip a st, dc into next st (3 open squares made)

Dc into next 10 sts, ch 1 skip a st, dc into next st, (ch 1, skip a st, dc into next dc x3 times) (4 open squares made)

Row 8: This row will mirror Row 7, place open squares on top of open squares and solid squares on top of solid squares.

Ch 4, turn, skip ch 1, dc into next dc, (ch 1, skip a st, dc into next st x3) (4 open squares made)

Dc into next 10 sts, (ch 1 skip ch 1, dc into next dc x3) (3 open squares made)

Dc into next 10 sts, (ch 1, skip ch 1, dc into next dc x4) (4 open squares made)

Row 9: Ch 4, turn, skip a ch, dc into next dc, (ch 1, skip ch 1, dc into next dc x3), ch 1, skip a st, dc into next st (5 open squares made)

dc into next 6 sts, ch 1, skip a st, dc into next dc, (ch 1, skip ch 1, dc into next dc x3), ch 1, skip a st, dc into next st (5 open squares made),

dc into next 6 sts, ch 1, skip a st, dc into next st, (ch 1, skip ch 1, dc into next dc x4 times) (5 open squares made). (15 open squares, 6 solid squares).

Row 10: This row will mirror Row 9. Place open squares on top of open squares and solid squares on top of solid squares.

Ch 4, turn, skip ch 1, dc into next dc, (ch 1, skip ch 1, dc into next dc x4) (5 open squares made)

Dc into next 6 sts

(Ch 1, skip ch 1, dc into next dc x5) (5 open squares made)

Dc into next 6 sts

(Ch 1, skip ch 1, dc into next dc x5) (5 open squares made) (15 open squares, 6 solid squares)

Row 11: Ch 4, turn, skip ch 1, dc into next dc, (ch 1, skip ch 1, dc into next dc x4), ch 1, skip a st, dc into next st (6 open squares made)

Dc into next 4 sts, (dc into ch 1 space, dc into next dc x5) dc into next 4 sts

Ch 1, skip a st, dc into next st, (ch 1, skip ch 1, dc into next dc x5) (6 open squares made) (12 open squares, 9 solid squares)

Row 12: This row will mirror Row 11. 

Ch 4, turn, skip ch 1, dc into next dc (ch 1, skip ch 1, dc into next dc x5) (6 open squares made)

Dc into next 18 sts

(Ch 1, skip ch 1, dc into next dc x6) (6 open squares made) (12 open squares, 9 solid squares)

Row 13: Ch 4, turn, skip ch 1, dc into next dc, (ch 1, skip ch 1, dc into next dc x5), ch 1, skip a st, dc into next st (7 open squares made)

Dc into next 14 sts

Ch 1, skip a st, dc into next st, (ch 1, skip ch 1, dc into next dc x6) (7 open squares made) (14 open squares, 7 solid squares)

Row 14: This row will mirror Row 13.

Ch 4, turn, skip ch 1, dc into next dc, (ch 1, skip ch 1, dc into next dc x6) (7 open squares made)

Dc into next 14 sts

(Ch 1, skip ch 1, dc into next dc x7) (7 open squares made) (14 open squares, 7 solid squares)

Row 15: Ch 4, turn, skip ch 1, dc into next dc, (ch 1, skip ch 1, dc into next dc x6), ch 1, skip a st, dc into next st (8 open squares made)

Dc in next 10 sts

Ch 1, skip a st, dc into next st, (ch 1, skip ch 1, dc into next dc) (8 open squares made) (16 open squares, 5 solid squares)

Row 16: This row will mirror Row 15. 

Ch 4, turn, skip ch 1, dc into next dc, (ch 1, skip ch 1, dc into next dc x7) (8 open squares made)

Dc into next 10 sts

(Ch 1, skip ch 1, dc into next dc x8) (16 open squares, 5 solid squares)

Row 17: Ch 4, turn, skip ch 1, dc into next dc, (ch 1, skip ch 1, dc into next dc x7), ch 1, skip a st, dc into next st (9 open squares)

Dc into next 6 sts 

Ch 1, skip a st, dc into next st (ch 1, skip ch 1, dc into next dc x8) (9 open squares made) (18 open squares, 3 solid squares)

Row 18: This row will mirror Row 17

Ch 4, turn, dc into next dc, (ch 1, skip ch 1, dc into next dc x8) (9 open squares)

Dc into next 6 sts

(Ch 1, skip ch 1, dc into next dc x9) (9 open squares)

Row 19: Ch 4, turn, skip ch 1, dc into dc, (ch 1, skip ch 1, dc into next dc x8),  ch 1, skip a st, dc into next st (10 open squares)

Dc into next 2 sts

Ch 1, skip a st, dc into next st, (ch 1, skip ch 1, dc into next dc x9) (10 open squares) (21 open squares, 1 solid square)

Row 20: This row will mirror Row 19.

Ch 4, turn, skip ch 1, dc into next dc, (ch 1, skip ch 1, dc into next dc x9)

Ch 1, skip a st, dc into next st

(Ch 1, skip ch 1, dc into next dc x10) (21 open squares)

Row 21: This row will mirror row 20

Ch 4, turn, dc into next dc, (ch 1, skip ch 1, dc into next dc x20) (21 open squares

Border 

Row 1: We will be crocheting down the first side of the square

Ch 4 (counts as dc and ch 1), dc into top of last dc crocheted in row 21. Ch 1, skip the length of the last dc in row 21, and dc into the top of the ch 3 in row 20, ch 1, skip the rest of the ch 3 from row 20 and dc into the last dc from row 19. Continue with ch 1, skipping the length of dc/ch 3, and dc into top of dc/ch3. See pic below for details.

Place last dc for this side in first ch in row 1. (Ch 1, dc into same ch x2 more times)

Ch 1, turn down the bottom side of square, skip ch, dc into same ch as next dc from row 2, ch 1, skip next ch, dc into same ch as next dc from row 2. Continue until next corner (dc ch 1, dc, ch 1, dc in next corner). Continue this way until you reach the beginning corner, place (dc, ch 1) into same space as starting ch 4, sl st to 3rd ch. (23 open squares on each side)

Row 2: ch 1, (2 sc, ch 2, 2 sc) in same st as joining st, *sc into next ch 1 space, sc into next dc* Repeat from *to* until next corner (2 sc, ch 2, 2 sc), continue placing sc into each dc and ch 1 space, and making corners in the same fashion. Sl st to first sc. (49 sc down each side with ch 2 in each corner)

Row 3: Ch 4 (counts as dc and ch 1), skip a st, (3 dc, ch 2, 3 dc) in ch 2 corner space, ch 1, skip a st (you might need to scoot your last dc over to see where the first st is), dc into next 3 sts, *ch 1, skip a st, dc into next 3 sts.* Repeat from *to* until next corner. You should have 1 st left before the next corner. (3 dc, ch 2, 3 dc) into next ch 2 corner space.

Continue this way around, repeating from *to,* and making corners in same fashion. Place last 2 dc in the 2 sts before the starting ch, sl st into 3rd ch. (14 groups of 3 dc on each side with ch 2s in each corner)

Row 4: Ch 3 (counts as dc), dc into ch 1 space, dc into next dc, ch 1, skip a st, [dc into next dc, (2 dc, ch 2, 2 dc) in ch 2 corner space, dc into next dc], *ch 1, skip a st, dc into next dc, dc into ch 1 space, dc into next dc.* Repeat from *to* until next corner Repeat from [ to ] for the next corner spaces. Repeat from *to* for sides.

On last side, finish with ch 1 and sl st to top of starting ch 3 (15 groups of 3 dc on each side with ch 2s in each corner)

Row 5: Ch 4 (counts as dc and ch 1), skip a st, dc into next dc, dc in ch 1 space, dc into next dc, ch 1, skip a st, [dc into next dc, (2 dc, ch 2, 2 dc) in ch 2 corner space, dc into next dc], *ch 1, skip a st, dc into next dc, dc into ch 1 space, dc into next dc.* Repeat from *to* down the sides.

Repeat from [ to ] for ch 2 corner spaces. Sl st to top of starting ch 3 (16 groups of 3 dc down each side with ch 2 corner spaces)

Row 6: Sl st into next ch 1 space. Ch 3 (counts as dc), (2 dc, ch 3 picot, 3 dc) in same ch 1 space, skip next 3 dc, sc into next ch 1 space, skip next 3 dc, in ch 2 corner space make (5 dc, ch 3 picot 5 dc), *skip next 3 dc, sc into next ch 1 space, skip next 3 dc, (3 dc, ch 3 picot, 3 dc) in next ch 1 space.* Repeat from *to* down the sides.

Place (5 dc, ch 3 picot, 5 dc) in ch 2 corner spaces. Sl st to first st.

Cut with scissors, weave in any ends with tapestry needle.

Block with pins on blocking board.

Crochet Legend of Zelda Doily

And that’s it! I hope you enjoyed this beautiful Crochet Legend of Zelda pattern. Until next time!

Other Posts You May Like:

Crochet Legend of Zelda Pattern – Hearts

Hello everyone today I have another free, Zelda themed pattern; a Crochet Legend of Zelda Heart Pattern! I’ve recently been interested in a crochet technique called filet crochet. Have you ever heard of it? It creates a vintage vibe, and all you need is a super tiny hook and thread!

I think The Legend of Zelda series will always have a special place in my heart, it was one of the first video games that I ever played. The series of three hearts represents the amount of life you have when you start most Zelda games. As you play and get hurt by monsters, fall damage, etc., you lose parts or whole hearts until you collapse or replenish them.

Related Posts:

The filet crochet Legend of Zelda Hearts would look great if framed with a dark background and hung on the wall, or you can leave it as is and use it as a cute, nerdy place mat or table decoration. 

Alright, so before we get started there are a few basics about filet crochet we need to cover (it’s not too crazy, I promise).

Filet Crochet Basics:

In filet crochet, you can create your very own image using open or closed squares/gaps/holes. In order to create an open square, two sides of the square will be a dc and two sides will be a ch 1. A closed square will be comprised of 3 dc in a row. 

If you would like to add more columns to the sides, the correct math for the starting ch is x2 number of squares needed + 4 more chs, then dc in the 6th ch from your hook. So for this heart pattern, I have 50 squares across, so this gets me my 100 chs, plus 4 (the extra 4 make up a dc and a ch 1 for 1 side and the top of an open square). 

Clear as mud? Don’t worry, you’ll get the hang of it after a few rows!

Please note that some of these links are affiliate links. That means that if you click on these links and make a purchase, I may receive a commission at no extra cost to you. You can find more information about our disclosure policy here. Thank you for your support.

Materials Needed:

Abbreviations (US Terms):

  • ch – chain
  • sl st – slip stitch
  • sc – single crochet
  • dc – double crochet

Pattern Chart:

The image below is a helpful chart if you’re more of a visual learner.

Tips for this Pattern:

  • For this filet pattern, we use 3 dc to make a closed square and dc, ch1, dc for an open square.
  • The turning chain counts as a dc, ch 1 throughout the whole pattern.
  • The ch 1 spaces count as a stitch.
  • You can place a stitch marker on the left or right side to help you keep track of where you are, however once you start making the 3rd half heart, it’s not difficult to determine.
  • Repeat instructions enclosed in () by the number indicated at the end. Example: (ch 1, skip ch 1 space, dc in next dc x3 times). 

Crochet Legend of Zelda Hearts Pattern

Ch 104

Foundation Chain for LOZ Heart Pattern
Ch 104

Row 1: Dc in 6th ch from hook, *ch 1, skip a ch, dc in next ch.* Repeat from *to.* End with a dc in the last ch (100 sts/50 open squares).

Dc in 6th ch from hook
Row 1 Completed
Row 1

Row 2: Turn, ch 4, skip ch 1 space, dc in next dc, *ch1, skip ch1 space, dc in next dc* Repeat from *to* (50 open squares).

Turn, ch 4, dc in next dc for Row 2
Beginning of Row 2: Turn, ch 4, dc in next dc

Row 3: Turn, ch 4, skip ch 1 space, dc in next dc, (ch 1, skip ch 1 space, dc in next dc x 7 times), (dc in ch 1 space, dc in next dc x 2). At this point you should have 8 open squares and 2 closed squares. *(Ch 1, skip ch 1 space, dc in next dc x 14), (dc in ch 1 space, dc in next dc x 2 times).* Repeat *to* once more. (Ch 1, skip ch 1 space, dc in next dc x 8 times). (44 open squares, 6 closed squares).

Row 3
Row 3

Row 4: Repeat row 3.

Row 5: Turn, ch 4, skip ch 1 space, dc in next dc, (ch 1, skip ch 1 space, dc in next dc x 6  times), *dc in next ch 1 space, dc in next 5 sts, (dc in ch 1 space, dc in next dc x2 times). (Ch 1, skip ch 1 space, dc in next dc x11 times).* Repeat from *to* once more. Start of 3rd half heart. Dc in next ch 1 space, dc in next 3 sts, ch 1 skip a st, dc in next dc, (dc in next ch 1 space, dc in next dc x2 times), (ch 1 skip ch 1 space , dc in next dc x6 times). (14 closed squares, 36 open squares).

Row 5
Row 5

Row 6: Turn, ch 4, skip ch 1 space, dc in next dc, (ch 1, skip ch 1 space, dc in next dc x 4 times). Dc in ch 1 space, dc in next dc, (ch 1, skip next st, dc in next st x2), ch 1, skip ch 1 space, dc in next 5 dc, (dc in ch 1 space, dc in next dc x2 times) (Ch 1, skip ch 1 space, dc in next dc x8 times), *dc in next ch 1 space, dc in next 11 sts, (dc in next ch 1 space, dc in next dc x2 times)* (ch 1, skip ch 1 space, dc in next dc x8 times). Repeat from *to* once more, (ch 1, skip ch 1 space, dc in next dc x5 times). (21 closed squares, 29 open squares).

Row 7: Turn, ch 4, skip ch 1 space, dc in next dc, (ch 1, skip ch 1 space, dc in next dc x 4 times), *dc in next 16 sts, (ch 1, skip ch 1 space, dc in next dc x8 times).* Repeat from to *to* once more. Dc in next 8 dc, (ch 1, skip ch 1 space, dc in next dc x3 times), dc in next 2 sts, (ch 1 skip ch 1 space, dc in next dc x5 times). (21 closed squares, 29 open squares).

Row 7
Row 7

Row 8: Turn, ch 4, skip ch 1 space, dc in next dc (ch 1, skip ch 1 space, dc in next dc x2 times), (dc in next ch 1 space, dc in next dc x2 times), ch 1, skip next st, dc in next st, (ch 1, skip ch 1 space, dc in next dc x3 times), dc in next 8 sts, (dc in next ch 1 space, dc in next dc x2 times), *(ch 1, skip ch 1 space, dc in next dc x 4 times), (dc in next ch 1 space, dc in next dc x2 times), dc in next 16 sts, (dc in next ch 1 space, dc in next dc x2 times).* Repeat from *to* once more. (Ch 1, skip ch 1 space, dc in next dc x3 times). (18 open squares, 32 closed squares).

Row 8 of LOZ Hearts
Row 8

Row 9: Turn, ch 4, skip ch 1 space ,dc in next dc (ch 1, skip ch 1 space, dc in next dc x2 times), *dc in next 24 sts, (ch 1, skip ch 1 space, dc in next dc x4 times.* Repeat from *to* once more. Dc in next 12 sts, (ch 1, skip ch 1 space, dc in next dc x4 times), dc in next 4 sts, (ch 1, skip ch 1 space, dc in next dc x3 times). (18 open squares, 32 closed squares).

Row 10: Turn, ch 4, skip ch 1 space, dc in next dc, ch 1, skip ch 1 space, dc in next dc, dc in ch 1 space, dc in next st (ch 1 skip ch 1 space, dc in next dc x6 times), dc in next 12 sts, *dc in ch 1 space, dc in next st, (ch 1 skip ch 1 space, dc in next dc x 2), dc in next ch 1 space, dc in next 25 sts.* Repeat from *to,* one more time, dc in ch 1 space, dc in next dc, (ch 1 skip ch 1 space, dc in next dc x2 times). (14 open squares, 36 closed squares).

Row 10 of filet crochet LOZ Hearts
Row 10

Row 11: Turn, ch 4, skip ch 1 space, dc in next dc, ch 1, skip ch 1 space, dc in next 3 sts (ch 1 skip ch 1 space, dc in next dc x2 times), dc in next 22 sts, (ch 1, skip ch 1 space, dc in next dc x2 times), dc in next 2 sts, (ch 1, skip ch 1 space, dc in next dc x2 times), dc in next 22 sts, (ch 1, skip ch 1 space, dc in next dc x2 times), dc in next 2 sts, (ch 1, skip ch 1 space, dc in next dc x2 times), dc in next 8 sts, (ch 1, skip ch 1 space, dc in next dc x6 times), dc in next 2 sts, (ch 1, skip ch 1 space, dc in next dc x2 times). (18 open squares, 32 closed squares).

Row 12: Turn, ch 4, skip ch 1 space, dc in next dc, ch 1, skip ch 1 space, dc in next dc, dc in next 2 sts, (ch 1, skip ch 1 space, dc in next dc x6 times), dc in next 8 sts, *(ch 1, skip ch 1 space, dc in next dc x2 times), dc in next 2 sts, (ch 1, skip ch 1 space, dc in next dc x2 times), dc in next 22 sts.* Repeat from *to* once more, (ch 1, skip ch 1 space, dc in next dc x2 times), dc in next 2 sts, (ch 1, skip ch 1 space, dc in next dc x2 times). (18 open squares, 32 closed squares).

Row 12 of filet crochet LOZ Hearts
Row 12

Row 13: Turn, ch 4, skip ch 1 space, dc in next dc, ch 1, skip ch 1 space, dc in next 3 dc, *(ch 1, skip ch 1 space, dc in next dc x2 times), dc in next 22 sts, (ch 1, skip ch 1 space, dc in next dc x2 times), dc in next 2 sts.* Repeat from *to* once more. (Ch 1, skip ch 1 space, dc in next dc x2 times), dc in next 8 sts, dc in ch 1 space, dc in next st, (ch 1, skip ch 1 space, dc in next dc x5 times), dc in next 2 sts, (ch 1, skip ch 1 space, dc in next dc x2 times). (19 open squares, 31 closed squares).

Row 13
Row 13

Row 14: Turn, ch 4, skip ch 1 space, dc in next dc, ch 1, skip ch 1 space, dc in next 3 sts, (ch 1, skip ch 1 space, dc in next dc x5 times), dc in next 10 sts, *(ch 1, skip, ch 1 space, dc in next dc x2 times), dc in next 2 sts, (ch 1, skip ch 1 space, dc in next dc x2 times), dc in next 22 sts.* Repeat from *to* once more. (Ch 1, skip ch 1 space, dc in next dc x2 times), dc in next 2 sts, (ch 1, skip ch 1 space, dc in next dc x2 times). (19 open squares, 31 closed squares).

Row 15: Turn, ch 4, skip ch 1 space, dc in next dc, ch 1, skip ch 1 space, dc in next dc, ch 1, skip a st, dc in next st, *(dc in next ch 1 space, dc in next dc x2 times), dc in next 6 sts, (ch 1, skip a st, dc in next st x2 times), dc in next 10 sts, ch 1, skip a st, dc in next st, (ch 1, skip ch 1 space, dc in next dc x2 times), ch 1, skip a st, dc in next st.* Repeat from *to* once more. (Dc in ch 1 space, dc in next st x2 times), dc in next 6 sts, (ch 1, skip a st, dc in next st x2 times), (dc in ch 1 space, dc in next dc x5 times), (ch 1, skip ch 1 space, dc in next dc x3 times). (20 open squares, 30 closed squares).

Row 16: Turn, ch 4, skip ch 1 space, dc in next dc, (ch 1, skip ch 1 space, dc in next dc x2 times), ch 1, skip a st, dc in next 7 sts, ch 1, skip a st, dc in next dc, (ch 1, skip ch 1 space, dc in next dc x2 times), ch 1, skip a st, dc in next st, dc in next 6 sts, *ch 1, skip a st, dc in next st, (ch 1, skip ch 1 space, dc in next dc x4 times), ch 1, skip a st, dc in next 7 sts, ch 1, skip a st, dc in next st, (ch 1, skip ch 1 space, dc in next dc x2 times), ch 1, skip a st, dc in next 7 sts.* Repeat from *to* once more. Ch 1, skip a st, dc in next st, (ch 1, skip ch 1 space, dc in next dc x2 times). (32 open squares, 18 closed squares).

Row 16
Row 16

Row 17-18: Turn, ch 4, dc in next dc, *ch 1, skip ch 1 space/next st, dc in next dc.* Repeat from *to.* (50 open squares).

Border:

Turn, ch 1 (ch 1 does not count as a st), sc in each st across (sc inside the ch 1, not under), when you get to the end of the first row, (sc, ch 2, sc) for your corner stitch. Continue down the short side. See picture below for sc placement. Try to place a sc in the top and middle of the dcs. 

arrows pointing to where to sc on short side

The right most arrow points to the “top” of a dc, the middle arrow to the “middle” and the left arrow to the next “top.”

Place a (sc, ch 2, sc) in the next 3 corner spaces.

Continue until you finish the last corner, then sl st into first sc.

Cut thread with scissors and pull through. Weave in ends with tapestry needle.

Dc in 6th ch from hook

Optional: Blocking

If you want a super straight, and clean looking finished product, I would suggest blocking your work. This step is optional, and you don’t have to do this if you like the way your project looks.

There are many different ways to do this, however, my favorite is to soak the project in some water, place it on a towel and gently pat/soak of the excess water. I use a scrap cardboard box to to lay it on and place pins around the project into the cardboard to “stretch” it out. Let it air dry (usually 24 hours+) and take the pins out. 

Your crochet project should be much straighter! 

And there it is! I hope you all enjoyed this Crochet Legend of Zelda Heart Pattern! Let me know what you think on Instagram by tagging me @strommercrafts with your finished project :). 

Happy crocheting! Until next time xoxo.

Cojiro the Blue Cucco Crochet Pattern – Free Pattern

Chibi Cojiro Crochet Pattern

Does anyone else remember this little guy from The Legend of Zelda: Ocarina of Time? The rarest of all Cuccos? Cojiro was a side quest item from that video game, and if I remember correctly, it was somewhat obscure. I know when I played it as a kid I had to lookup a guide to complete it, but that’s just me!

Since it’s spring time here, I’ve been seeing little baby chicks all over social media and at the tractor supply store, so it got me to thinking about Cojiro from The Legend of Zelda and how cute it would be to try and crochet a chibi version of him.

I followed a pattern by Lauren from A Menagerie of Stitches for the body, which can be found here.  The pattern for her spring chicks is absolutely adorable and the use of color is amazing.

I did change the size of the wings and added Cojiro’s crest and beard.

This is truly a simple design, and you could finish it within an afternoon. When finished you can hold him in one hand. Depending on your tension, he’s about 4-5 inches tall and about 3-4 inches wide.

Materials Needed for Chibi Cojiro Crochet Pattern:
  • 1 skein of Red Heart Super Saver in Blue
  • <1 skein of Red Heart Super Saver in Yellow and Cherry Red
  • 3.5 mm crochet hook
  • 9mm safety eyes
  • Poly-fil
  • Scissors
  • Stitch Marker
  • Tapestry Needle
  • Pins (optional)
Abbreviations Used:
  • Mc – magic circle (see my previous post on making one here)
  • Sc – single crochet
  • Hdc – half double crochet
  • Dc- double crochet
  • Sl st – slip stitch
  • Ch – chain
  • St(s) – stitch(es)
  • Sc2tog – single crochet two together
Body

With blue colored yarn.

Round 1: 6sc in mc (6sts). Use your stitch marker to mark the beginning of the next round.

Round 2: 2 sc in each st around(12 sts)

Round 3: Sc 1, 2 sc in next st around (18 sts)

Round 4Sc 2, 2 sc in next st around (24 sts)

Round 5: Sc 3, 2 sc in next st around (30 sts)

Round 6: Sc 4, 2 sc in next st around (36 sts)

Round 7: Sc in each st around (36 sts)

Round 8: Sc 5, 2 sc in each st around (42 sts)

Round 9-18: Sc in each st around (42 sts) 

I added the eyes around the 10th and 11th round, 6 stitches apart from each other.

Round 19: Sc 5, sc2tog around (36 sts)

Round 20: Sc 4, sc2tog around (30 sts)

Start stuffing with poly-fil firmly and continue to stuff as you go along.

Round 21: Sc 3, sc2tog around (24 sts)

Round 22: Sc 2, sc2tog around (18 sts)

Round 23: Sc 1, sc2tog around (12 sts)

Round 24: Sc2tog around (6 sts)

Cut yarn and fasten off.

Wings (make 2)

Round 1: 6 sc in mc (6sts)

Round 2: 2 sc in each st around (12 sts)

Round 3: Sc 1, 2 sc in next stitch around (18 sts)

Leave a long tail for sewing later, cut and pull through.

Beak

Using yellow yarn.

Round 1: Ch 3, starting in the 2nd ch from the hook, hdc in next ch, dc in last ch. 

Leave a tail for sewing, cut and pull through.

Crest

Using red yarn.

Round 1: Ch 7, starting in 2nd ch from the hook, (sc, dc, sc) in one ch, sl st into next ch. Repeat until end of ch 7. 

Leave a tail for sewing, cut and pull through.

Beard

Round 1: 4 sc in mc

Round 2: 1 sc in next st, ch 2. 

Leave a tail for sewing, cut and pull through.

Assembly

Use your pins to help keep the beak, wings, crest and beard in place and straight when you sew, however this is not 100% necessary.

With the tapestry needle, sew the beak 1 round below the eyes. 

Sew the wings in the same round as the beak, 5 sts away from the edge of the beak. 

Sew the beard right below the beak.

Sew the crest on the top of his head, line the 2nd “hump” in the middle.

And there you have it! If you have any questions or problems with the pattern please don’t hesitate to contact me at strommercrafts@gmail.com.

Thank you and happy crocheting!


Top down view of chibi cojiro

Crochet Legend of Zelda Triforce Dishcloth Pattern

Hello everyone! Today I have a Crochet Legend of Zelda dishcloth pattern for you! These neutral colored dishcloths boast the iconic triforce symbol from the beloved video game.

If you’re like me and a fan of the Legend of Zelda series, you’ll love these crochet dishcloths. Not only will they show your love for the game, they’re a functional crochet item too. Talk about a win-win!

I attempted to crochet the triforce dishcloths with the classic green background and yellow triforce colors, however they seemed to bright and contrasting for this project. Instead I opted for neutral colors, and I love the way these turned out.

I am using a medium 4 worsted weight yarn for this pattern, but feel free to use any color or type of yarn as long as it’s the same weight.

These dishcloths measure about 7x7in when laid flat, which is a perfect size for crochet dishcloths.

Use this for yourself, or gift to a friend or family member who loves The Legend of Zelda Series too!

Related Posts:

Please note that some of these links are affiliate links. That means that if you click on these links and make a purchase, I may receive a commission at no extra cost to you. You can find more information about our disclosure policy here. Thank you for your support.

Materials Used:

Terms Used:

Please note these are in US terms, not UK

  • ch – chain
  • sc – single crochet
  • sl st – slip stitch
  • st(s) – stitch(es)

Special Considerations:

When you need to make a color change in this pattern, it’s best to do it in the stitch BEFORE the stitch that needs the color change.

If you need help with color changing, see my post on How to Color Change in Crochet the Right Way.

To perform the color change, insert your hook into the next stitch, yarn over and pull through the stitch (you now have two loops on your hook). Instead of finishing your single crochet stitch like normal, put your new yarn color on your hook. Pull that color through the two loops. Tighten your stitch by pulling on the yarn ends.  

Alright let’s check out the pattern!

Crochet Legend of Zelda Triforce Dishcloth Pattern:

To get this dishcloth colorway, see directions below.

Triforce dishcloth with aran base color and buff triforce color

With Aran

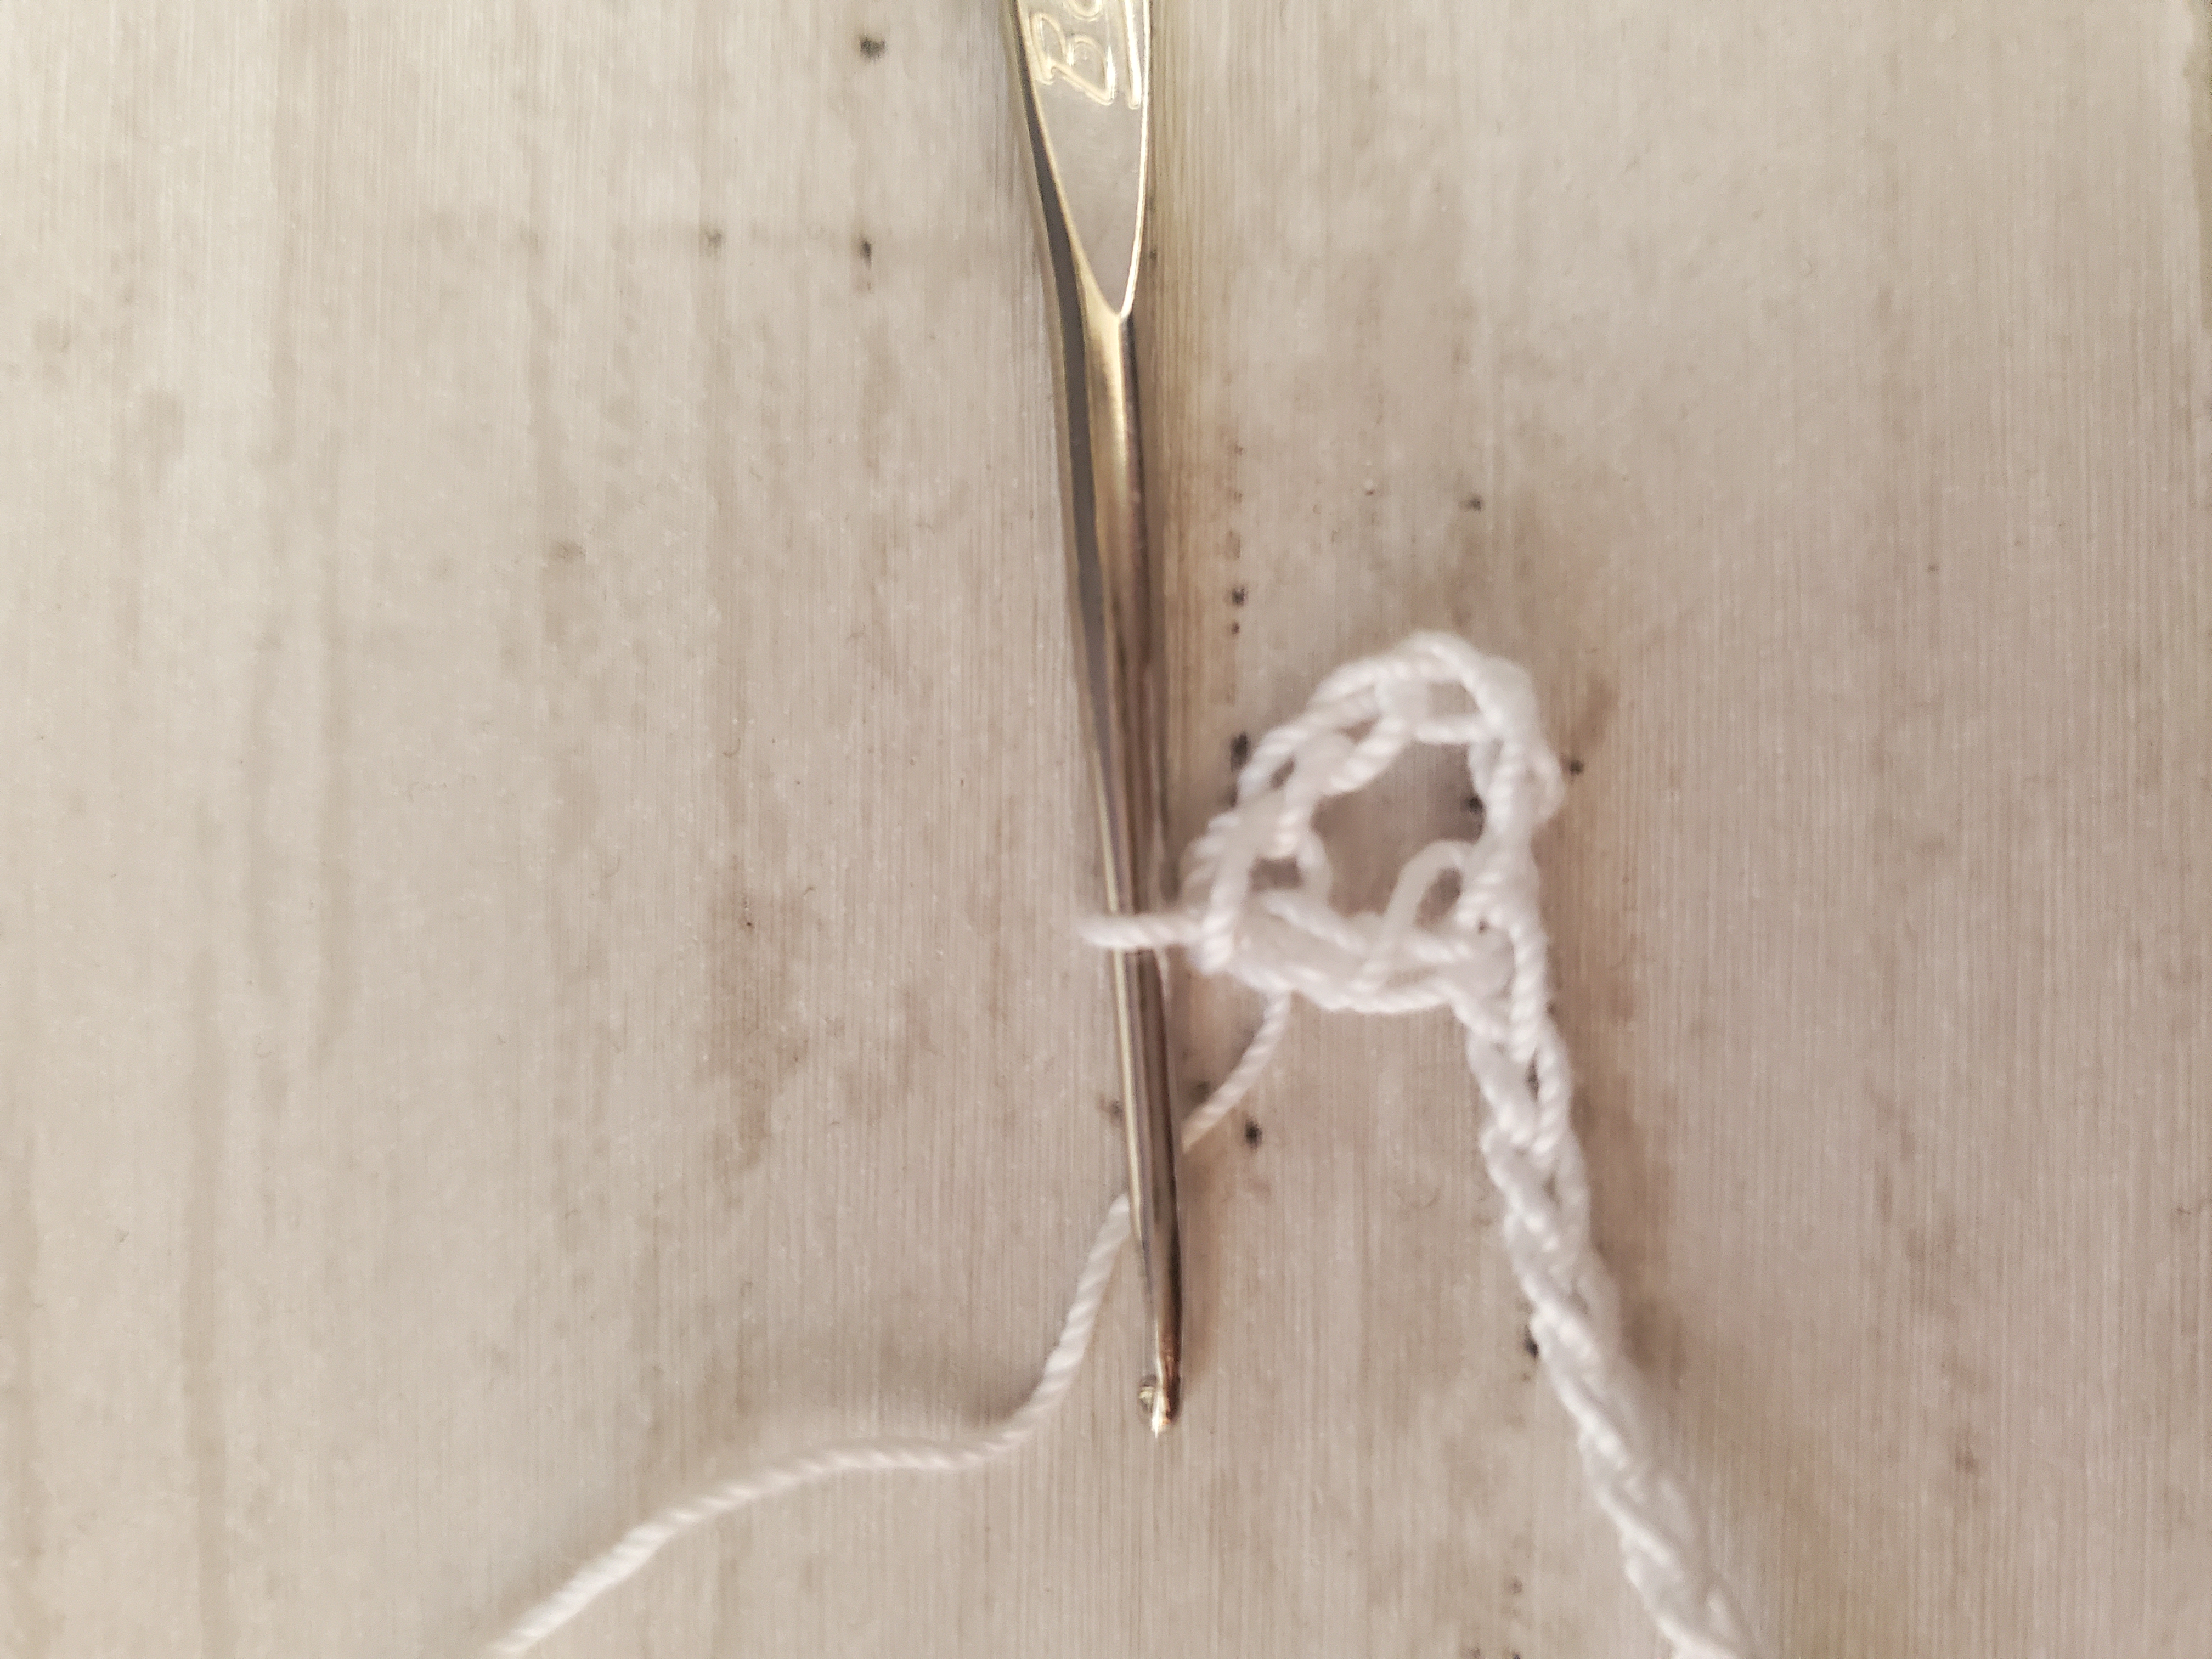
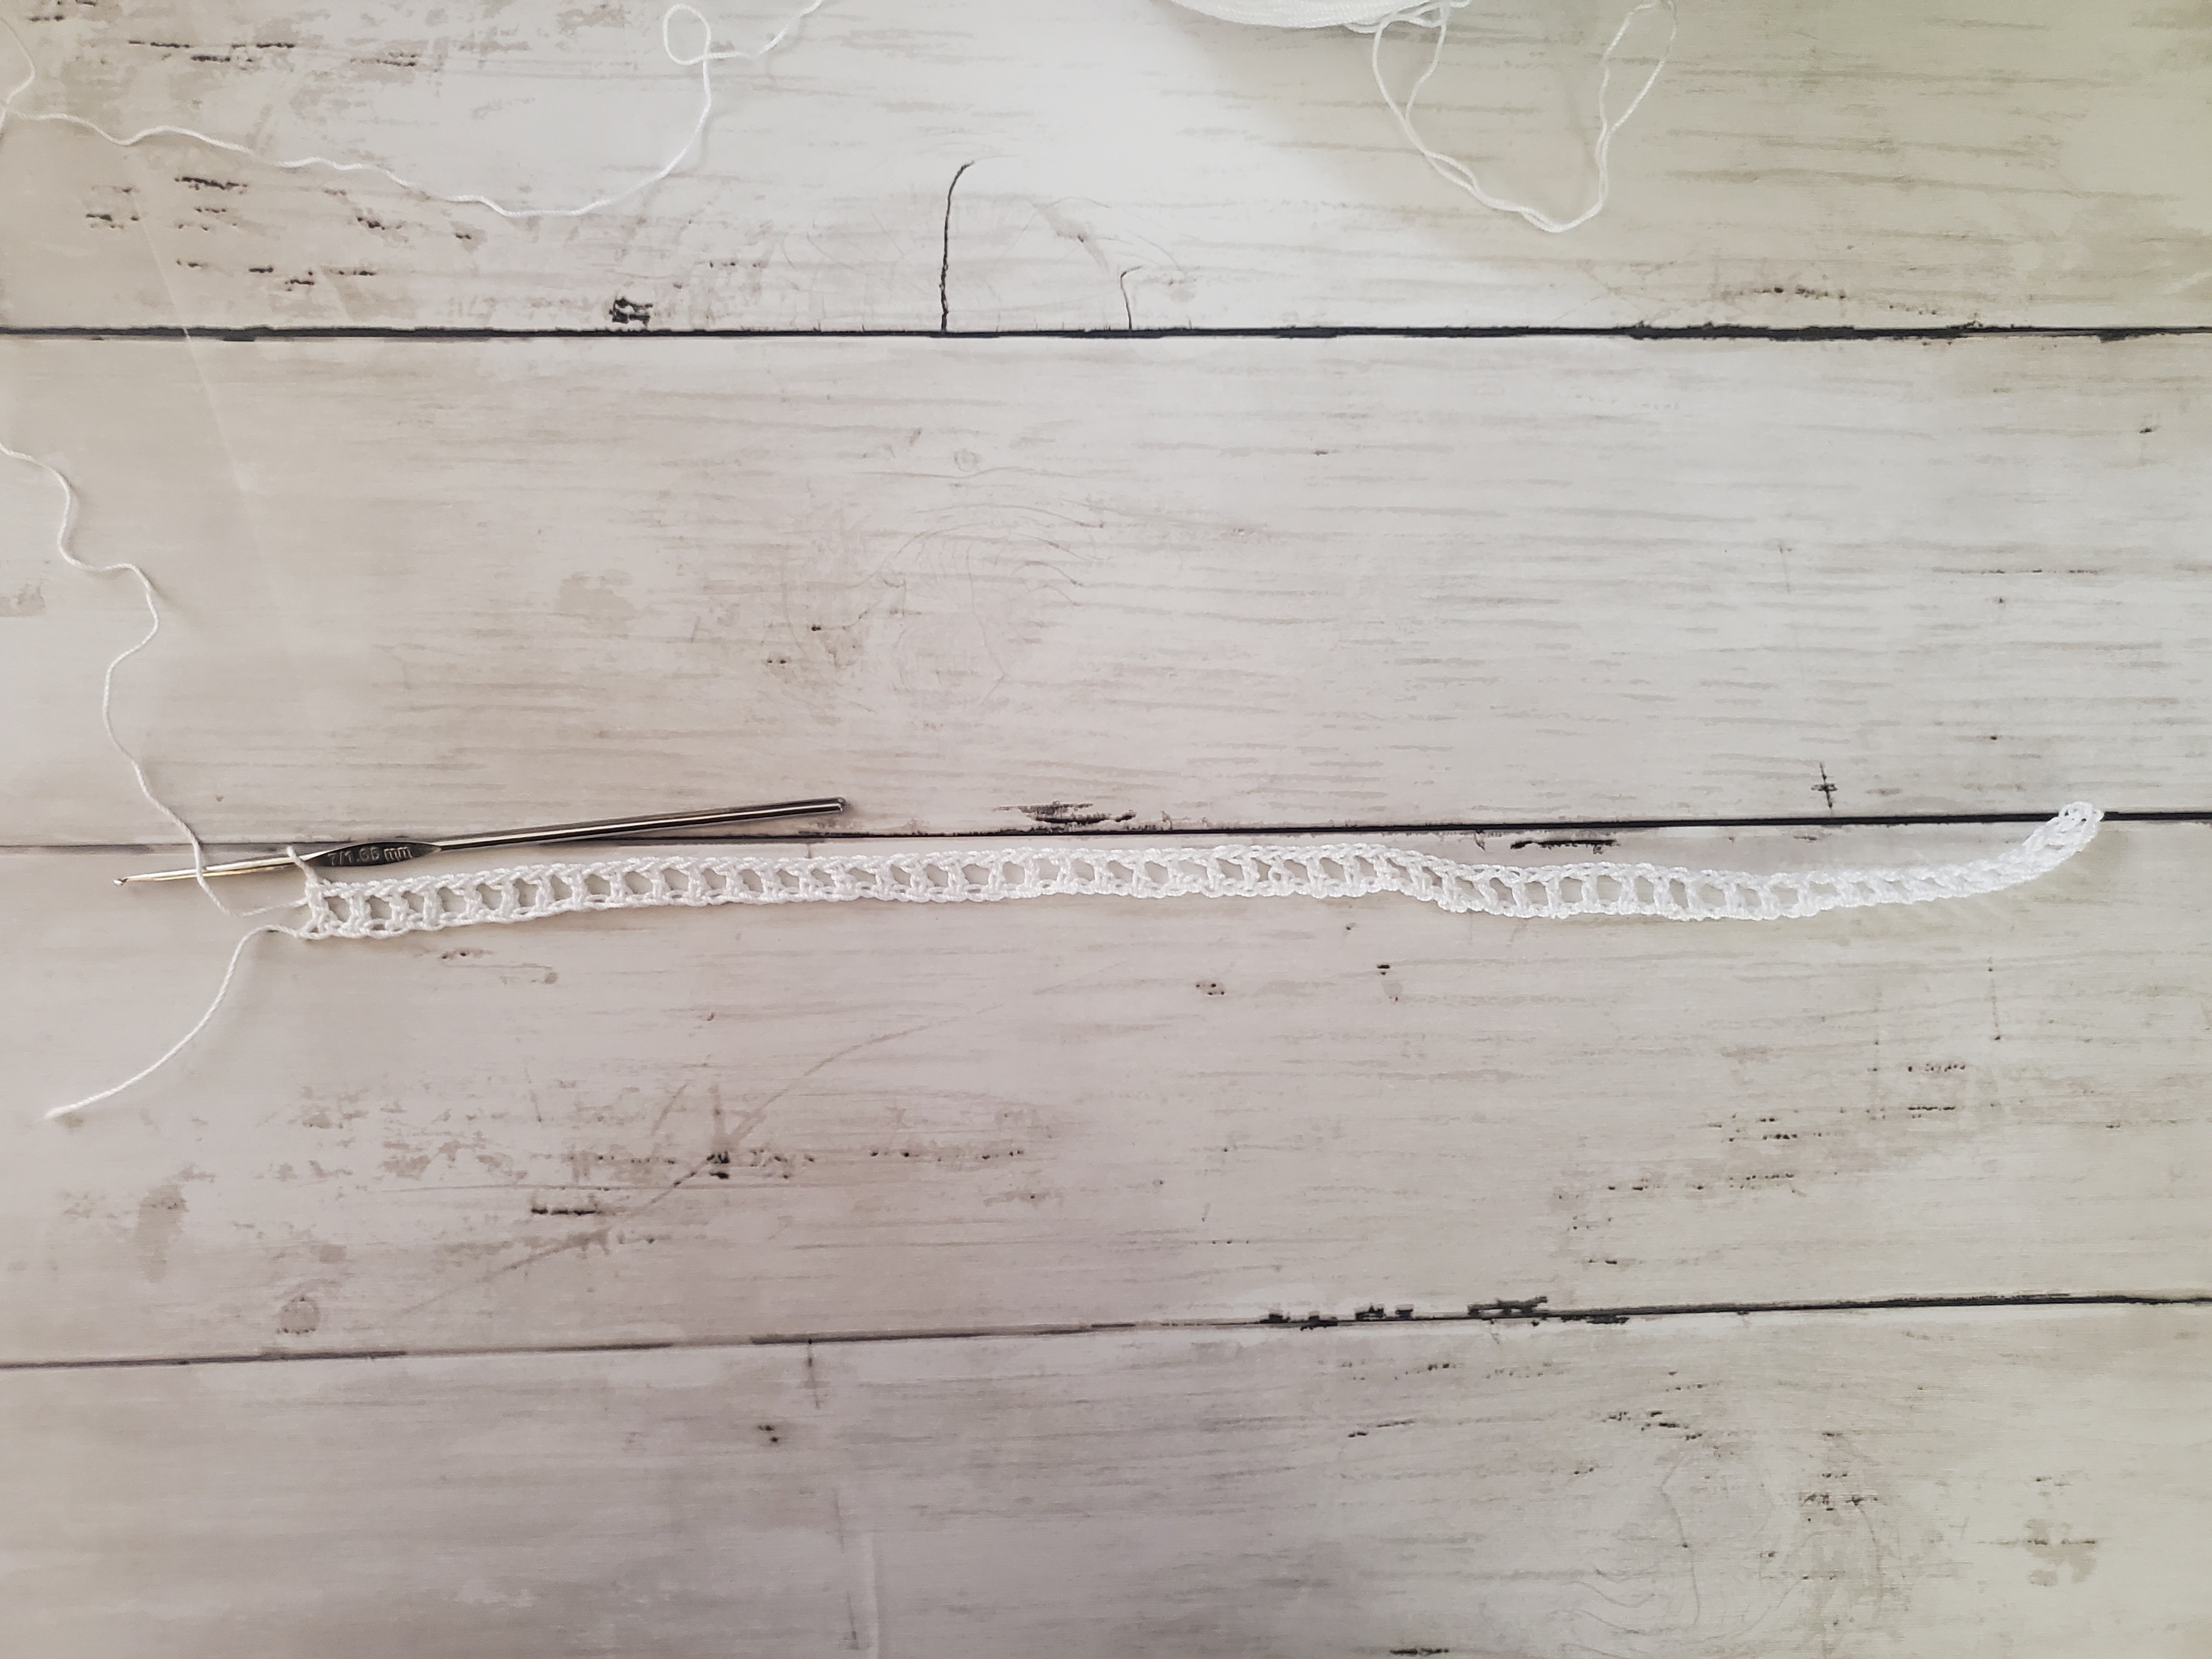
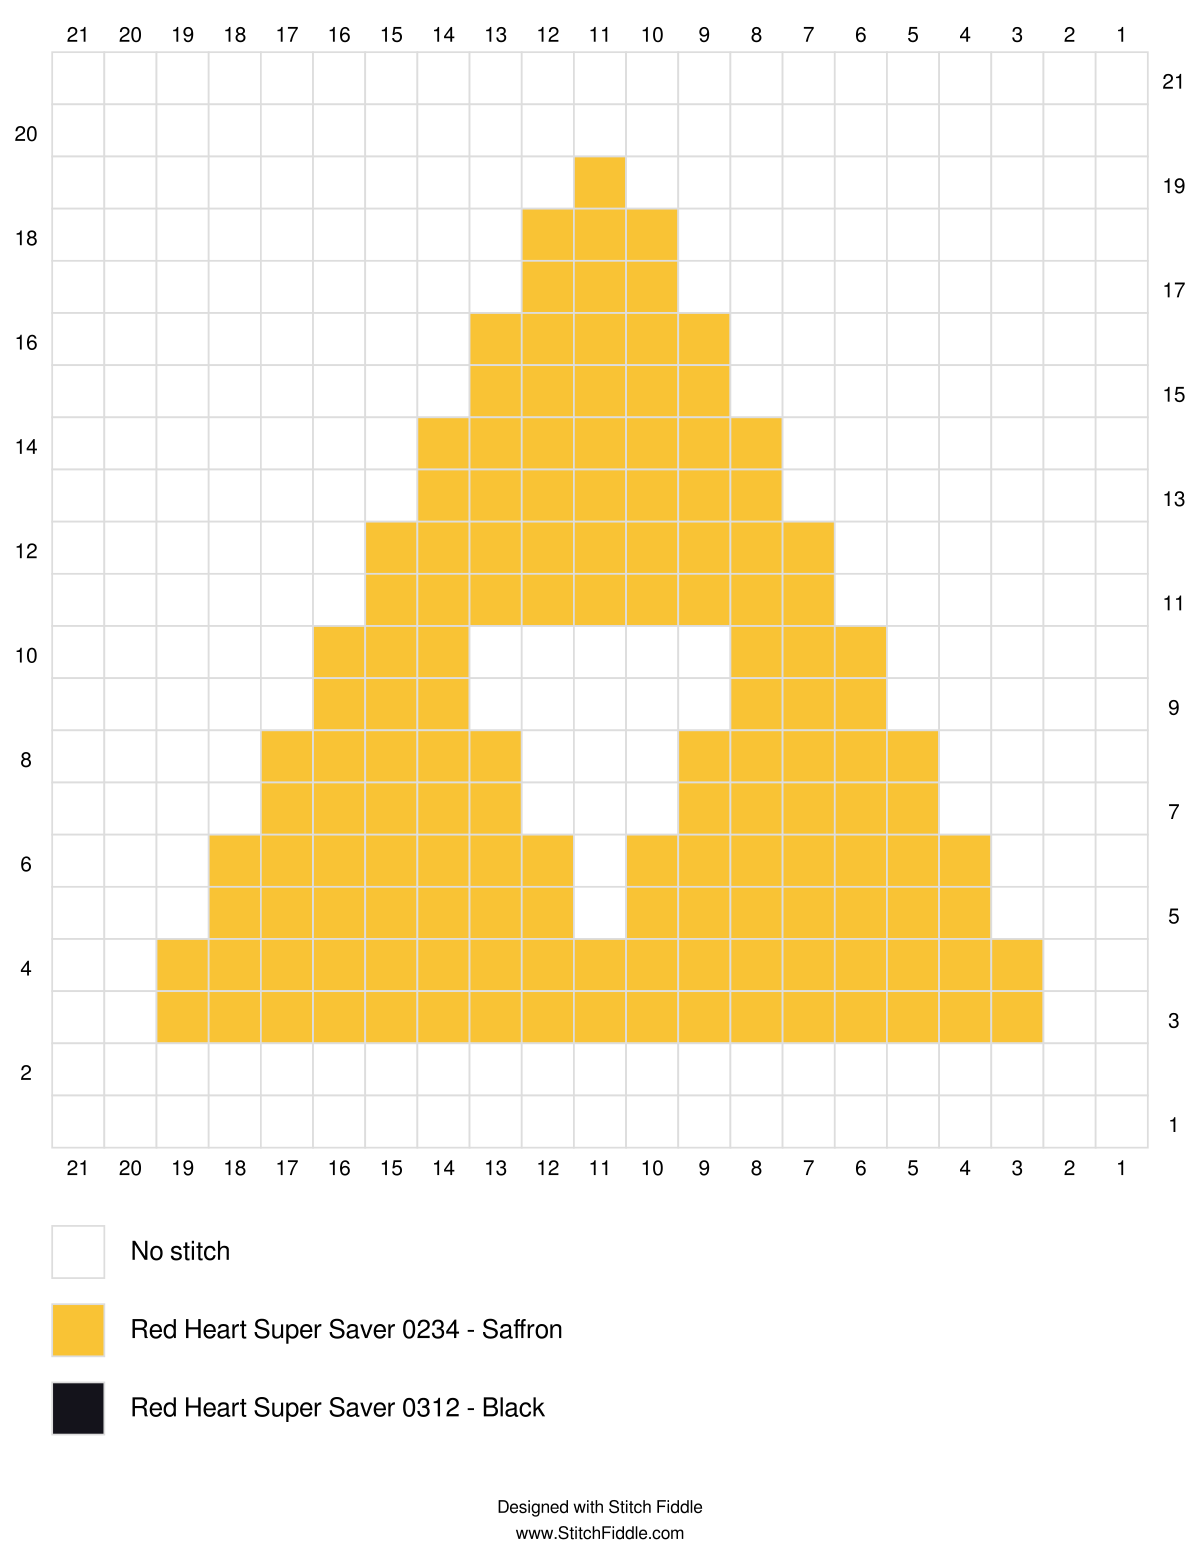
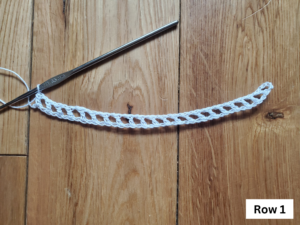
Row 1) Ch 28, sc in second ch from hook, sc in next 26 chs (27 sts)

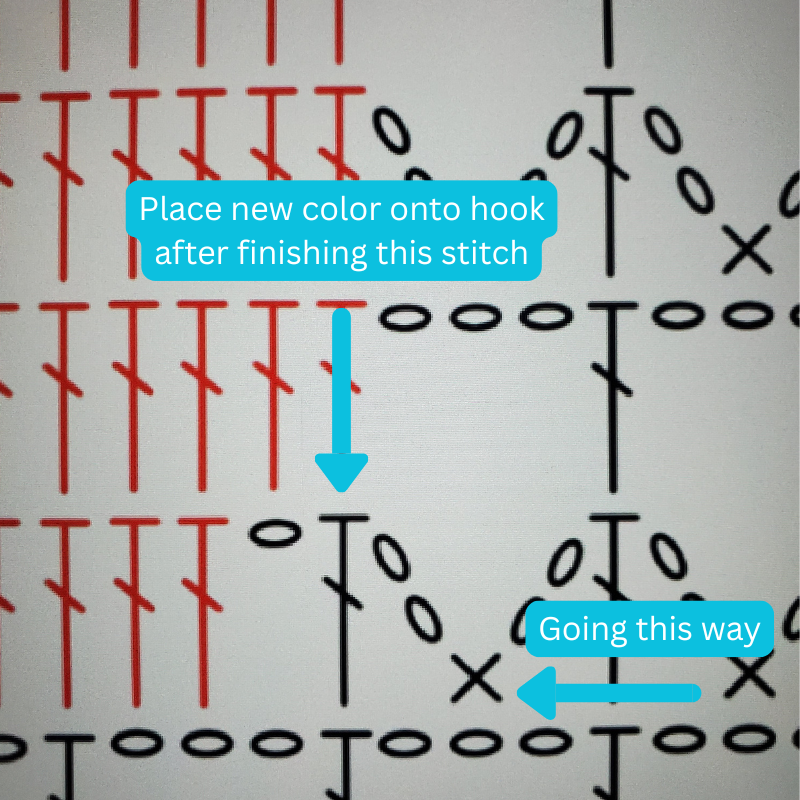
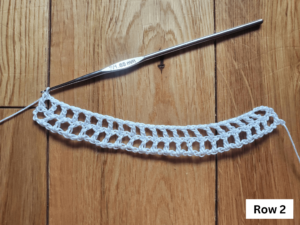
Row 2) Turn, ch 1, sc in next st (but don’t finish all the way, with two loops on hook, switchto Buff, then finish), sc in next 25 sts, on the 25th st, switch to Aran, sc in last st

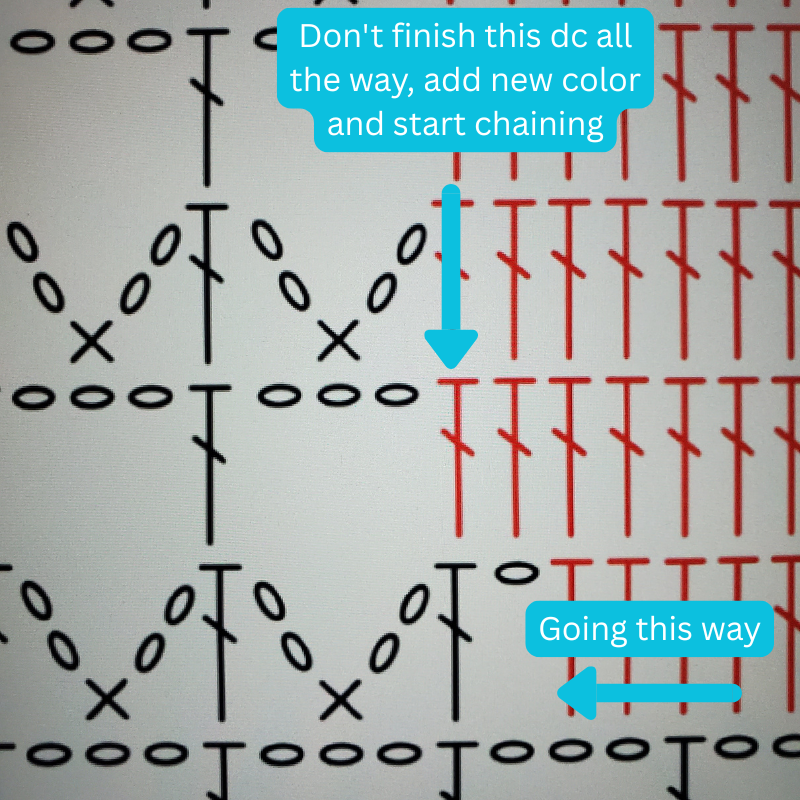
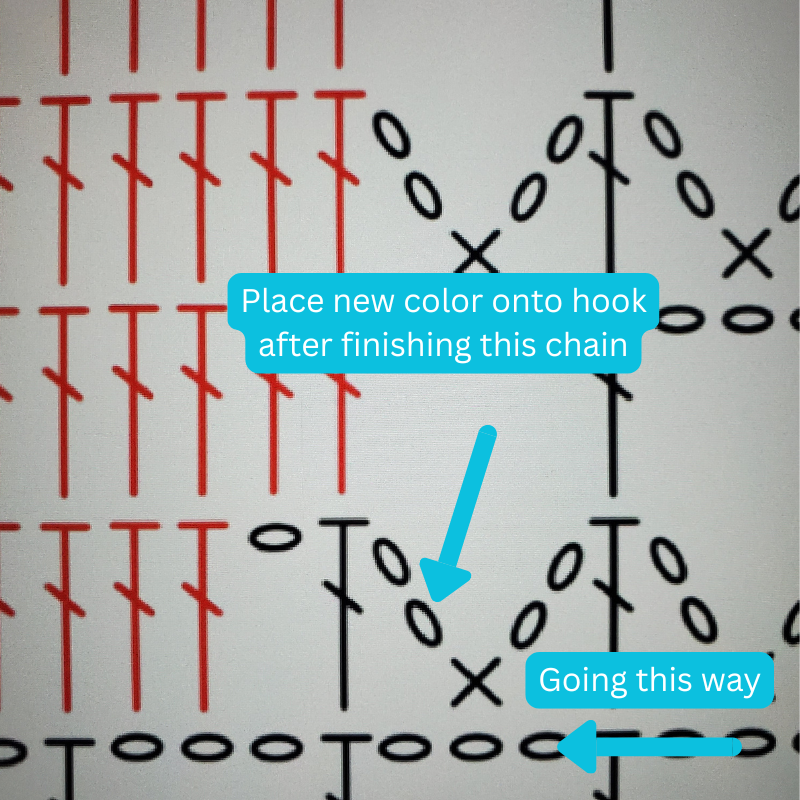
Row 3) Turn, ch 1, sc in next 2 sts, on second st switch to Buff, sc in next 12 sts, change to Aran, sc in next st, change back to Buff, sc in next 12 sts, change to Aran for next 2 sts

Row 4) Repeat row 3 

Row 5) Turn, ch 1, sc in next 3 sts, switch to Buff, sc in next 9 sts, switch to Aran, sc in next 3 sts, switch back to Buff, sc in next 9 sts, switch to Aran, sc in next 3 sts
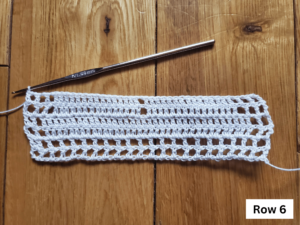
Row 6) Repeat row 5

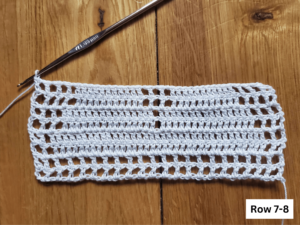
Row 7) Turn, ch 1, sc in next 4 sts, switch to Buff, sc in next 7 sts, switch to Aran, sc in next 5 sts, switch to Buff, sc in next 7 sts, switch to Aran, sc in next 4 sts

Row 8) Repeat row 7

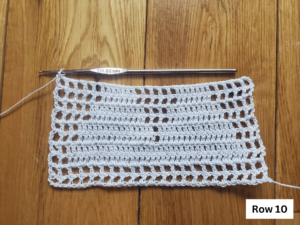
Row 9) Turn, ch1, sc in next 5 sts, switch to Buff, sc in next 5 sts, switch to Aran, sc in next 7 sts, switch to Buff, sc in next 5 sts, switch to Aran, sc in next 5 sts

Row 10) Repeat row 9

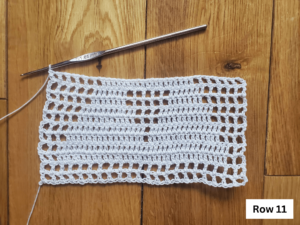
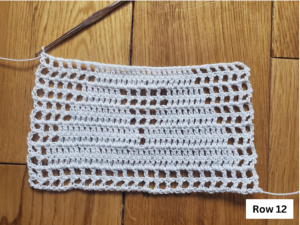
Row 11) Turn, ch 1 sc in next 6 sts, switch to Buff, sc in next 3 sts, switch to Aran, sc in next 9 sts, switch to Buff, sc in next 3 sts, switch to Aran, sc in next 6 sts

Row 12) Repeat row 11

Row 13) Turn, ch 1, sc in next 7 sts, switch to Buff, sc in next st, switch to Aran, sc in next 11 sts, switch to Buff, sc in next st, switch to Aran, sc in next 7 sts

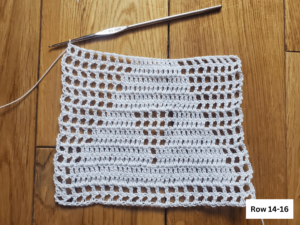
Row 14) Turn, ch 1, sc in next 7 sts, switch to Buff, sc in next 13 sts, switch to Aran, sc in next 7 sts

Row 15) Turn, ch 1, sc in next 8 sts, switch to Buff, sc in next 11 sts, switch to Aran, sc in next 8 sts

Row 16) Repeat row 15

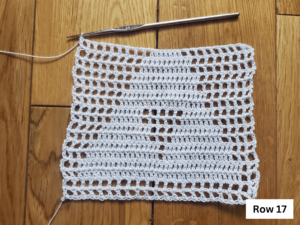
Row 17) Turn, ch 1, sc in next 9 sts, switch to Buff, sc in next 9 sts, switch to Aran, sc in next 9 sts

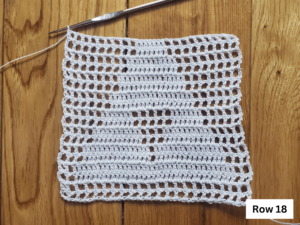
Row 18) Repeat row 17

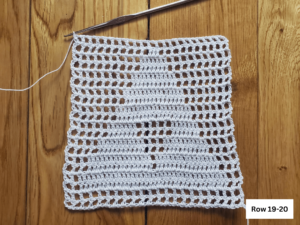
Row 19) Turn, ch1, sc in next 10 sts, switch to Buff, sc in next 7 sts, switch to Aran, sc in next 10sts

Row 20) Repeat row 19

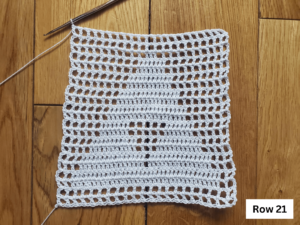
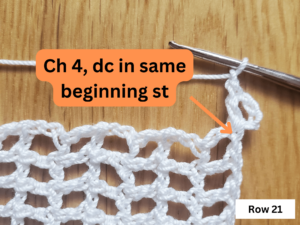
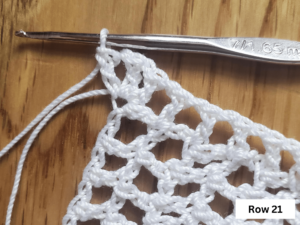
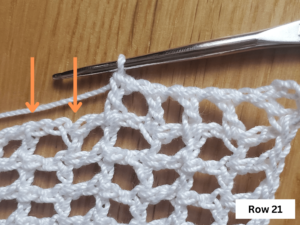
Row 21) Turn, ch 1, sc in next 11 sts, switch to Buff, sc in next 5 sts, switch to Aran, sc in next 11 sts

Row 22) Repeat row 21

Row 23) Turn, ch 1, sc in next 12 sts, switch to Buff, sc in next 3 sts, switch to Aran, sc in next 12 sts

Row 24) Repeat row 23

Row 25) Turn, ch 1, sc in next 13 sts, switch to Buff, sc in next st, switch to aran, sc in next 13 sts

Row 26) Repeat row 25

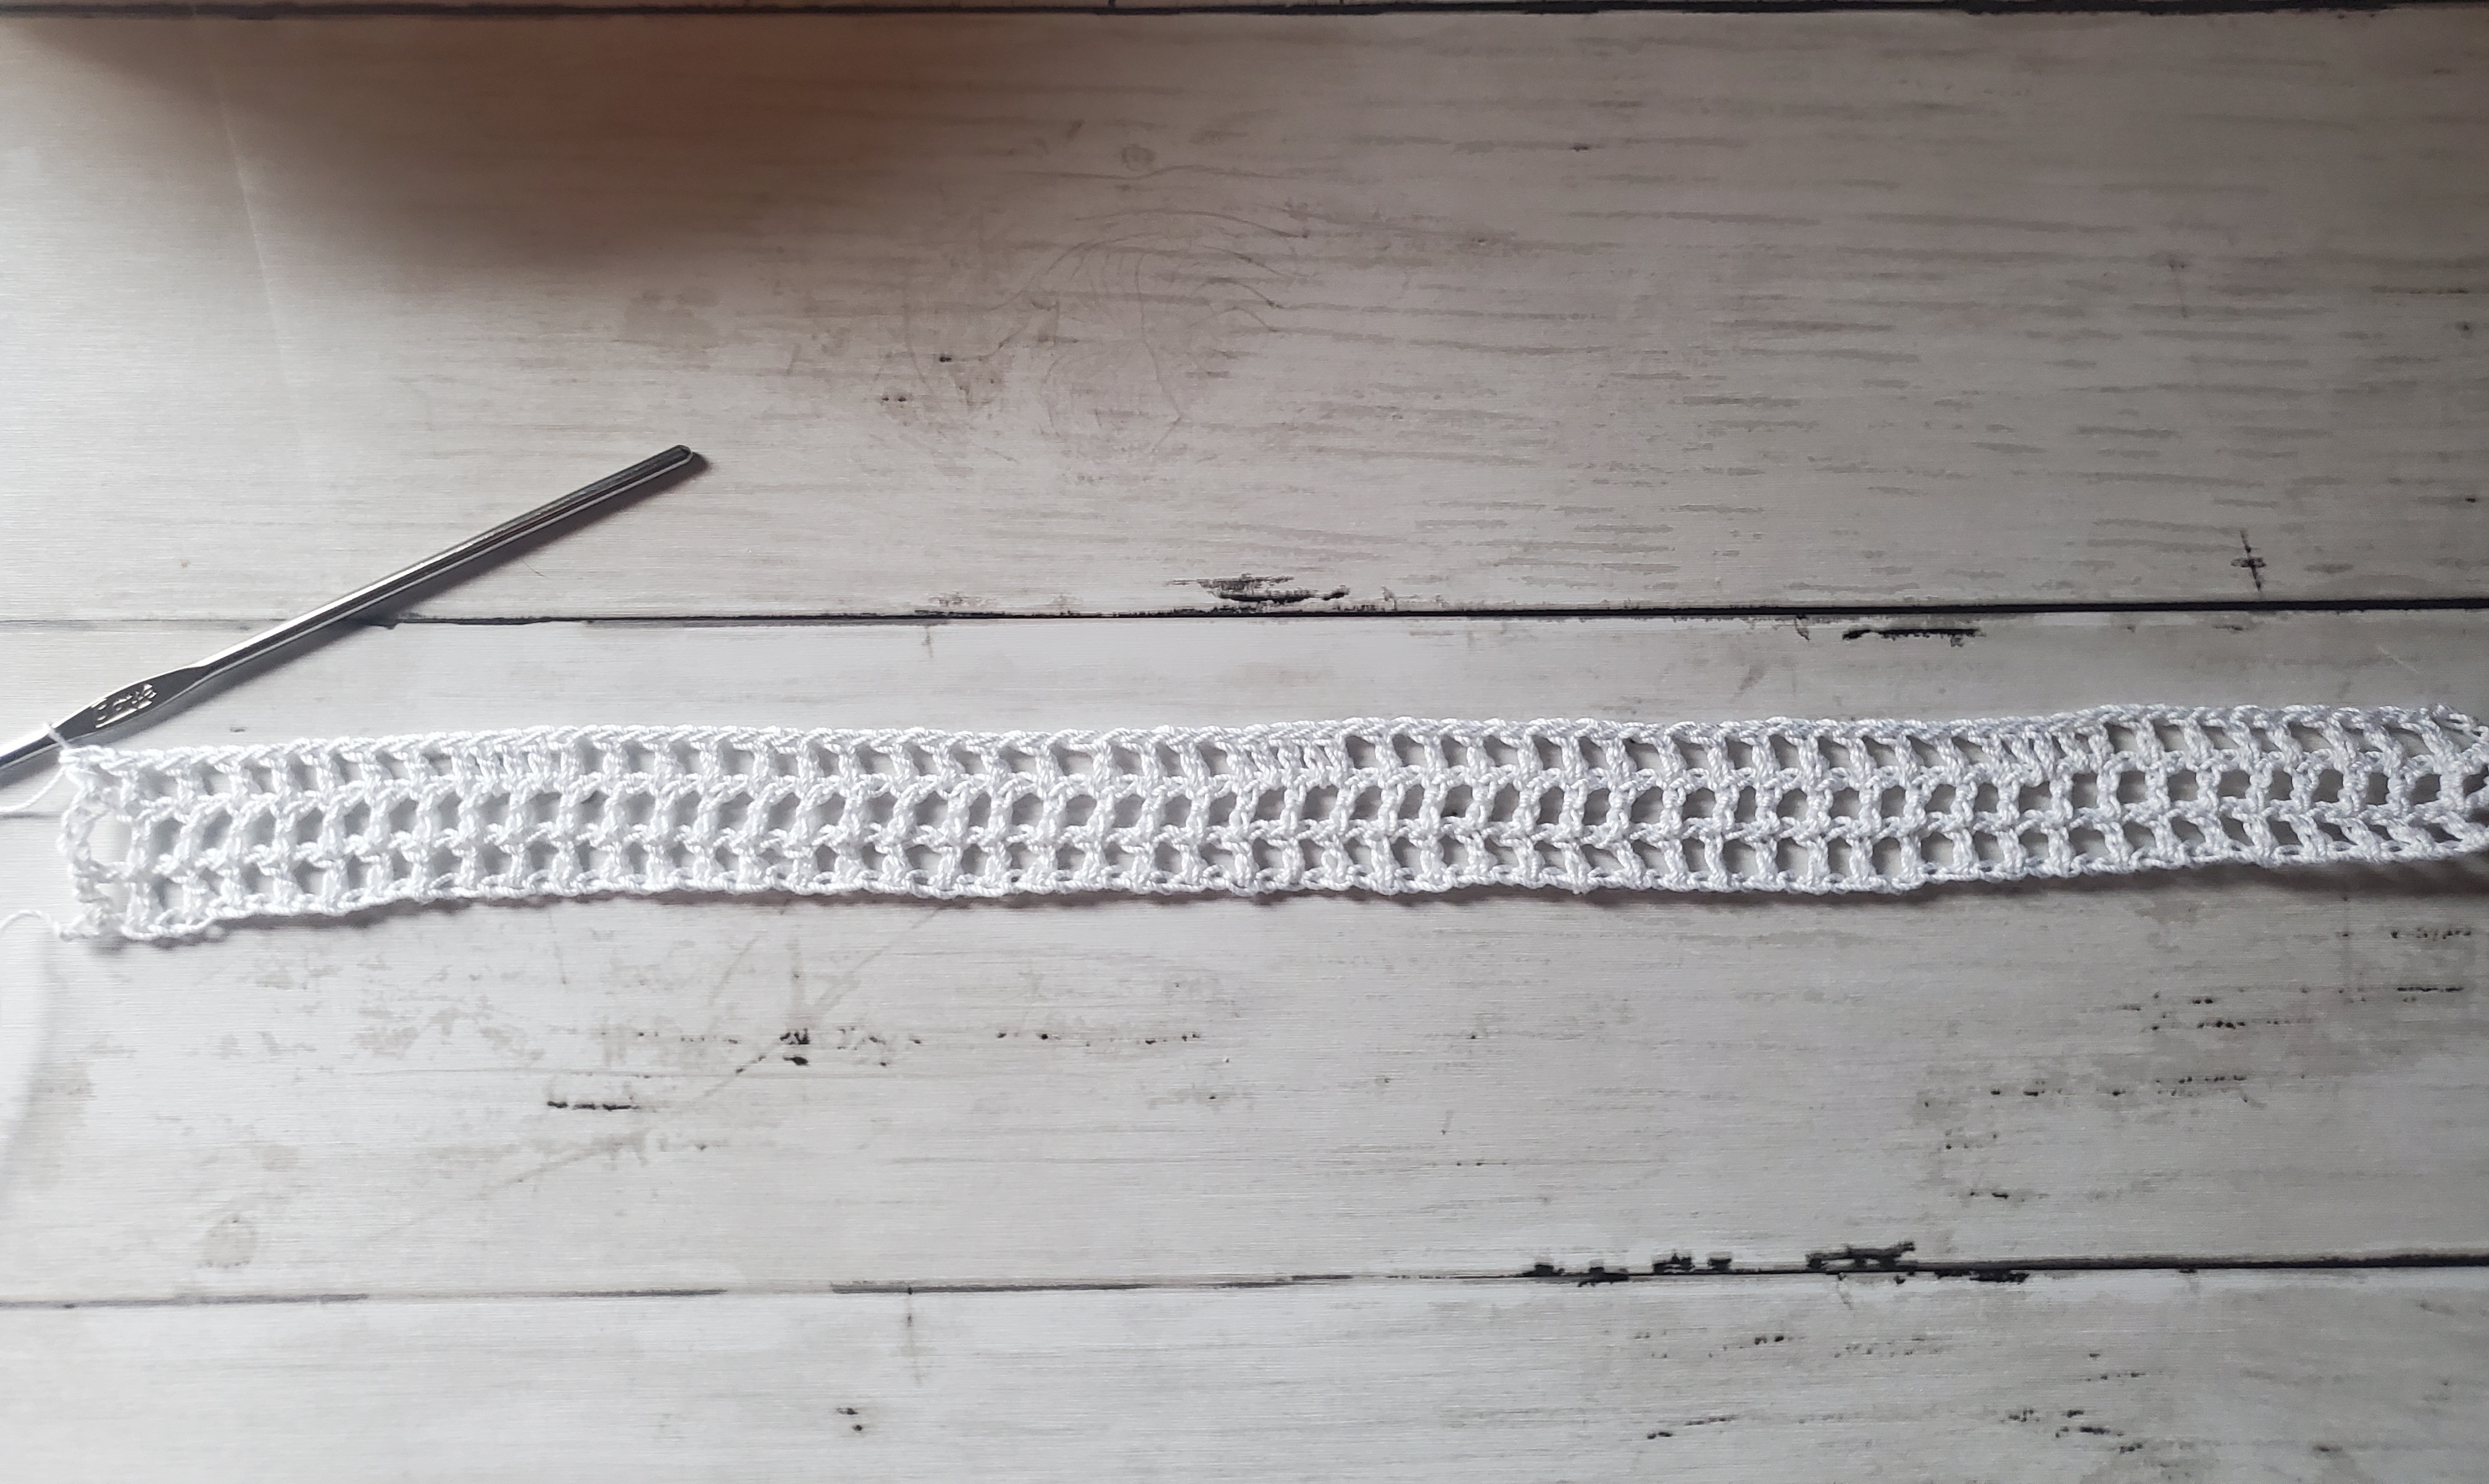
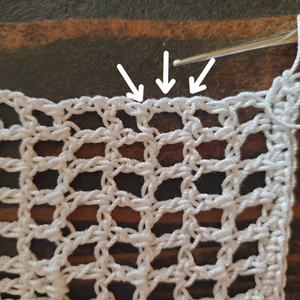
Row 27) Sc in each st across with Aran

Cut yarn with scissors, weave in ends with tapestry needle.

To obtain the second dishcloth, simply switch the colors with the above directions.

Crochet triforce dishcloth with buff base color and aran for triforce

I hope you enjoyed this crochet Legend of Zelda Triforce Dishcloth Pattern!

Until next time!

Other Posts You May Like: